

The visual nature of LabVIEW makes it straightforward for programming novices to create applications, especially when using features such as express VIs, which replace the coding tasks with a dialogue box configuration
Electronic system-level design is an electronic design methodology that is defined as “the utilisation of appropriate abstractions in order to increase comprehension about a system, and to enhance the probability of a successful implementation of functionality in a cost-effective manner.”
In other words, it makes it easier to understand an electronic system by showing only the essentials of the system. The basic premise is to model the behavior of the entire system using a high-level language such as C, C++, LabVIEW, or MATLAB, or by using graphical ‘model-based’ design tools.

In this article, we look at one such system design software offering from National Instruments, called LabVIEW.
A software-based ecosystem is fast becoming one of the most talked about features for more and more T&M companies. This is, in part, due to the clear advantage of a system that has multiple test capabilities, a marked difference from the traditional instrumentation approach. The flexibility, scalability, and higher testing speeds are driving this particular industry trend.
To make things clearer, a modular instrument is essentially generic hardware that acquires and generates raw data while the software is stored on the user’s PC, which allows user-defined measurements and analysis. On the other hand, a successful software-defined T&M system comprises not only hardware platforms that are modular, reconfigurable, and based on open industry standards but also system design software that can be used to easily define the functionality of the system.
National Instrument’s LabVIEW is one such example. It is a graphical programming platform that helps engineers scale from the design to test stage, for both small and large systems. It allows for unprecedented integration with legacy software and hardware while capitalizing on the latest computing technologies. LabVIEW programs are called virtual instruments (VI) because their appearance and operation imitate physical instruments.
LabVIEW contains a comprehensive set of tools for acquiring, analyzing, displaying, and storing data as well as tools to help you troubleshoot your code. The VIs contain three components—a front panel, a block diagram, and the icon and connector pane. In LabVIEW, you build a user interface, or front panel, with controls and indicators.
The most common controls are knobs, dials, push buttons and other input devices. The most common indicators are graphs, LEDs and other displays. After you build the user interface, you add code using VIs and structures to control the front panel objects. The block diagram contains the code and can be considered analogous to a flowchart.
Features
You can use LabVIEW to communicate with hardware such as vision, data acquisition and motion control devices as well as GPIB, VXI, PXI, RS-232, and RS-484 devices. It also has built-in features for connecting your application to the Web using the LabVIEW Web Server and software standards such as ActiveX and TCP/IP networking.
LabVIEW lets you create test and measurement, data acquisition, data logging, measurement analysis, and report generation applications. It is also possible to create stand-alone executables and shared libraries, like DLLs, because LabVIEW is a true 32-bit compiler. Let us check out some of the important features of this software.
Access to instrumentation hardware
LabVIEW scores over other development environments because it has extensive support for accessing instrumentation hardware. Abstraction layers and drivers for many different types of instruments and buses are included (or are available for inclusion). These present themselves as graphical nodes. The abstraction layers offer a set of standard software interfaces to communicate with the hardware devices. The pre-loaded driver interfaces save program development time.
According to NI, the USP of LabView is that even people with limited coding experience can write programs and deploy test solutions in a reduced time frame when compared to working with more conventional or competing systems.
Compiler-produced code
In terms of performance, LabVIEW includes a compiler that produces native code for the CPU platform. The graphical code is translated into executable machine code by interpreting the syntax and compilation. The syntax of LabVIEW is strictly enforced during the editing process, and compiled into the executable machine code when requested to run or even while saving. In the latter case, the source code and the executable are merged into a single file.
The executable runs with the help of the LabVIEW run-time engine, which contains some pre-compiled code to perform common tasks that are defined by the ‘G’ language. The run-time engine does the dual function of reducing compile time and also providing a consistent interface to various operating systems, graphic systems, hardware components, etc. The run-time environment is the reason the code is portable across platforms.
Extensive support via libraries and functions
A large number of libraries with many functions for signal generation, data acquisition, mathematics, signal conditioning, statistics, analysis, etc, along with numerous graphical interface elements, are provided in several LabVIEW package options. The fully object-oriented character of LabVIEW code allows for code reuse without modifications as long as the data types of input and output are consistent—which essentially means that two sub-VIs are exchangeable.
Create stand-alone executables
The LabVIEW Professional Development System allows the creation of stand-alone executables, and the resultant executables can be distributed again and again. The run-time engine and its libraries are provided freely along with the executable.
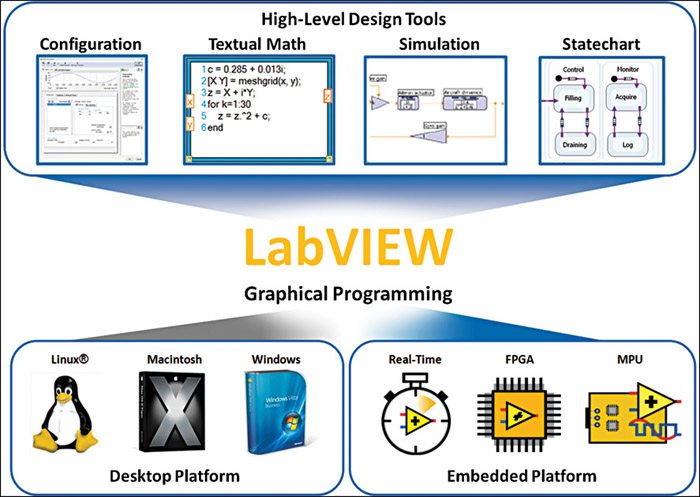
Integrated development environment
The LabVIEW development environment is an application program available for the Windows, Mac and Linux operating systems. It lets users build their own source code, construct graphical user interfaces, compile and run their programs. It also includes libraries for communicating with a wide variety of instrumentation, displaying data in graphical form and performing advanced analysis, making it all the more suitable for scientific and engineering applications compared to general-purpose programming languages.
Multiple execution targets
LabVIEW can be used to develop software that runs on more exotic hardware and not just on a PC. NI has a real-time operating system, which can run on PXI controllers, a PC hardware and cRIO controllers. Using the real-time module on LabVIEW, code can be built to run on these targets, achieving up-time and system determinism not possible under other operating systems.
In addition, there are also programmable FPGA targets from NI, in the form of PCI/PXI cards and cRIO backplanes, that allow reconfiguration at the logic circuit level. Through the LabVIEW FPGA module, it is possible to create a solution with the tight timing and low processing overhead of a pure hardware system, but with the easy reconfigurability of a software solution.
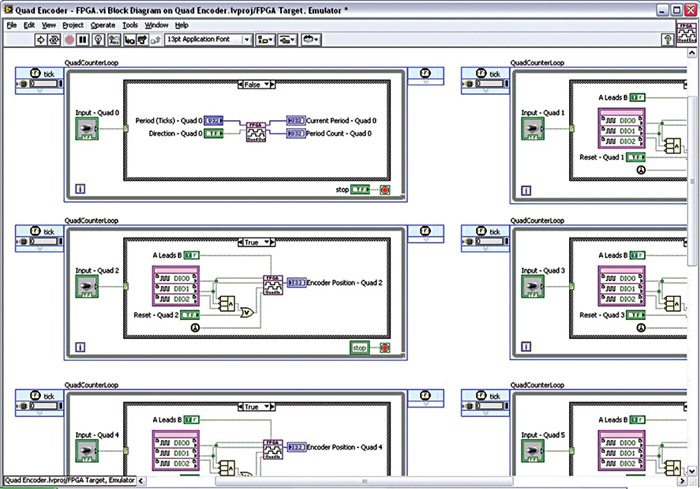
Block diagram—graphical source code
LabVIEW replaces text source code with a graphical block diagram, where nodes replace function calls and wires between the nodes representing data transfer. In a manner that’s opposite to text-based programming, where functions execute in a sequential manner, in graphical programming, it is the data flow between block diagram nodes that controls the execution order. The visual nature of LabVIEW makes it straightforward for programming novices to create applications, especially when using features such as express VIs, which replace the coding tasks with a dialogue box configuration.
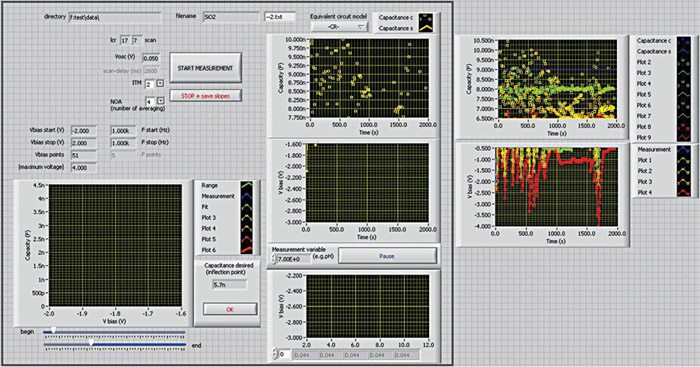
Front panel—the graphical user interface
LabVIEW provides the ability to build graphical user interfaces, which it calls front panels to provide an analogy with physical instruments. As the main focus of LabVIEW is science and engineering, in addition to standard user interface objects such as ‘OK’ buttons and text entry boxes, there are lots of items specifically aimed at these areas.
There is a low-cost LabVIEW Student Edition aimed at educational institutions for learning purposes. There is also an active community of LabVIEW users who communicate through several e-mail groups and Internet forums, thus making sure that users can fiddle around with the system and still not get completely lost.
Summary
The distinguishing feature when compared to other programming languages is that LabVIEW uses graphics instead of text listings for its source code. LabVIEW is very popular with scientists and engineers, who do not necessarily have a background in software programming, due to this graphical coding and straightforward integration with a wide range of measurement instruments and control equipment. With the updates for the software pouring in, LabVIEW is all set to be the industry’s darling among system design software for the time being.
How to install LabView: Student’s edition
There is a proper order for installing National Instruments’ software based on how the individual pieces work together. Here is the order in which to install the suite:
1. Development system (LabVIEW)
2. Software toolkits and modules (LabVIEW Control Design and Simulation Toolkit)
3. Hardware drivers (NI-ELVISmx Device Driver)
The development system is installed first because it is the base or platform onto which everything else is installed. The modules and toolkits are then installed because they are development system dependent, and are added in place of the development system like the functions palette of LabVIEW. Last of all, the drivers are installed along with the driver support for the development system and toolkits.
If they are not installed in this order, the dependent features will not realize that the development system is present, and thus not appear in the development system environment.
Once you have downloaded and opened the software, the program will automatically start the installation process.
After installing LabVIEW, Student Edition, it is the right time to install hardware drivers. You can obtain the hardware drivers to use with LabVIEW from their official website. After correctly installing the drivers and restarting the system, you are now ready to launch LabVIEW. Have fun with the software!
Getting started with LabVIEW
Launch LabVIEW by click-starting on your Windows toolbar and navigating to ‘All Programs.’ From the program directory, click ‘National Instruments LabVIEW 2011 SP1.’ The ‘Getting Started’ window is divided in half from left to right. On the left is the ‘Files’ section and on the right is the ‘Resources’ section. In the ‘Files’ section, under ‘New,’ you can create a blank VI, project, or module-specific project, or you can select the ‘More’ folder to start from one of the many LabVIEW templates. In the ‘Resources’ section, you can find additional tools for getting started, ranging from online discussion forums to a comprehensive library of example programs that are shipped with LabVIEW.
The front panel window
When a user opens a new or an existing VI, the front panel window of the VI appears and it now functions as the graphical user interface of the VI. The source code that runs the front panel can be found on the block diagram. The front panel window contains a toolbar across the top and a ‘Controls’ palette that you can access by right-clicking anywhere on the front panel. After opening the ‘Controls’ palette, you can use it to place controls and indicators on the front panel.
Controls and indicators
Controls are the interactive input terminals such as knobs, push buttons, dials and other input devices, while indicators are the interactive output terminals of the VI such as graphs, LEDs and other displays. Controls simulate instrument input devices and supply the block diagram with data. Indicators simulate instrument output devices along with displaying data, which the block diagram acquires.
Every indicator and control has a data type associated with it. To use an example, the Trigger (sec) horizontal slide is a numeric data type. If you double-click the Trigger control, then LabVIEW jumps to the terminal location on the block diagram. The most commonly used data types are numeric, Boolean value and string.
The block diagram window
When the user creates or opens a new VI, the front panel automatically opens up. To bring up the block diagram, select Window -> Show Block Diagram from the menu bar. Alternatively, you can switch/toggle between the front panel and the block diagram by pressing Ctrl+E.
The components included in a block diagram include functions, sub-VIs, terminals, structures, constants and wires that transfer data among other block diagram objects. A tool is a special operating mode of the mouse cursor, so the operating mode of the cursor corresponds to the icon of the tool selected. The current position of the mouse determines LabVIEW’s tool selection. You can manually choose the tool you need by selecting it on the ‘Tools’ palette (from the menu bar, select View»Tools Palette).
The drag-and-drop functionality allows you to place objects on the block diagram by simply dragging and dropping them from the ‘Functions’ palette. This automatically appears when you right-click anywhere on the block diagram workspace with its code containing provisions for functions, constants, structures, and some sub-VIs.
Functions
Functions are the fundamental operating elements of LabVIEW. They possess neither a front-panel window nor one for the block diagram, but they do come with input and output terminals for passing data in and out—similar to controls and indicators. The functions in the ‘Functions’ palette are cleverly arranged in groups based on the type of function they perform, thus making the interface extremely user-friendly.
