

This article focuses on a software that can be used for Verilog and SystemVerilog development projects. let us take a look at its features by installing it and setting up a project with it.
EFY Bureau
SVEditor is an Eclipse-based IDE (integrated development environment) for SystemVerilog and Verilog development. It provides a colourising editor for SystemVerilog with support for source navigation, content assist, source indent and auto-indent, SystemVerilog source templates and context-sensitive viewing of source documentation. Users have praised SVEditor for some of its features, such as searching for a colourisation of SystemVerilog keywords or words in a directory, auto-completion and some content assist. They believe you can use SVEditor for debugging if you love emacs. Quoting from sourceforge.net, one user has said, “I’m totally stoked that this project is under active development. The tool is already very useful. Keep up the good work!”
 Features
SVEditor provides a variety of features that make developing designs and test-bench environments in SystemVerilog simpler and more efficient. The software provides many ways to navigate across the project source. The ‘Open Declaration’ option navigates to the location of the item’s declaration like class, module, interface, field or method. By clicking the ‘Open Type Hierarchy’ tab, it opens the ‘Type Hierarchy’ view for the specified class or module. Another feature, called ‘Doc Hover,’ displays the code documentation when hovering around the documented element. The New Class/Interface/Module Wizards can be used to quickly create new files containing a class, interface, or module. The ‘Open Class Diagram’ displays a UML-style class diagram of the target class.
How to install SVEditor
Listed below are several ways to install SVEditor.

A combination of Eclipse and SVEditor, SVE provides a complete development environment for SystemVerilog. It is provided as an installable package for Debian and the Windows operating systems. If you are not already an Eclipse user, SVE is the simplest way to get started with SVEditor.
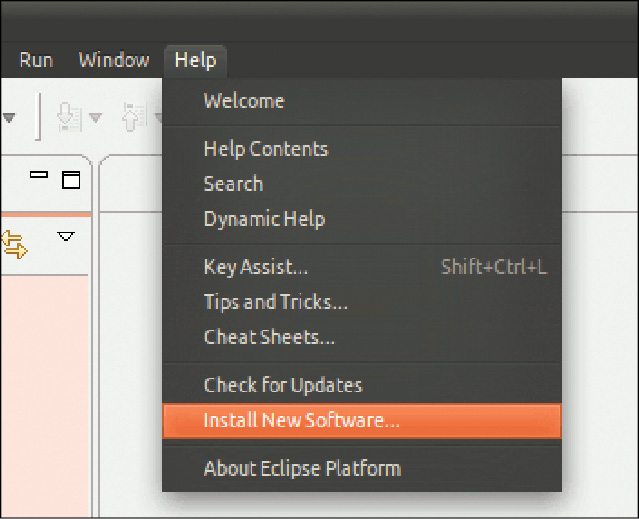
Installing SVEditor in an existing Eclipse environment. Via the SVEditor Update Site, SVEditor can be installed into an existing Eclipse environment. All you need to do is to open the ‘Install New Software’ dialogue box by selecting the ‘Help-Install New Software’ option (in Eclipse) as shown in the Fig. 1. As you can see in the figure, a new dialogue box opens up. Then, select ‘Add’ and specify the URL of the SVEditor update site, as shown, and select ‘OK.’ The ‘Installation Wizard’ will get updated to show the SVEditor feature. By selecting the SVEditor feature and then clicking on ‘Next,’ you will be prompted to agree to SVEditor’s licence (EPL). Simply continue selecting ‘Next’ until the install process completes.
Updating SVEditor. With a new release every other week (on an average), SVEditor continues to grow and improve. Staying updated with the latest version will only provide you access to the latest features and bug fixes. Updating an Eclipse plug-in is simple. Select the tab ‘Help’ and click on ‘Check for Updates’ from the main IDE menu.
Updating SVE. If you have installed one of the SVE packages, updating the SVEditor plug-in will involve a procedure nearly identical to the one explained above. When SVE is installed, the SVEditor plug-in is typically installed by the systems administrator. As a result of this, a normal user cannot update the plug-in. SVE must be started by an administrator in order to update the SVEditor plug-in.
Post installation
Getting started on an SVEditor project. An SVEditor project must be created and configured before editing the source with SVEditor. There are five main steps to setting up an SVEditor project. They are listed below:
1. An Eclipse project around the source must be created
2. Variables must be set to point to the external sources
3. An argument file must be created, in order to specify the root files
4. Specify the SVEditor project properties
5. Rebuild the project and check the results
This step-by-step guide will use the ‘UBus’ example, provided as part of the UVM package, as an example.
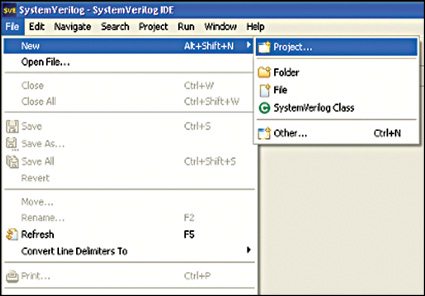
As listed above, the first step in setting up an SVEditor project is to create an Eclipse project around the source to be edited. In the case of this ‘UBus’ example, the source that we are most interested in is the source for the UBus testbench environment. Begin creating an Eclipse project by selecting New->Project… from the main menu, as shown in Fig. 2.
Expand the ‘General’ category, if required, and select ‘Project.’ Next, the project name must be specified and the physical location of the source files selected. To achieve this, follow the steps given below:
1. Specify the project name as ‘ubus’
2. The ‘Use default location’ check box must be unchecked
3. Click the ‘Browse’ button, select the location and then navigate to the directory where the source is located.
To create the project around the existing UBus source, select ‘Finish.’ The new UBus project will be shown in the Project Explorer.


