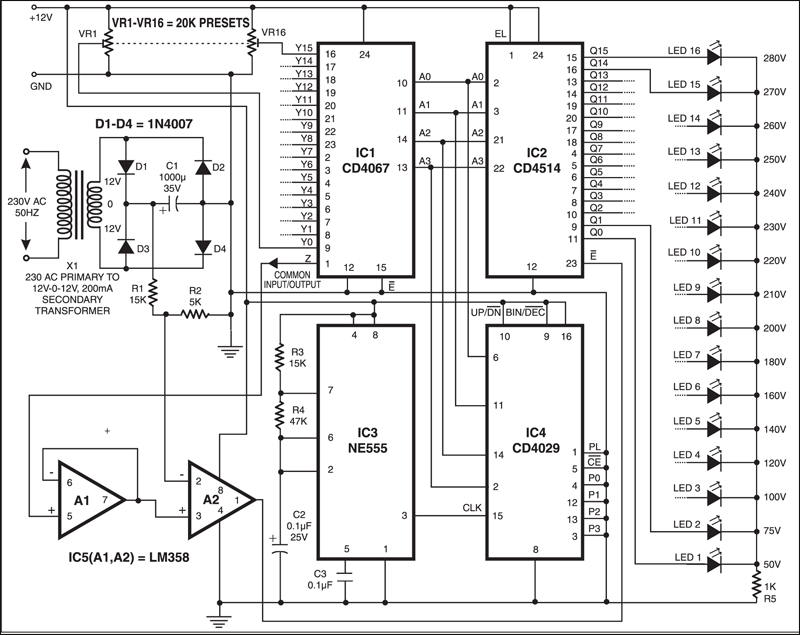
 Continuous monitoring of the mains voltage is required in many applications such as manual voltage stabilisers and motor pumps. An analogue voltmeter, though cheap, has many disadvantages as it has moving parts and is sensitive to vibrations. The digital mains voltage indicator circuit described here indicates the mains voltage with a resolution that is comparable to that of a general-purpose analogue voltmeter. The status of the mains voltage is available in the form of an LED bar graph.
Digital Mains Voltage Indicator Circuit

Presets VR1 through VR16 are used to set the DC voltages corresponding to the 16 voltage levels over the 50-250V range as marked on LED1 through LED16, respectively, in the figure. The LED bar graph is multiplexed from the bottom to the top with the help of ICs CD4067B (16-channel multiplexer) and CD4029B (counter). The counter clocked by NE555 timer-based astable multivibrator generates 4-bit binary address for multiplexer-demultiplexer pair of CD4067B and CD4514B.
Circuit operation
The voltage from the wipers of presets are multiplexed by CD4067B and the output from pin 1 of CD4067B is fed to the non-inverting input of comparator A2 (half of op-amp LM358) after being buffered by A1 (the other half of IC2). The unregulated voltage sensed from rectifier output is fed to the inverting input of comparator A2.
The output of comparator A2 is low until the sensed voltage is greater than the reference input applied at the non inverting pins of comparator A2 via buffer A1. When the sensed voltage goes below the reference voltage, the output of comparator A2 goes high. The high output from comparator A2 inhibits the decoder (CD4514) that is used to decode the output of IC4029 and drive the LEDs. This ensures that the LEDs of the bar graph are ‘on’ up to the sensed voltage-level proportional to the mains voltage.
The initial adjustment of each of the presets can be done by feeding a known AC voltage through an auto-transformer and then adjusting the corresponding preset to ensure that only those LEDs that are up to the applied voltage glow.
EFY note
It is advisable to use additional transformer, rectifier, filter, and regulator arrangements for obtaining a regulated supply for the functioning of the circuit so that performance of the circuit is not affected even when the mains voltage falls as low as 50V or goes as high as 280V. During Lab testing regulated 12- volt supply for circuit operation was used.
The project was originally published in January 1997 and has recently been updated.


