


Nowadays, we have lots of game controllers that are improving the gaming experience over the years. There are number of factors responsible for a game to get a good fan base. Graphics quality, story line, the way in which user interacts with the game etc., Gaming experience can be improved to a good extent with the help of controllers, but these controllers are quite expensive. Have you ever thought of making your own controllers for games? This project takes you through a series of simple steps to help you make your own game controller using Arduino for any games you want to play. This project designs a throttle system for Microsoft flight simulator.
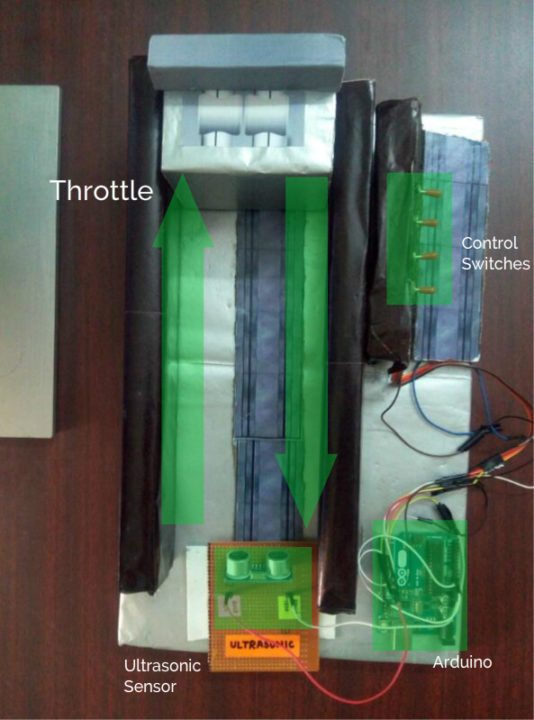
The first image is the game controller using Arduino, designed for flight simulator. It has a throttle system, control switches (Lights, landing gear control, APU Switches and seat-belts ON/OFF).
Concept of the game controller
This project explains the concept of the game controller with help of a flight simulator game. In this game, to speed up the flight that to increase the engine speed we use F3 key for gradual set by step increase or F4 key for max throttle and F2 for gradual step by step decrease or F1 for Idle throttle. We are going to programmatically trigger the corresponding keys based on some conditions.
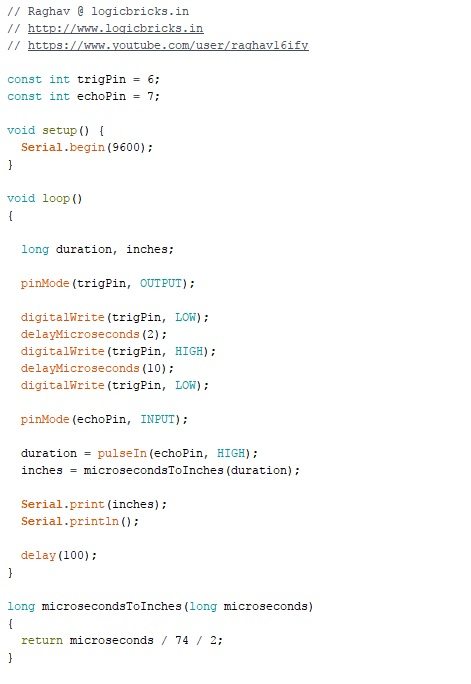
This project uses an ULTRASONIC SENSOR to measure the distance between the sensor and the obstacle (say a cardboard box) in front of it. We use an Arduino board to get the distance value and send it in serial to pc in a specific COM port. In order to program the Arduino we need Arduino IDE.
Distance (unit inches) – Approximately 73.7 microseconds per inch (i.e. sound travels at 1130 feet per second). This gives the distance travelled by the wave from the sensor to the obstacle and again back to sensor, so we divide by 2 to get the distance of the obstacle.
The HC-SR04 module produces duration in microseconds as the output that the time taken to receive the echo. The following convention is used to convert the distance (inches) in place of duration:
Distance = duration / 74 / 2
Next we design a small application that reads this serial value and programmatically triggers the keys based on the following condition.
if past distance < new distance (this condition is satisfied is the obstacle is moved towards the sensor)
tigger F3
else if past distance > new distance (this condition is satisfied if the obstacle is moved away from the sensor)
trigger F2
else if new distance > max_idle_limit
trigger F1 key once and release all the keys
else if new_distance <= max_speed_limit
trigger F4 once and release all the keys
else (i.e. when the past = new distance)
there is no movement
release all the keys
The above conditions are tested for each and every distance value sent by the Arduino board in serial port. This application should run in parallel to the game for which the controller is designed.

Components & Software Required
- Arduino: This project uses Arduino UNO R3. If you have Arduino Leonard/Due board then there is no need to making the software in C# since the board has its own keyboard libraries for triggering keys.
- Ultrasonic Sensor HC-SR04
- Jumper Wires
- Arduino IDE
- Visual Studio IDE
Circuit diagram
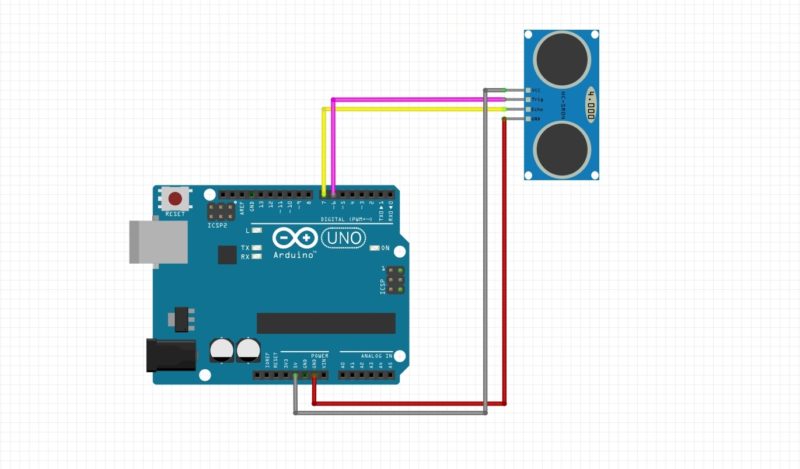 Arduino Board pin 7 – Echo Pin Ultrasonic Sensor
- Arduino Board pin 6 – Triger Pin Ultrasonic Sensor
- 5V – Vcc of Ultrasonic sensor
- Gnd pin to GND of ultrasonic sensor
If you want add more functionalities to game, add some toggle switches and button to some other pins and you can listen and respond to them by treating them as interrupts. But now lest don’t complicate this ill just take you through the basic setup.
Implementing the game controller using Arduino
- Download Arduino IDE and Microsoft visual studio IDE
https://www.arduino.cc/en/main/software – Arduino IDE Download link
https://www.visualstudio.com/downloads – Microsoft visual studio Download link
- Download the starter kit (game controller serial port listener program) from the below link https://github.com/RaghavVenkat/Serial_Listiner_Game_Controller
- The starter pack has the code for Arduino (which implements the concept we discussed above) circuit diagrams and the base codes for the application that we are going to make using c# in Microsoft Visual studio.
- Connect the Ultrasonic sensor with arduino board. (use the above give circuit diagram, you can also find the circuit diagram inside the starter-kit).
- Connect the arduino board to PC. When you open IDE you will see two function setup() and loop()
- The setup() function will only run once, after each powerup or reset of the Arduino board. Use it to initialize/defining variables, pin modes, etc.
- The loop()function does precisely what its name suggests, and loops consecutively, allowing your program to change and respond. Use it to actively control the Arduino.
- As we have already discussed about the working of Ultrasonic sensor, let’s start with c# application designing part.
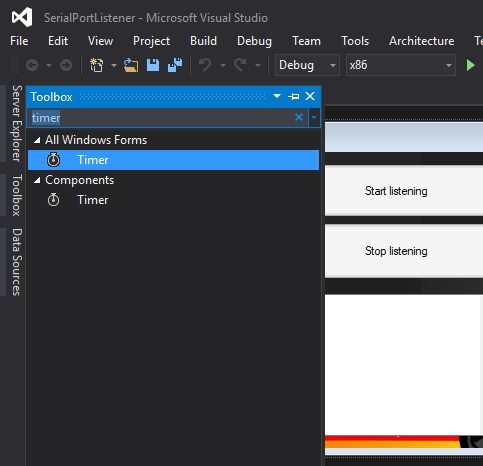
- Open Visual studio and open the serial_listiner c# program which you can find inside the “c# part” folder of the starter kit.
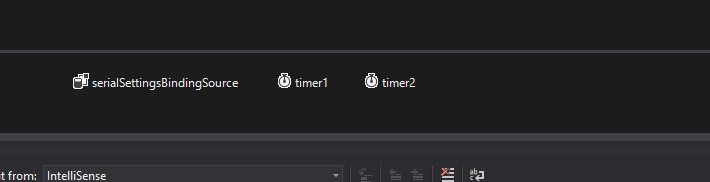
- Create two timers in the MainForm from the Toolbox panel.
- Set Enabled – as false and interval as 1, you can find theses under properties panel.

- Declare 2 variables
Int or long past =0;
Int or long val =0;
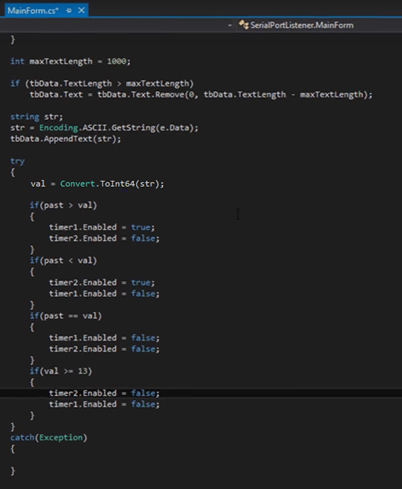
- Navigate to void _spManager_NewSerialDataReceived(object sender,SerialDataEventArgs e) { ….. } function
- And type in the code give in the below picture.
- As we discussed we are triggering the keys based on the predicates that we have stated.
- Instead of directly triggering the keys we are going to use timers that inturn triggers keys so that it produces a considerable amount of effect on the game.
In the below code i am receiving the serial values are read as string and converted into int type.
- To convert string to int use Convert.ToInt32 or Convert.ToInt64, in case of 32 you need to catch type mismatch errors, but it will also work. If you are using Convert.ToInt64 then you need to declare the variables PAST and VAL with Long data type modifier.
Now let’s code the timer functionalities.
Here we are going to use one built-in function SendKeys.Send() – used for sending keystrokes to an application. This comes under Send keys class.
- Let us use timer 1 for sending F3 key when enabled and Timer 2 for sending F2 key when enabled respectively.
- Send(“{F3}”); inside timer 1_tick function
- Send(“{F2}”); inside timer 2_tick function
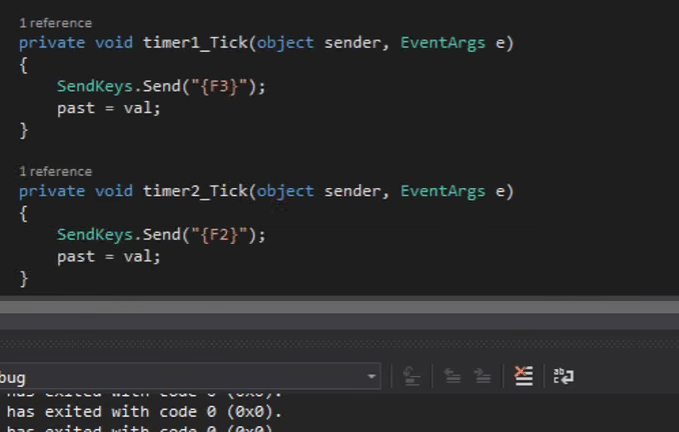
- Once after triggering a key we need to update the value of PAST variable to the current value read from the serial port.
- That’s all! Now run this application in parallel to the flight simulator game. Set the port, baud rate and hit on “Start Listening”.
In addition to this we can also add buttons, toggle switches to control landing lights, landing gears, etc. by treating them as interrupts and if you want to make controllers yoke/ joysticks used in airbus or Boeing, use flex resistors or gyro sensors (both fits good to do that functionality). Even in place of ultrasonic sensor we can also use potentiometer.
The below video of the project in action should also help,
This concept can be used for any games, for instance for a game like EURO TRUCK SIMULATOR we can use this setup as an accelerator and break by triggering the “Up arrow key”/ “W Key” and “DOWN arrow Key”/” S key” respectively. Thus, if you have an idea to create controller for any games,
- First find the action which you want to control from real world (here it refers to controller).
- Find the corresponding key that triggers that action in the game.
- Code the logic that is required to trigger this key.
Enjoy Gaming!
More projects available at: Electronics Projects


