


When we work with rechargeable battery it is useful to have the following functions:
- measuring the charging current,
- measuring the discharging current,
- measuring voltage over the battery
But in order to measure the current we should interrupt the circuit and to introduce the Ampere meter.
In practice it is much easier to use voltmeter and to convert the current into voltage.
That short article give simple circuit of the power supply for embedded system backed up with rechargeable battery (RB).

The MCU can measure:
- the charging current,
- the discharging current,
- the input unregulated voltage of the charger
- the voltage over the battery
That gives extensive control of the MCU over the battery and increase the reliability of the entire system.
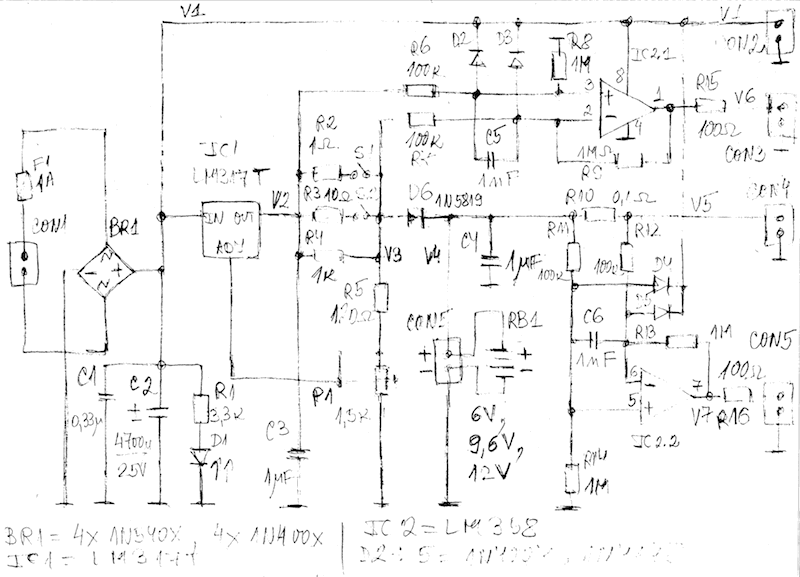
Description of the circuit
Figure 1 presents the circuit for measuring the charging and the discharging current of the battery.
The input voltage is applied to the connector CON1.
If we use the circuit with 12V rechargeable battery (RB1) we can use transformer providing (15-17)Vrms/(0.5-1A).
The bridge rectifier BR1, C1 and C2 works as AC/DC converter.
IC1 LM317T or LM350T works as current and voltage limiter in the same time.
The maximal output voltage is set with R2, R3, R4, S 1 and S2.
The current should be limited to around 1A.
The maximal output voltage is set with the trimmer-potentiometer P1.
The diode D6 stops the discharging if the battery.
Measuring charging current
IC2.1 and associated components works as current to voltage converter.
The charging current is captured with R4, R4//R2, R4//R3 or R4//R2//R3 depending of S1 and S2.
The captured voltage is amplified with IC1.1.
The voltage gain Av1 is set to 10 and can have any appropriate value:
Av1 = Rf1/Ri1 = 10
where
Rf = R8 = R9 = 1MOhm
Rf = R6 = R7 = 100kOhm
Measuring discharging current
IC2.2 and associated components works as second current to voltage converter.
The discharging current is captured with R10.
R10 can have any appropriate value depending on the required current, usually from 0.1Ohm to 10Ohm.
The captured voltage is amplified with IC2.2.
The voltage gain Av2 is set to 10 and can have any appropriate value:
Av2 = Rf2/Ri2 = 10
where
Rf2 = R13=R14=1MOhm
Rf2 = R11=R12=100kOhm
Connectors
CON1 is for the input voltage.
CON2 is for the measurement of the unregulated input voltage.
CON3 is for measurement of the charging current.
CON4 is for the measurement of the voltage of the battery.
CON5 is for measurement of the discharging current.
The integrated circuits
IC1 is LM317T or LM350T or other adjustable regulator providing more than 1A and dissipating 20W or more.
IC1 should be mounted on heat sink with thermal resistance below 10C/W.
IC2 is LM358 or similar dual OA.
The output of the OA should go to the ground.
The input should go as close to the power supply as possible.
The circuit can work with 6V, 9,6V, 12V or similar rechargeable battery.
Conclusions
That short article presents the circuit for measuring the charging and the discharging current of the battery.
The circuit can be used as:
- charger, discharger, tester, trainer of rechargeable batteries
- input stage of power supply for embedded system which with battery with back up.