
In the 11th line, the ‘HaarDetectObjects’ function is used to detect the features you want. This function has three parameters. The first one is the source image, the second the Haar classifier that you want to use and the third one creates a memory storage. Then there is a ‘for’ loop to draw a rectangle around the portion that you may have identified in the previous stage, using the ‘rectangle’ function. ‘Rectangle’ function takes four parameters: the image on which to draw, followed by the two opposite corners of the rectangle, and the last one denotes the colour.
Serial communication
This section will show you how to use the pyserial module, Arduino and, finally, how to build a full-fledged embedded system for image processing. Pyserial is a library that provides Python support for serial communication.
Now, let us explore how to use pyserial and send data to other devices via serial communication. First run Python in a terminal. Then import the pyserial module (import serial). If this gives no errors, we are ready—else you may have to install the package with the module. Now, since laptops do not have serial ports, you may use a USB-to-serial converter (db9) for this demo. Short the Data Transmitting (pin 3) and Data Receiving (pin 2) pins of COM port, so whatever information you send via the pyserial module would come back. The pyserial.py code illustrates this.
The first line of pyserial.py code opens the desired serial port and sets the baud rate. The second line writes the data to the serial port, the third reads the data from the serial port and stores it in a variable, and the last line displays the value of the variable. If everything goes well, the output on your screen should be the same string written to the serial port—EFY\n. If so, your serial communication system is working well. Use this to communicate with Arduino board.
Setting up Arduino
Let us use the Arduino IDE (Fig. 9) to write the code. You can install it via Ubuntu Software Centre by just searching for ‘Arduino.’ After the installation, launch it. Connect your Arduino to your computer via the USB cable. Then select the target board—go to Tools->Board option and make the choice. Next, configure the serial port via Tools->Serial option and select the available port. Connect an LED with current-limiting resistor between pin 13 and ground. Now, write the first Arduino_LED.ino code to get an LED to flicker.

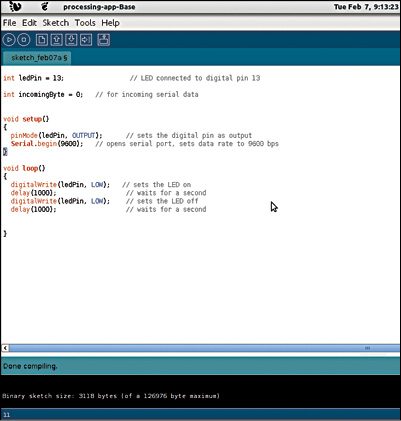
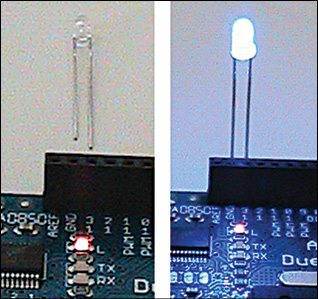
Click the Verify button to check for errors in the program, and then click the Upload button to dump the code to the Arduino. If everything is fine, you will see the LED toggle on and off (Fig. 10).
The comments have been included on right side in the Arduino_LED.ino code for explanation. There are basically two modules in Arduino—setup and loop. The first module runs once, while the latter runs infinite times. In the fifth line is defined a variable for the pin number to connect the anode of the LED. Then in setup module, it has been declared that the pin would be used as an output pin. Then serial communication was initialised with a baud rate of 9600. Now in the loop module, the value of pin 13 was first set as ‘low’ (0, because the pin is digital). This will turn off the LED. After a delay of one second, the pin value was set to ‘high’ (1), which will turn on the LED, followed by another one-second delay. This loop will run forever, hence the LED will continue to turn on and off.
Controlling the LED with image
The buildinges.py OpenCV code will detect faces from a given image, and if the operation is successful, it will trigger the Arduino via pyserial.

The buildinges.py code is quite similar to the face.py code. Basically, the pyserial module has been imported, which will trigger the Arduino. When we perform face detection, all detected contours are stored in the ‘faces’ variable (this means a non-zero and non-negative value if the operation is successful). So we do a basic condition check, and if face detection is successful, it triggers Arduino and sends letter Y to the serial port—else it sends letter N.
Now let us look at the buildinges.ino Arduino code, which will respond to the above OpenCV code.
In the ‘if’ condition under void loop ( ) in buildinges.ino code, we used Serial.available ( ), which detects if any data has been sent to the serial port. If true, then Serial.read ( ) will read the incoming character and store it in ‘incomingBit.’ Then the data received from the serial port will be printed on the screen. If the value of ‘incomingBit’ is ‘Y,’ program turns on the LED else LED is off.
Application
The LED can be replaced by any electronic appliance in your house, like a fan, refrigerator or TV. (Obviously you will need a relay to control these appliances.) Look at this from the security point of view. We can design an embedded system that uses OpenCV for image-processing to detect an intruder, and trigger an alarm via the pyserial module and Arduino.
Download Source Code: click here
The author is a FOSS advocate and loves to explore different open source technologies. His areas of interest include OpenCV, Python, Android, Linux, Arduino, BeagleBoard and other open source hardware platforms


