Most remote controls around us, use IR for signal transmission. An IR remote control for home appliances helps you connect to your decices at ease and operate them from the comfort of your bed or your chair. Here we try to build an IR remote control for home appliances that you can use in your home. Using this circuit, you can remotely control the switch-on and switch-off operation of your AC mains operated home appliances. The working range of the circuit depends on the orientation and the intensity of the IR beam.
IR remote control for home appliances: Transmitter circuit

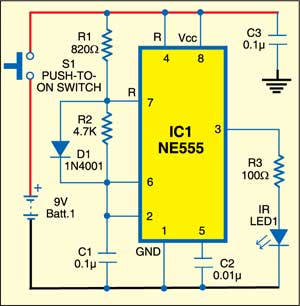
Fig. 1 shows the transmitter circuit. It is built around timer IC NE555 wired as an astable multivibrator. The multivibrator produces a pulsed output waveform with ‘on’ time of about 57 µs and ‘off’ time of about 326 µs, which means it generates about 2.6 kHz. The output of IC1 is fed to IR LED1 through current-limiting resistor R3. The IR LED1 used here is the same as in TV remotes. The circuit operates off a 9V battery, which is connected to the circuit through switch S1.
IR remote control for home appliances: Receiver circuit
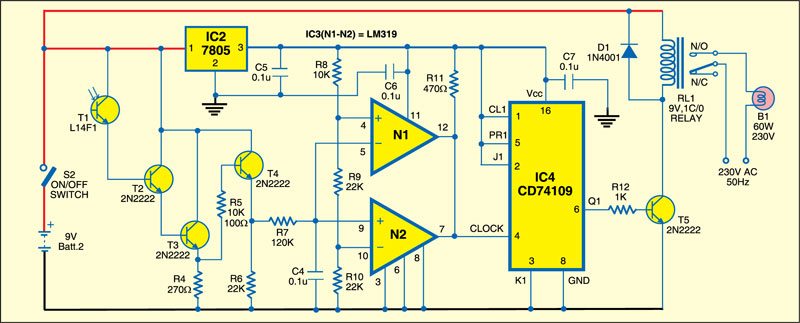
Fig. 2 shows the receiver circuit. It consists of phototransistor L14F1 (T1), voltage regulator 7805 (IC2), three 2N2222 transistors (T2, T3 and T4), dual voltage converter LM319 (IC3), dual J-K flip-flop 74109 (IC4) and some discrete components. The circuit operates off a 9V battery, which can be connected to the circuit through switch S2.
The Darlington pair built around transistors T2 and T3 amplifies the photo-current generated by the photo-transistor (T1). The equivalent photo-voltage appears across resistor R4. So across resistor R4 you get a replica (in term of wave shape but not in amplipude) of what you produce at the output of IC1 in the transmitter. The amplitude would vary with distance and other factors such as the angle of arrival of the IR beam at sensor L14F1.

The low-pass filter constituted by resistor R7 and capacitor C4 produces about 3V DC. This DC voltage is fed to the junction of the inverting input of N1 and the non-inverting input of N2. The window comparator (IC3) is designed such that whenever the input voltage is between 2 and 4 volts (greater than 2V but less than 4V), its output goes high. If the input voltage is less than or equal to 2V, or more than or equal to 4V, the output goes low.
The window output is fed to the clock input of J-K flip-flop CD74109 (IC4). IC4 is wired in toggle mode. That means its output goes high if it is initially low and vice versa every time it is clocked. The output of IC4 is fed to the base of relay-driver transistor T5. Relay RL1 energises to light up the bulb when transistor T5 conducts.
Circuit working
Working of the circuit is simple. Initially, when no IR beam is falling on sensor photo-transistor T1, the DC voltage appearing at the input of the window comparator is nearly zero. The window output remains low. Transistor T5 is cut-off and the relay remains de-energised.
When switch S1 is pressed momentarily, the IR beam falls on the photo-transistor for this short period of time and a postive-going pulse appears at the input of the window comparator. The output of the comparator goes low, which toggles the flip-flop (IC4) and transitor T5 conducts. Relay RL1 energises to switch on bulb B1.
Assemble both the circuits on separate PCBs and house in suitable cabinets. In the transmitter unit, fix IR LED1 on the front side and switch S1 on the back side of the cabinet. Keep the 9V battery inside the cabinet.
Similarly, in the receiver unit, fix the photo-transistor (L14F) on the rear side such that the IR beam falls on it. To avoid circuit malfunction, cover the phototransistor (T1) with a suitable contraption so that the phototransistor is not exposed to unwanted light sources. Fix switch S2 on the front panel and the relay on the back side. Keep the 9V battery inside the cabinet.


why this receiver circuit is used.if i designed this receiver circuit where i place it(remote)
PLEASE SEND PCB LAYOUT
What is the value of R5 , there are 2 values written in this circuit 10 k or 100 ohm , pls tell me fast
What is N1 and N2?
What is N1 and N2 ?
can we use a remote instead of IR Transmitter?
N1 and N2 are IC3 LM319