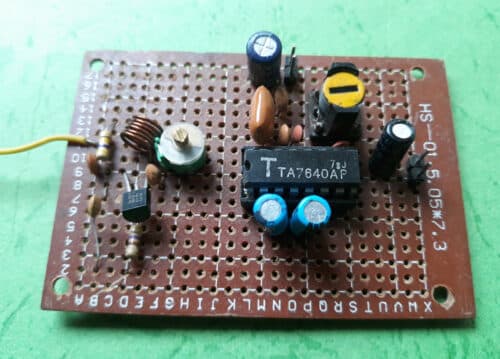
Here is a simple project of a Low Cost using an IC LA7640AP. Only a single NPN high frequency transistor BF 494 and an IC TA 7640AP are used in a circuit. This IC TA 7640AP can be easily available in a market and also cost is not expensive. The TA 7640AP is comes with 16-pins. The frequency between 88.00MHz-108MHz can be tuned with this FM radio receiver.
Most FM radio receivers works on an IF frequency of 10.7MHz. But this one works on 5.5 MHz IF frequencies. As a performance of your FM radio is also not very bad by using a 5.5MHz IFT coil and 5.5MHz ceramic filter. As 10.7 MHz IFT coil are rarely available and cost is also expensive but 5.5 MHz IFT coil can be easily available and also cost very cheap or you can taken from your old Black & White TV sets.
Circuit Description
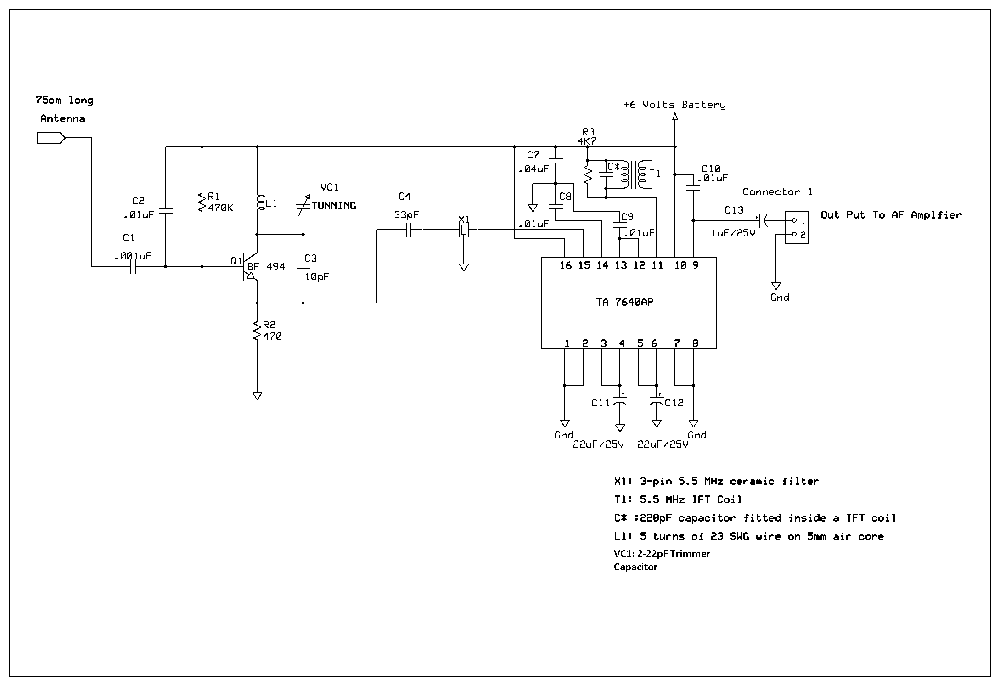
The circuit of this FM Radio Receiver is divided in to two parts. RF amplifier, Oscillator, mixer stage and 5.5 MHz IF amplifier, FM detector and AF preamplifier.
A single NPN transistor BF 494 is used in this RF section. Coil L1 (5 turns of 23SWG wire on 5mm air core) and VC1 2-22pF trimmer capacitor are connected in a parallel to each other with works as a tuned circuit. Resistor R1 (470K) is connected to a +6 Volts power section and a base of a transistor BF 494 and C1 (102) is connected to base of Q1 and a 75cm long wire which works as an antenna. A capacitor C2 (103) is connected to a base of Q1 and Ground. Capacitor C3 (10pF) is connected between emitter and collector of Q1 (BF 494) and will works as feedback capacitor.

Transistor Q1 will works as 88.00MHz-108.00MHz RF amplifier, oscillator of frequency 93.5MHz-113.5 MHz and mixer. A received signal of 88.00MHz-108.00 and oscillator frequency of 93.5MHz-113.5MHz are mixed and 5.5 MHz output signal of 5.5MHz is taken out from an emitter of Q1 which is passed to a pin 15 of IC1 through a capacitor C4 and to an input of ceramic filter X1 (5.5 MHz 3-pin ceramic filter).
Next stage is a 5.5MHz IF section, FM detector and AF preamplifier. An IC TA7640AP is used in this stage.
Pin 1, 2 are connected to ground. Pin3, 4 are connected to each other and connected to ground with an electrolytic capacitor C11 (22uF/25V) and by facing a positive terminal to pin 3, 4. Pin 5, 6 are also grounded with an electrolytic capacitor C12 (22uF/25V) with facing positive terminal to 5, 6. Pins 7, 8 are connected to ground.
Pin 9 is connected to a 2-pin connector with an electrolytic capacitor C13 (1uF/25V). An audio signal is taken out from this (pin9). A capacitor C10 (.01uF) is connected between pin 9 and pin10. Pin 10 is also connected to +6 Volts. A 5.5 MHz IFT coil and a resistor R3 (4K7) are connected to each other in parallel and connected to pin 11 and +6Volts supply. Pin 12 and 13 are connected to each other and connected between a capacitors C7 and C8 (which are connected in series and connected to +6 Volts through a capacitor C9 (.01uF). A ground terminal is connected in between capacitors C7 and C8. Pin 15 of IC1 TA 7640AP is connected to an output of X1 (5.5MHz ceramic filter). An output AF frequency is taken away from a pin 9 and to an AF power amplifier.

Construction and Adjustment
A suitable 5*7cm veroboard could be used to make your FM radio receiver. Put an IC 16-pin socket to a middle of your veroboard. Now solder this IC 16-pin socket. Put a 2-pin connector and solder on a right side on your veroboard. Now put all the remaining components used for this project and also solder all of them as given on a circuit diagram.
Finally take a 6 Volts battery and connect to your FM radio. You’ll also need a good AF power amplifier for your FM radio testing.
Connect your FM radio receiver output to an AF power amplifier. Switch on your FM Radio Receiver. You’ll hear a hissing sound from your FM radio receiver. Adjust a volume of your amplifier to middle position.
Now take a metal screw driver and gently touch to a pin 15 of IC1. You may hear some stations on 5.5 MHz SW1 band. Now your 5.5 MHz IF, FM detector and AF preamplifier section is working.
Now we will test a RF section of your FM radio receiver. Take a properly calibrated FM radio and bring it towards your FM radio RF section. Gently tune VC1 (a 2-22pF trimmer capacitor)
Until you’ll hear a hissing sound from FM radio. Now your RF section is also working. Tune a VC1 slowly until you catch a station signal. Now take a plastic screwdriver and gently tune a 5.5MHz IFT coil until you will hear the stations clear and loud. So, your FM Radio Receiver is working and ready for a listing.*
| Parts-List |
| Semiconductors |
| Q1: BF 494 |
| IC1: TA7640AP |
| Resistors |
| R1: 470K |
| R2: 470 |
| R3:4K7 |
| Capacitors |
| C1:.001uF |
| C2:.01uF |
| C3:10pF |
| C4:33pF |
| C7:.04uF |
| C8, C9, C10:01uF |
| C11:22uF/25V |
| C12: 22uF/25V |
| C13:1uF/25V |
| Miscellaneous |
|
16-pin IC socket. 5*7cm veroboard, 2-pin connectors, 5.5MHz IFT coil with 220pF capacitor fitted inside, 5.5 MHz 3-pin ceramic filter, colour wires e.t.c.
|


