We often desire an OTP based locker that allows us to share a virtual key for one-time use to unlock it. This kind of intelligent door lock system provides the flexibility to grant access to delivery persons or friends by using an OTP (One-Time Password), while also notifying us about each locking and unlocking event.
However, these locks tend to be quite expensive. Today, we will design a smart door lock that assists you in creating an OTP which can be shared with friends, relatives, or parcel delivery personnel for temporary access. The primary control of the door remains with you.
The best part is that you can receive messages and notifications, as well as control every step, using your favorite chat app—no additional installations are required.

Previously we build the OTP-Based Smart Wireless Locking System Using Arduino.
Here, we will utilize Telegram to generate or share the OTP and lock/unlock the door using the provided OTP.
So let’s begin the design with a collection of the following components-
Bill of Materials:
| Components | Quantity | Description | Price Approx INR |
| ESP 32 | 1 | WiFi Board | 400 |
| Solenoid lock | 1 | 5V Seloniod | 100 |
| Relay Module | 1 | 5v SPST | 100 |
| Wires | 10 | Jumper wires | 20 |
| Total | 620 |
Preparing Chat Bot
Initially, we have to create an AI BOT to make our AI camera chat with us, respond to us, and review our messages. This AI BOT receives the message, processes that message, and responds to us instead of a human being.
Also Check: AI BoT using ML
For this, we can create BOT in any messaging app like WhatsApp, Telegram, or any other messaging app. For now, we are preparing a Telegram chatbot as it’s open source, simple, easy, and free to use. First, we need to go to Botfather in Telegram and then we need to create a new chatbot. You will be able to see the instructions on the Telegram website to create a new bot and get the API token.
Now, after creating the new bot, get the API token. This API token helps us with getting the message, reviving the message, and responding using the BOT using our Telegram channel. After receiving the API token, save the API token as we need it in the next part of coding.
Next, start the BOT by searching for the BOT name you have just created.
My bot’s name is Darwin. Hence, I will search for Darwin and then start my bot with the command /start.

You can read the following previous DIY article for reference on creating the telegram bot and interfacing with Arduino: DIY Chat BoT.
OTP-based Locker – Coding
To begin, let’s add the ESP32 board to the Arduino IDE. After that, we need to install the Telegram async library in Arduino. With these preparations completed, we are now ready to start coding.
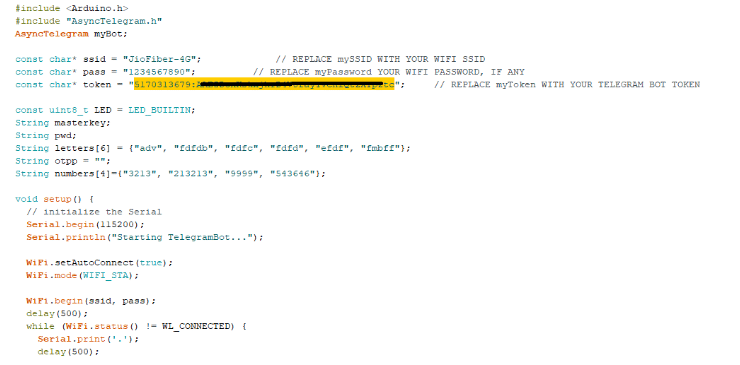
First, we will create an array of letters and numbers that will be used to generate the OTP. This array will serve as the basis for generating random OTP codes.
Next, we need to set the Wi-Fi credentials to which the lock will connect. This involves providing the appropriate SSID and password for the desired Wi-Fi network.
Finally, we need to set the API key of the Telegram bot that we created in the previous steps. This API key will allow our code to interface with the Telegram platform and send/receive messages.
With these initial configurations in place, we can proceed with the rest of the code implementation.

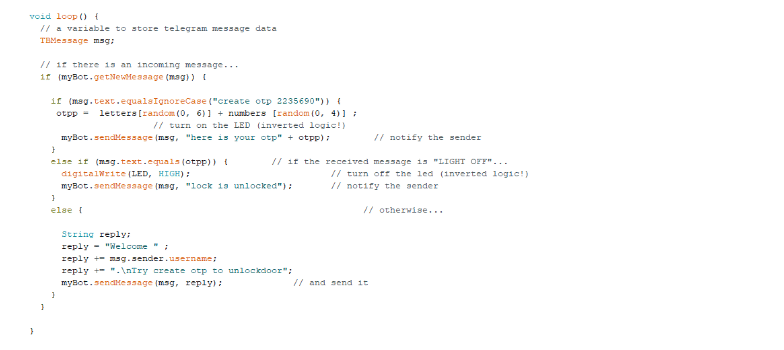
Now, let’s create the loop function where we will be checking the incoming messages to the Telegram bot. If the received message is to generate an OTP, we will verify the password, which is known only to the admin or the real owner of the lock. Once the password is verified, the lock will generate the OTP and send a reply message containing the OTP to the admin.
The admin can then use this OTP to unlock the lock for themselves or share it with anyone they wish to grant one-time access to.
Additionally, we will create another condition in the loop function to check the OTP sent to the lock via a Telegram message. If the OTP is correct, the lock will unlock the door. Otherwise, it will respond with a message instructing the user to regenerate the OTP.
Once the coding is complete, upload the code to the ESP32 board by selecting the appropriate port and board settings.

OTP-based Locker Circuit Diagram
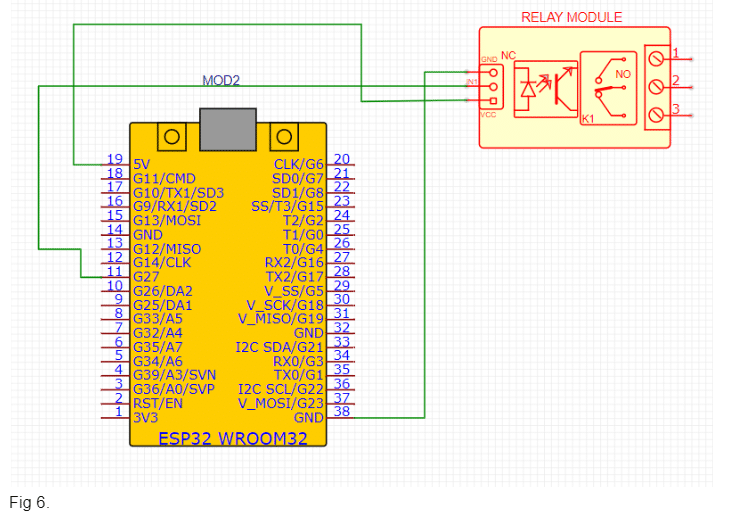
Begin by establishing the connection between the relay and ESP as per the provided circuit diagram. Next, connect the solenoid lock to the NO (Normally Open) pin of the relay. Connect one wire from the solenoid to the 5V power supply’s GND (Ground) terminal, and connect the other -Ve (Negative) terminal of the 5V power supply to the Common pin of the relay.

Testing OTP-based Locker


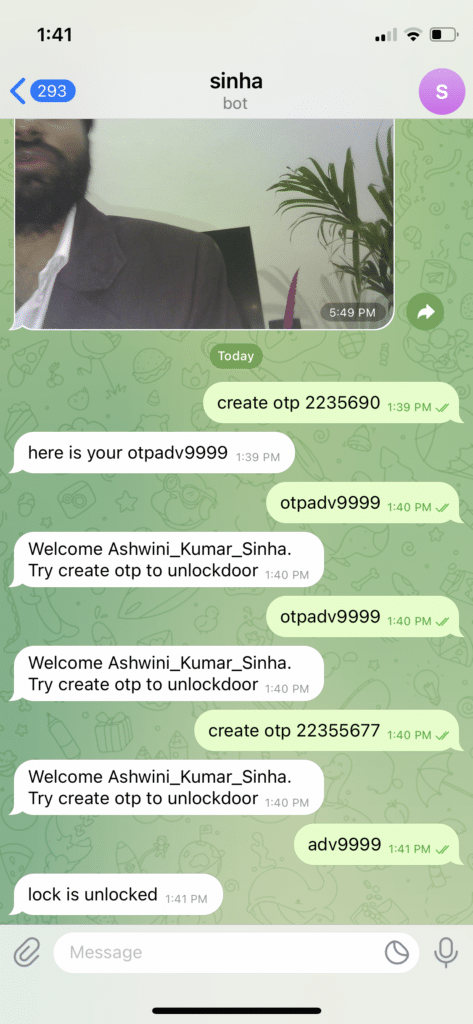
To begin, power up the device and ensure that it is locked. Wait a few seconds for it to establish a connection with your Wi-Fi network and the Telegram API. Next, open the Telegram bot you have previously created and send a message to generate the OTP.
Make sure to include the unique password you have set in the code. If the password is correct, the lock will generate the OTP and send it to you as a reply in Telegram.
Now, you can create a QR code from the Telegram bot. Share this QR code with the person you wish to grant access to, along with the OTP you received. The person can then scan the QR code and open the Telegram bot. They should send the OTP to unlock the door.
If the OTP is correct, the lock will respond with a message confirming the door unlock, and it will proceed to unlock the door using the solenoid lock connected to the relay.
You can check the step-by-step video guide to make this OTP-based Door Lock System.


