 Useful for vehicle owners, this garage light control & security system automatically turns on indoor/outdoor garage lights and raises an alert when an automobile enters the garage.
Garage light control & security system
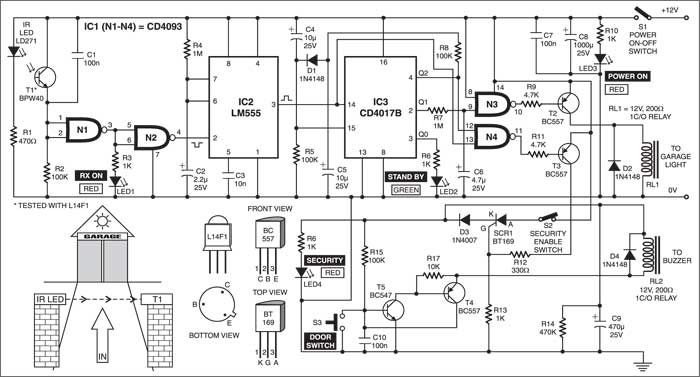
Assume switch S2 is in ‘on’ (closed) state. When power switch S1 is turned on, the complete circuit is energised by the 12V DC supply. LED3 lights up to provide power-on indication. Simultaneously, IC3 (CD4017B) is instantly reset by the power-on-reset circuit formed by the combination of capacitor C4 and resistor R5, and green LED2 lights up as a standby indicator. As per the physical arrangement, IR rays from IR-LED fall on phototransistor T1 and it conducts to pull up the inputs of NAND gate N1 (used here as an inverter) to logic 1. As a result, the output of gate N2 goes high to make the monostable built around IC2 inactive.

Now, when a vehicle moves through the door, the IR beam is interrupted and the output state of gate N2 changes from high to low state, which triggers the monostable and red LED1 (Rx on) lights up briefly. The output of monostable provides clock pulse to IC3, which changes its output state, with its pin 2 going high and pin 3 going low. As a result, standby indicator green LED2 goes off and relay driver pnp transistor T2 gets forward biased via gate N3 to energise relay RL1. The contacts of relay RL1 can be used to switch indoor and outdoor garage lights.
Circuit operation
After parking the vehicle, when the owner moves through the passage to interrupt the light beam once again, the monostable (IC2) is retriggered and the output state of IC3 changes again. This time, the output at pin 2 of IC3 goes low, while the output at its pin 4 goes high. This output resets IC3, after a short delay determined by components R8, C5, and D3. Standby LED2 again lights up.
Before the resetting function, the security system drive circuit is activated via gate N4 as follows: During retriggering, both inputs (pins 12 and 13) of gate N4 are at high logic level, taking its output pin 11 low to forward bias pnp transistor T3 via resistor R11. As a result, the SCR (BT169) is triggered via R12 and latched. Now the DC supply is extended to the rest of the circuit via the SCR until it is reset by disabling switch S2.
Door switch S3 is N/O type and it opens only when the door is opened. This triggers the regenerative pair of transistors T4 and T5, and relay RL2 is energised (and latched). Contacts of relay RL2 may be connected to an emergency beeper, a high-power signalling device, or an automatic telephone dialer, as desired by the user.
Resistor R7 and capacitor C6 have been deliberately added to delay the switching off of relay RL1. This extends the lamp’s ‘off’ time (for a short duration), allowing the owner to move in while the light is on. The delay can be increased by increasing the value of capacitor C6.
Note:
A high-value capacitor will also increase the delay in turning the lights on, which is not desirable.
The article was first published in February 2003 and has recently been updated.


can we use another component rather than t1 BPW40 and LD271???
Comment acheter les livres electronique automatique robotique de l’inde?
Bonjour,
Bonne année à toi aussi.
Nous fournissons des livres via grab.electronicsforu.com. Vous pouvez le vérifier là-bas.