The door lock controller given here is a simple electronic switching circuit realised using a low-cost unipolar Hall effect sensor IC MH183. This CMOS switch IC incorporates advanced chopper stabilisation technology to provide accurate and stable magnetic switch points. The design, specifications and performance have been optimised for solidstate switch application. The internal output transistor is switched on (Out=Low) in the presence of a sufficiently strong south-pole magnetic field facing the marked side of the package. Similarly, the output is switched off (Out=High) in the presence of a weaker south field and remains off with ‘zero’ field.

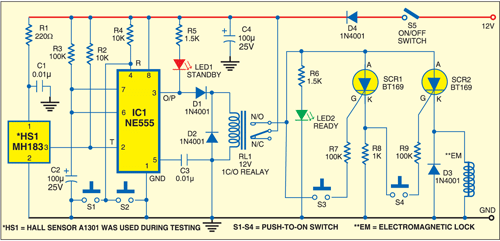
The circuit of sensor-based door lock is shown in Fig. 1. This door lock can be used to operate an electric strike or an electromagnetic door lock. A small electromagnetic strike unlocks the door. When the Hall sensor switch detects a strong south-pole magnetic field in its vicinity, the remaining circuit is switched on for about 10 seconds. This delay can be adjusted. When the right sequence of triggers is applied (via pushbuttons), the electromagnetic door lock becomes operational.

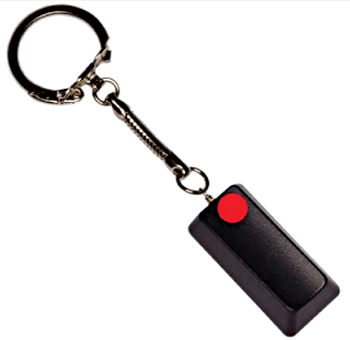
You can use a standard bar magnet fastened to a key ring (shown in Fig. 2) as the master key to operate this simple and smart door lock mechanism.
When power to the circuit is provided using switch S5, 12V DC from the external power supply unit or battery pack is routed to the circuit through polarity-guard rectifier 1N4001 (D4). The ‘standby’ indicator (LED1) lights up to show the device status. Use of resistor R1 is recommended for protection of MH183 Hall sensor switch (HS1). Capacitor C1 is a traditional buffer element.
To open the lock, bring the south pole of the bar magnet very close to the face of HS1 for a moment. This will energise the electromagnetic relay through the monostable wired around NE555 (IC1). The standby indicator (LED1) turns off to indicate the response.
Simultaneously, the ‘ready’ indicator (LED2) lights up. This condition is maintained by the timer circuit for about 10 seconds (set by R3-C2 combination) even if the bar magnet is removed. So it is no longer necessary to hold the magnet in place.

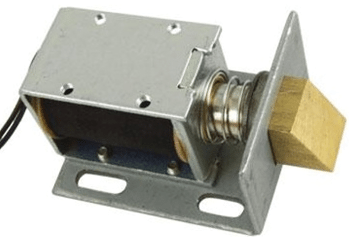
First, press pushbutton S3. SCR1 fires through resistor R7. Next, press S4 to switch on SCR2. Once this trigger sequence executes, 12V DC supply is available to the solenoid of the electromagnetic door lock (shown in Fig. 3) through SCR2. Within the delay period, if any wrong switch (S1 or S2) is pressed, IC1 is disabled by its reset terminal (pin 4) and further operation or unlocking is not possible. The lock can then be opened only by using a bar magnet and sequentially pressing S3 and S4.
You can replace Hall effect sensor MH183 and BT169 SCRs with components having similar characteristics. However, this may require some minor modifications in the circuit, such as change in the values of R2, R7, R8 and R9.


