 This project offers a stand-alone, automated fan speed controller that intelligently adjusts fan speed in response to temperature changes. Using embedded technology, this closed-loop system offers efficient and dependable temperature control. The Arduino board’s microcontroller (MCU) ATMega8/168/328 allows for rapid, dynamic control, and the LCD screen gives real-time temperature and fan speed data for convenient monitoring.
This project demonstrates a self-sufficient fan speed controller that smartly adjusts to temperature variations. It uses embedded technologies to provide effective and dependable temperature regulation. The Arduino’s strong microprocessor allows for quick modifications, and the LCD screen displays real-time feedback for convenient monitoring.
Circuit and Working:
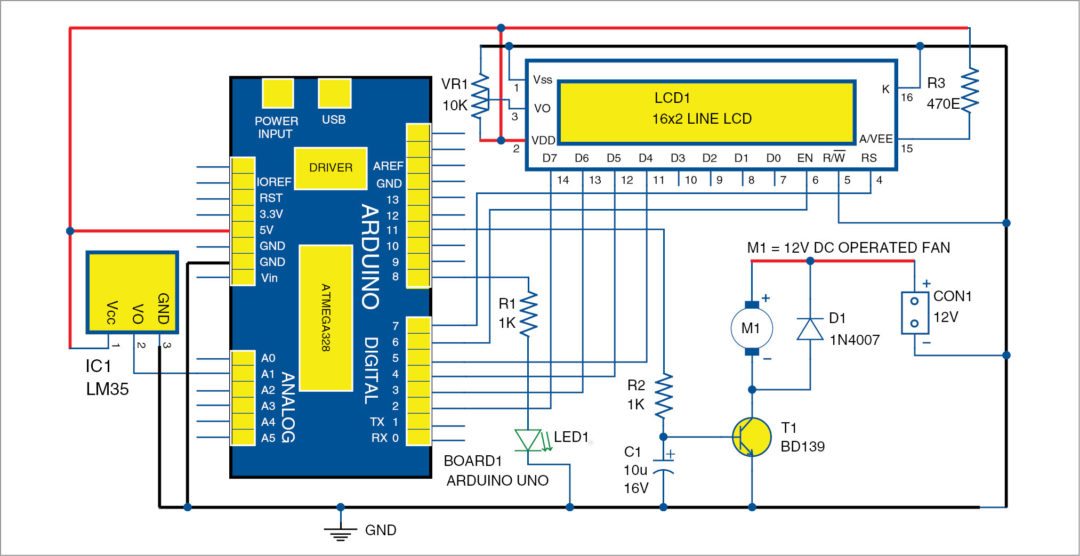
Circuit diagram of the temperature fan speed control and monitoring is shown in Fig. 1. It is built around Arduino Uno board (Board1), 16×2 LCD (LCD1), temperature sensor LM35 (IC1) and a few other components.
Arduino is at the heart of the circuit as it controls all functions. LM35 is a precision integrated circuit whose output voltage is linearly proportional to Celsius (Centigrade) temperature. It is rated to operate over a -55°C to 150°C temperature range. It has +10.0mV/Celsius linear-scale factor.
Temperature sensor LM35 senses the temperature and converts it into an electrical (analogue) signal, which is applied to the MCU through an analogue-to-digital converter (ADC). The analogue signal is converted into digital format by the ADC. Sensed values of the temperature and speed of the fan are displayed on the LCD. Temperature and monitoring using Arduino The MCU on Arduino drive the motor driver to control fan speed.
Fan Speed Control Technique:
- Pulse-Width Modulation (PWM): PWM regulates fan speed using a low-frequency signal (~30Hz) with varying duty cycle. The PWM signal controls how much power the fan receives, allowing for smoother adjustments.
- Efficient Power Use: A small pass transistor serves as a switch, conserving power while controlling speed. However, due to the pulsed nature of PWM signals, which causes mechanical vibrations, this method may cause the fan to become slightly noisy.
Construction and Testing:
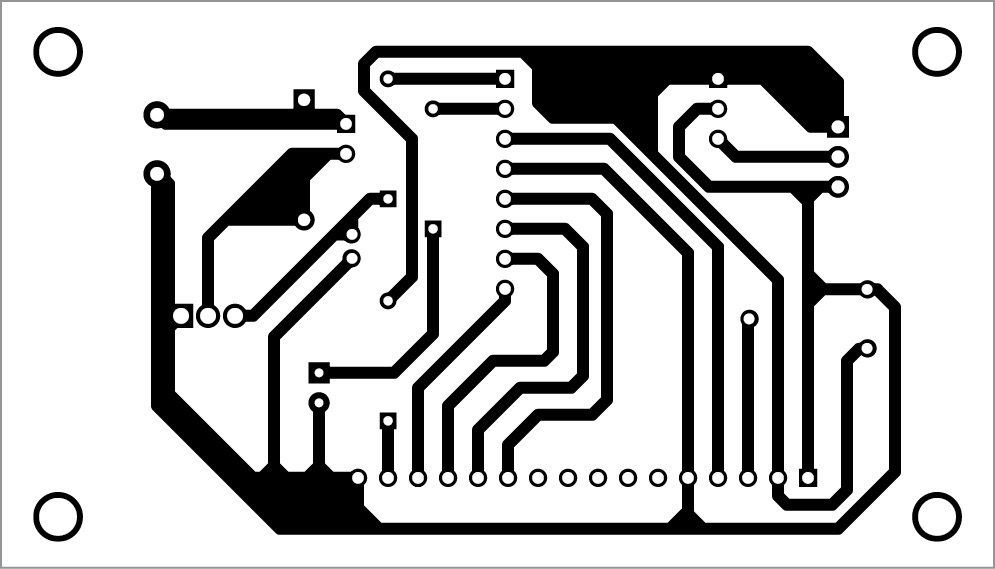
A single-side PCB for the temperature-based fan speed control and monitoring circuit is shown in Fig. 3 and its component layout in Fig. 4. Assemble the circuit on the PCB.
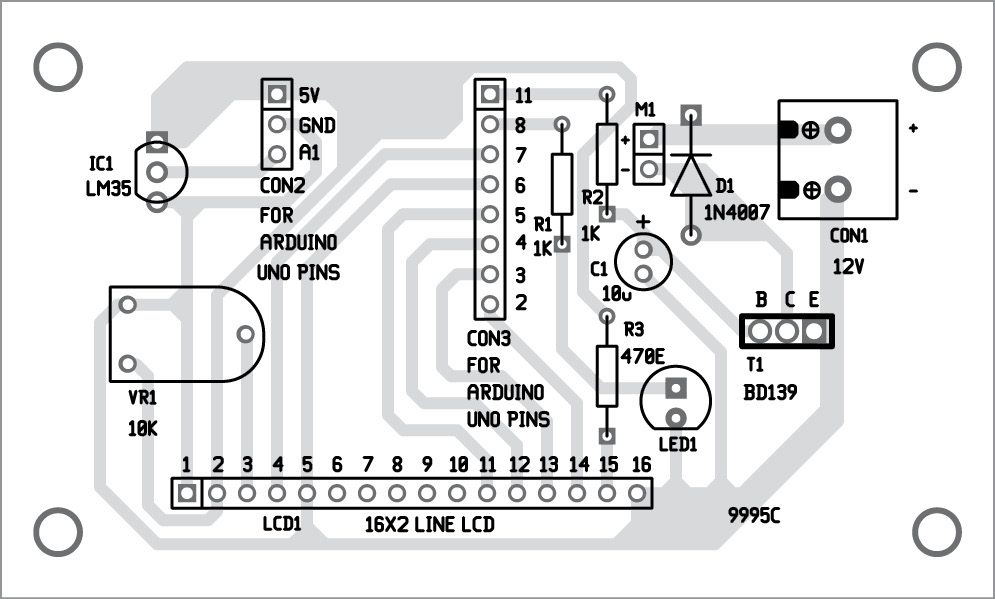
CON2 and CON3 are used to connect Board1 (Arduino UNO board) through external connectors. A 12V battery is used to drive the 12V DC-operated fan.
Download PCB and Component Layout PDFs: click here
Software and Programming:
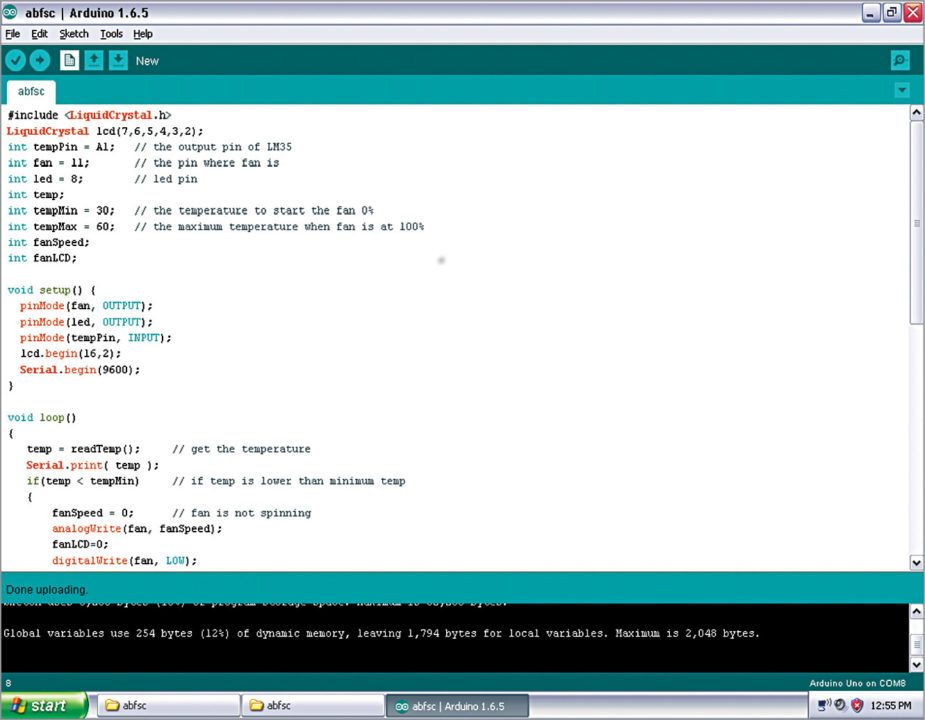
Software for the automatic temperature controller and monitor circuit is written in Arduino programming language. Arduino Uno is programmed using 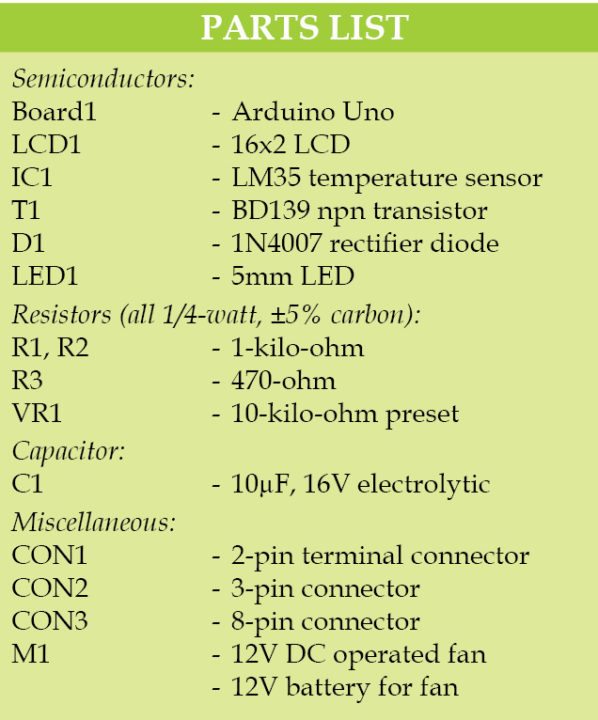 Arduino IDE software.
ATmega328P on Arduino Uno comes with a pre-programmed bootloader that allows users to upload a new code to it without using an external hardware programmer.
Connect Arduino board to the PC and select the correct COM port in Arduino IDE. Compile the program (sketch). Then select the correct board from Tools Board menu in Arduino IDE and upload the sketch (abfc.ino) to Arduino through standard USB port.
Advanced Features and Customization Options:
- Multiple Fan Control: Use this arrangement to control numerous fans based on temperature zones inside a room.
- Real-Time Data Logging: Connect to an SD card module or IoT platform to record temperature and speed data over time for study.
- Enhanced Control Algorithms: Use proportional-integral-derivative (PID) control to provide smoother, more exact adjustments in response to temperature fluctuations.
- Noise Reduction: Use capacitors or inductors in the PWM circuit to reduce noise from fan vibrations.
Download the source code: click here
Biswajit Das was manager – R&D, EFY Labs till recently.
This article was first published on 16 December 2016 and was updated on 28 October 2024.


please send your full document
This is the full project along with all relevant files.
@Abhimanyu Rathore can i have the coding for this project?
works without LCD screen and its program?
nice project
Thank you for your feedback.
awesome and usefull
Thank you for your feedback.
Plz send the source code as a word doc or pdf
nice project send project details to my email
Dear Gopi Reddy, all the details and required files are already present in the article.
Please send the source code as a word document or PDF
Can u give me the programm code and full details about this project….
Please sent pdf’s about this project
Please send your request for pdf to [email protected]
How to do the literature review about this project?
Plz send the source code as a word doc or pdf
Pls send the full prjocet rprt as pdf
Dear, all the relevant information is already provided in the article.
Why should we use the temperature sensor LM 35 only …. What about the remaining sensors… ?
please send the source code
Dear Binu,
The article has the source code. Please download it from the end of the page.
sir Plz send the source code as a word doc or pdf
Please send your request for source code in .doc or pdf to [email protected]
can i have report for this project
Couldn’t understand the relation between fan speed and temperature. Can you plz explain
“fan speed=temp;
fan speed=1.5*fan speed” ?
super , thanks
You are welcome.
why do you use this number please explain to convert to celsius
in this line
return temp * 0.48828125;
can you send me the code please
The source code is present in the article itself.
please send me files circuit in proteus with PCB layout and its coding at [email protected] .. i urgently need your help
We do not use Proteus software, sorry.
what if I dont want to use the lcd?? Do I just need to erase all the lcd thing in the coding or I need to do a new coding?
Circuit should work even without LCD
In what way its save energy or electricity
hello Sir need to use this techknowledge in radiator cooling fan.
We need some information about this. could you please call on 8983767988
Can u send me full program of fan control by lm35
these project can also work with ceilling fan
No this is a DC circuit
Can u give the project report of this project
I feel BD139 is not suit in this circuit . Because Bd 139 require 500mA at base to work in its maximum efficiency . but here arduino has only 40 mA out and i suspect the current hitting at base after the resistance 1K. i think N channel mosfet is more suit on this circuit to deliver maximum amount of current to DC motor
o sorry Nchannel mosfet will not work here it require NPN and another PNP transistor in the motor driving circuit
My request is, Please re calculate the collector current by multiplying the base current with DC current gain of transistor. i feel this motor driving circuit require multiple transistors so that it can deliver higher current when the fan is in high speed mode
what is the expense for doing this project
Nice idea sir.Please mail the source code of the project sir.
Could you please share some more details, how to control celing fan with this.. ? Which component need to change or Add ?
Thanks in advance..
PCB has a problem. Pin 5 of lcd is ground and it is connected to digital pin 6 of arduino. Instead digital pin 6 should be connected lcd pin 6 according to circuit diagram. It is better to use an non power transistor to drive the motor. Programme needs lot of corrections
Motor is not working.Please help
Can we use in sealing fan?
Sir can I know what are the disadvantages of this project except noise??
Nice project, but can I get it in PDF
Hi Ikenna, you can save this page as PDF or this article is available in August 2016 issue of EFY.