 This is a computer-based Break Timer program to remind you to take regular breaks while working on your desk for good health. Some of us spend at least sixty per cent (if not more) of our day sitting on a chair working on a computer or for some other work.
This physical inactivity for such long durations causes diseases like varicose veins, weak bones, back problems, weak digestion and can even increase the risk of cancer. Doctors around the world suggest good posture while sitting and taking regular breaks from your work. You can walk around and stretch a little bit for a healthy life.
Here is what the software does. Once installed, it reminds you to take a break after a predetermined time through an audio announcement. It also randomly selects a video from a list (already fed in the program) and plays it to further motivate you to leave the desk and move around.
Software Program
The software is written in Python programming language. All steps, from installation, program creation to running the program, are included in this article to help you get started with Python programing language. Various modules including webbrowser, random, time and pyttsx are used in the program that could be useful for other Python based projects including embedded systems. The software performs well on Window7/Windows10 systems.
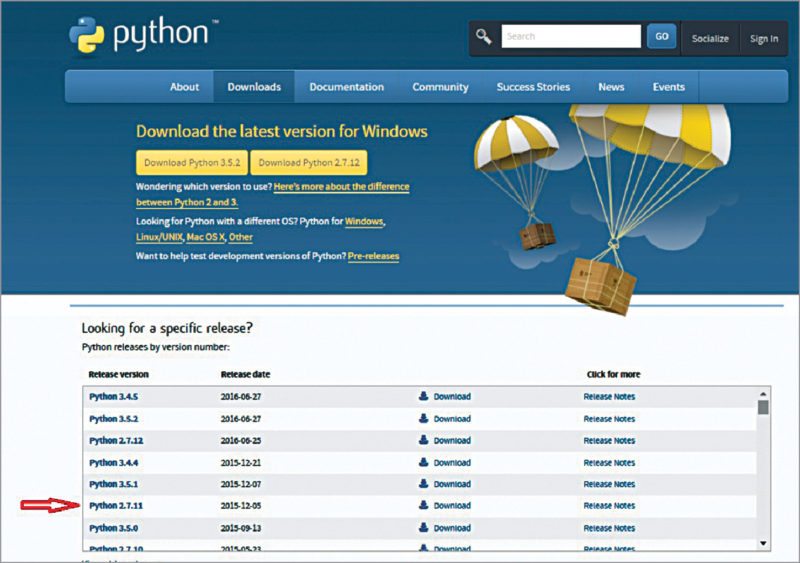
Download and install Python. Python is available in two versions: Python 2 and Python 3. We have used Python 2.7.11 for our program. Download and install this version of Python before writing the program. You can download it from https://www.python.org/downloads/
Open the link; you will see the page as shown in Fig. 1. Click on Download Python 2.7.11 (marked by red arrow in the figure).

Once downloaded, install the software by following the steps given below:
- Double-click on the downloaded file.
- Select Install for all users option and click Next (Fig. 2).

3. Select the location to install Python. Click Next.
4. Keep the default selection (Fig. 3) and click Next.

5. You will be prompted for permission to install the software; select Yes. Page shown in Fig. 4 will appear to indicate the status of installation. Once finished, Next tab will be activated.

6. Click Finish to complete the software installation.

Add Python to path environment variable
Python can be directly run through Command Prompt on Windows. But this needs addition of Python directories to the path under System Variables as explained below. If you run python.exe command immediately after installation without adding the path, you may encounter the error shown in Fig. 6.

Follow the steps below to add Python to Environment Variables path:
1. Right-click on My Computer, then Properties and then Advanced System Settings (Fig. 7).

Click on Environment Variables and search for the Path variable. Select Path variable and click on Edit (Fig. 8).

2. In case of Windows 7, add the following at the end of the variable value:
C:\Python27
3. In case of Windows 8 or above, window shown in Fig. 9 will appear. Click on New and add:
C:\Python27

4. Select OK, and it is done.
5. Open Command Prompt and type python (Fig. 10). This screen confirms proper installation of Python.

Note down the Python version and architecture. This will be required later in the article while downloading pywin.
6. Now, you can directly run Python commands from Command Prompt.
Python IDE
Python IDE comes with Python installation and is used to write, test and debug Python programs.
You can run it directly from the installed applications by clicking on its logo. Or, you can write IDLE in the search tab on Windows start button, click on IDLE (Python GUI) option. You will get Python shell screen as shown in Fig. 11.

Python is an interpreted language, so you can immediately start writing the commands, followed by pressing Enter on the keyboard. Commands get executed when you do this. Test by typing 2+2 and then press Enter. You should get four as the answer in the next line.
Create new program
Run Python IDLE→File→New File.
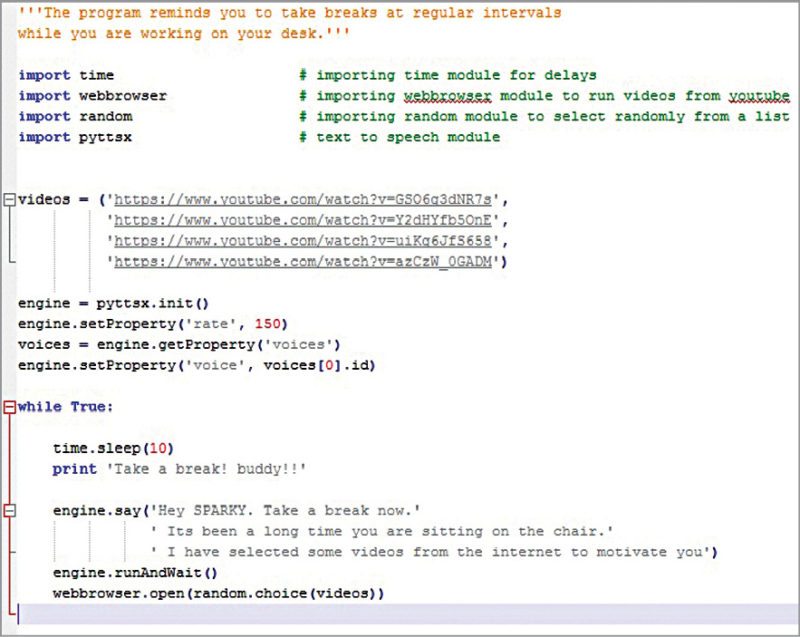
Start writing the program in IDLE. The complete program has been provided in takabreak.py file (Fig. 12), and it is recommended to copy the code from this file, or use the file as it is, because Python is an indentation-sensitive language.

Importing modules
Let us start with importing different modules that would be required in the program.
import webbrowser
# importing webbrowser module to run videos from youtube
import random
# importing random module to select randomly from a list
import time
# importing time module for delays
import pyttsx
# text to speech module
The first three modules are packaged with Python standard library, so you do not have to install these. You can check all different modules in Python standard library from https://docs.python.org/2/library/
The fourth module (pyttsx) does not come packaged with Python standard library. So it needs to be installed before importing in the program. This module is used for making audio announcements.
Pyttsx installation
This project requires conversion of text to speech. To achieve this, a ready-made Python package called pyttsx is available. It provides the text-to-speech synthesis facility and is tested on Windows, Linux and Mac.
To install pyttsx package, you need a package manager like pip, which automatically downloads all necessary files. It also puts the files in correct directories to set up the system.
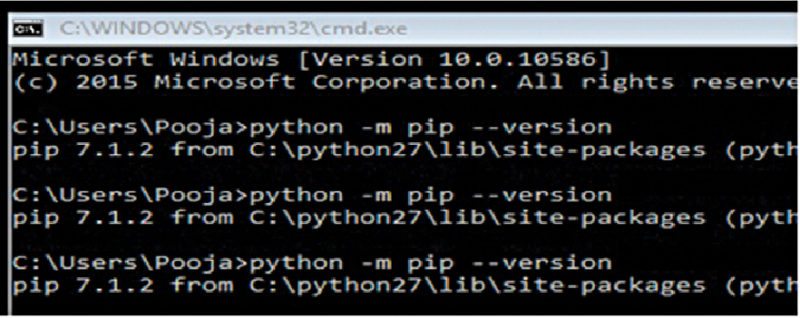
Python 2.7.11 already has this package included. To check if pip is installed, run the following command on Command Prompt (Fig. 13):
python -m pip –version
If pip is installed, the response will be something like:
pip 7.1.2 from C:\python27\lib\
site-packages (python 2.7)
Run the following command in Command Prompt to install pyttsx:
python -m pip install pyttsx
If you see the message to upgrade pip version, upgrade it by running the following command in Command Prompt:
Python -m pip install –upgrade pip
This completes the installation of pyttsx.

Installation of pywin32
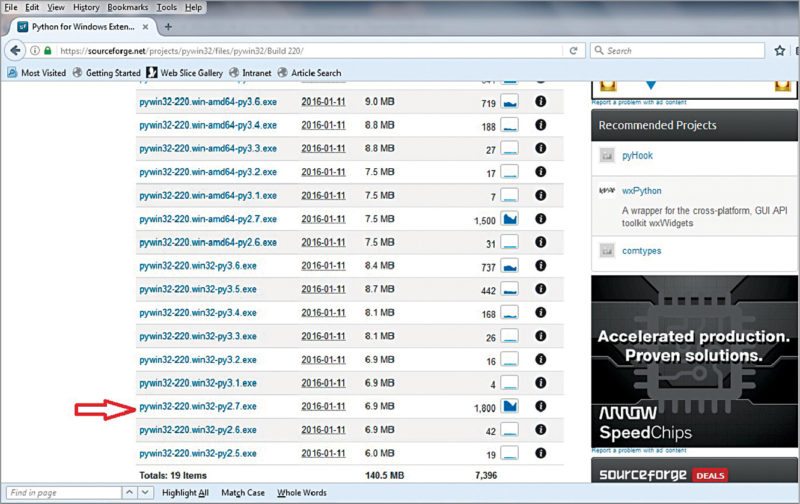
pyttsx package is dependent on pywin32, so install it by downloading the same from https://sourceforge.net/projects/pywin32/files/pywin32/
The window shown in Fig. 14 will appear. Download the correct file depending on your Python version and its architecture installed on your PC. (Remember the Python version noted in previous steps.) In this case, it is the one highlighted in Fig. 14.

Once downloaded, install the file. Make sure that while installing, all applications using Python should be closed. This completes the installation of pywin32.
Functions used
1. pyttx setup functions:
engine = pyttsx.init() # initialise text to speech engine
engine.setProperty(‘rate’, 150) # set speech rate
voices = engine.getProperty(‘voices’) # set voice property
engine.setProperty(‘voice’, voices[0].id) # set female voice
Above functions initialise text-to-speech engine and set various parameters.
2. To play audio message:
engine.say(‘Hey SPARKY. Take a break now.’
‘ Its been a long time you are sitting on the chair.’
‘ I have selected some videos from the internet to motivate you’)
This is the audio message that will be played every time the software has to remind you to take a break.
3. Function used to play video from youtube:
webbrowser.open(random.choice(videos))
This will play random videos from the list in the program as given below:
videos = (‘https://www.youtube.com/watch?v=GSO6g3dNR7s’,
‘https://www.youtube.com/watch?v=Y2dHYfb5OnE’,
‘https://www.youtube.com/watch?v=uiKg6JfS658’,
‘https://www.youtube.com/watch?v=azCzW_0GADM’)
The list can be further extended and any number of videos can be added.
4. To set time for breaks:
time.sleep(10)
Please note that ten seconds time is only for testing purpose. If you want to set the breaks to every two hours, you need to replace it with 7200.
Running the program
Run Python IDLE→File→Open.
Open takabreak.py file.
Click on Run→click Run Module.
This opens the interpreter that will print ‘Take a break! buddy!!’ and there will be audio announcement. There will also be a randomly-selected video that will start running in the browser.
The program can be terminated by pressing Ctrl+c keys in the interpreter window. You can also double click takabreak.py file to directly run it on Windows.
Download source code
For reading other interesting Software Projects: click here
This article was first published on 30 June 2017 and was updated on 31 March 2020.


