Counting the revolutions per minute (RPM) of motors—determining the motor speed— is essential in the field of industrial automation. It is useful especially for closed-loop control systems where proper action can be taken in case the actual RPM deviates from the set RPM.
Here is a project based on microcontroller AT89C4051 that measures and shows on an LCD the RPM of a running motor. Using a proper transducer, first the rotations of the motor are converted into pulses. The generated pulses are counted by the microcontroller for a fixed time (say, one second). The count is multiplied by a factor to get the exact RPM and then displayed; if time is one second, the factor is 60.
Circuit description

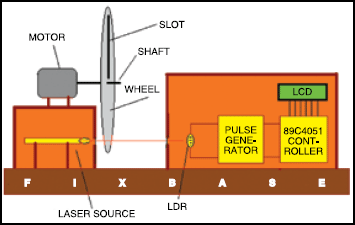
Fig.1 shows the block diagram of the RPM counter based on AT89C4051 microcontroller that generates pulses for every rotation of the motor, counts them and shows on the LCD. On a fixed base, there is a laser source on one side and the combination of a light-dependent resistor (LDR), pulse generator, microcontroller and LCD on the other side. Both the arrangements are housed in separate wooden cabinets such that the laser beam falls directly on the LDR. The motor is placed on top of the laser source. A slotted wheel is attached to the motor shaft. The wheel is so big that it can interrupt the laser beam falling on the LDR.
As the motor rotates, the slotted wheel also rotates. The laser beam falls on the LDR whenever the slot aligns with the laser beam and LDR, producing one pulse. Thus the rotations of the motor are converted into pulses that can be counted by the program in the microcontroller. Pulses are counted for one second. The pulse count is multiplied by 60 (because 1 RPM = 60 RPS) and finally shown on the LCD.


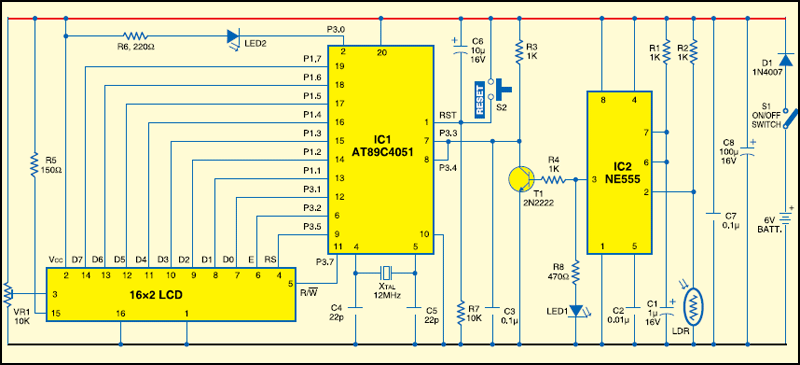
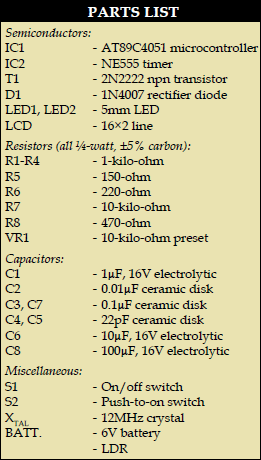
Fig.2 shows the circuit of the RPM meter. It comprises microcontroller AT89C4051, timer NE555, LCD module (16×2 line) and a few discrete components. Timer NE555 is configured as a monostable multivibrator whose time period depends upon the combination of resistor R1 and capacitor C1. Trigger pin 2 of NE555 is pulled high via resistor R2. The LDR is connected along with resistor R2 to pin 2 of NE555 such that when the laser light falls on the LDR, pin 2 goes low to trigger NE555.
The output from pin 3 of NE555 is inverted by transistor T1 and fed to port pins P3.3 and P3.4 of the microcontroller. LED2 is connected to port pin P3.0 (pin 2) of the microcontroller. Data pins D0 through D7 of the LCD are connected to port pins P1.0 through P1.7 of the microcontroller, respectively. Control pins E, RS and R/W of the LCD are connected to port pins P3.2, P3.5 and P3.7, respectively. A 12MHz crystal connected between pins 4 and 5 of the microcontroller, along with two 22pF capacitors C4 and C5, generates the basic clock frequency. Power-on reset is derived with the combination of resistor R7 and capacitor C6. Switch S2 is used for manual reset.
Operation
1. As the motor starts rotating, the laser light falls on the LDR when the slot aligns with the laser beam and LDR.
2. Every time the motor completes one rotation, the monostable (NE555) triggers to generate one pulse, which is indicated by LED1. So LED1 blinks at the rate of motor speed.
3. As the first pulse arrives, it generates an interrupt for the microcontroller and immediately the microcontroller starts counting the pulses. This is indicated by LED2. The LCD shows the message “Counting RPM…”
4. The microcontroller counts the pulses for a period of one second. Thereafter, LED2 shows the message “Counting finished…” and goes off. The microcontroller stores the count and multiplies it by 60 to give the final RPM count
5. The count is in hex format, so you have to convert it into decimal first. As the LCD accepts only ASCII values, the decimal values are converted into ASCII and shown on the LCD one by one.
6. Now if you press RST switch, the process repeats.
Software
The software for the RPM counter is written in ‘C’ language and compiled using Keil μVision3 compiler. Burn the generated ‘.hex’ file into the microcontroller using a suitable programmer. The source program is well commented and easy to understand
The various functions are detailed below:
1. Main function initialises the timer, LCD, ports, etc, displays the message “RPM counter,” clears the timer content and enables the external interrupt. It remains in the loop till ‘rpm flag’ (flag) is not set. When the RPM counting completes, it displays the RPM value if it is within the range.


