 Raspberry Pi is an excellent platform to learn programming and interfacing of a computer with the real world. But it is always annoying to move to a completely different setup to design applications around Raspberry Pi. Also, the handling of additional stuff like monitor, keyboard, powered USB hub and mouse all over the place is also a terrible pain. Soon you will get tired of all these.
The solution to this problem is hidden in the word ‘remote access.’ Remote access to Raspberry Pi can really help save you from all the clutter. You can do all sort of interesting stuff using your very own existing desktop without the need of connecting anything other than the power adaptor and Ethernet cable/Wi-Fi adaptor to Raspberry Pi. You will be able to remotely access Raspberry Pi over the local network.

There are several ways of doing this. Here we discuss the simplest among them, which uses secure shell (SSH) and virtual network connection, respectively.
Basic setup required
- In Raspberry Pi, insert the SD card with a good image of the operating system (refer to ‘Getting Started With Raspberry Pi’ in EFY April 2013 issue).
- Power it up.
- Set up the network on Raspberry Pi (refer ‘Set Up Network for Raspberry Pi’ in EFY May 2013 issue).
The network should be up and running before you configure Raspberry Pi for remote access.
Remote access to Raspberry Pi using SSH
SSH is nothing but a network protocol for secure data communication between two networked computers that are connected via a secure channel over an unsecured network. Here we access Raspberry Pi from a desktop computer over a local network using SSH.
With the help of SSH, you can effectively open a terminal session on Raspberry Pi from a host computer.
The first thing that you have to do is to enable your Raspberry Pi for using SSH. You can easily do this when you boot Raspberry Pi for the first time through ‘raspi-config’ utility. This utility appears automatically when you boot Raspberry Pi for the first time. If you missed to do this configuration setting during the first boot, don’t worry, you can still do it easily by following these steps:
1. Open LX terminal on Raspberry Pi and enter the following command (refer Fig. 2):
sudo raspi-config
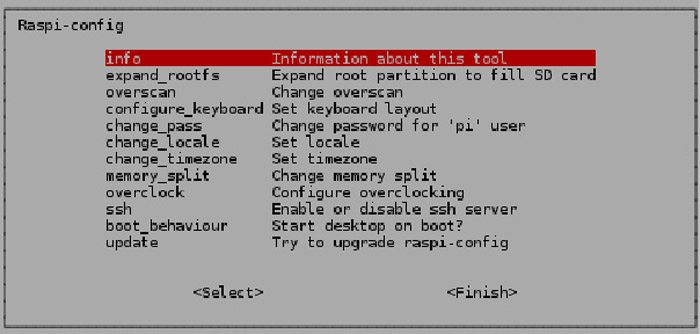
2. Now press ‘Enter.’ You will immediately see a window for raspi-config utility (refer Fig. 3) from where you can do the configuration for SSH.
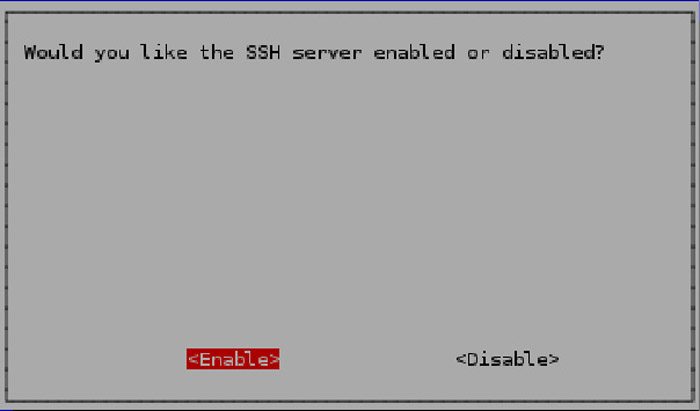
3. To enable the SSH server, scroll down to ‘ssh’ and hit ‘Enter.’ You will see another window as shown in Fig. 4.
4. Now press ‘Enable’ to enable your Raspberry Pi for using SSH. You will immediately see a script running and a confirmation message displayed as shown in Fig. 5.

Now that you have done the setup for Raspberry Pi, move to the other computer from where you would like to remotely access Raspberry Pi.
If you use Windows on your computer, follow these steps:
1. Download open source software ‘puTTY’ from https://www.putty.org. Install the software by running the downloaded executable file.
PuTTY is an SSH and telnet client, developed originally by Simon Tatham for the Windows platform. This open source software is available with source code and is developed and supported by a group of volunteers.
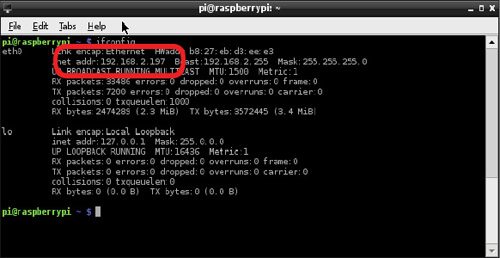
2. Find out the IP address of Raspberry Pi. Open LX terminal on Raspberry Pi and issue the below-mentioned command:
sudo ifconfig
You will get information as shown in Fig. 6. Note down the IP address.
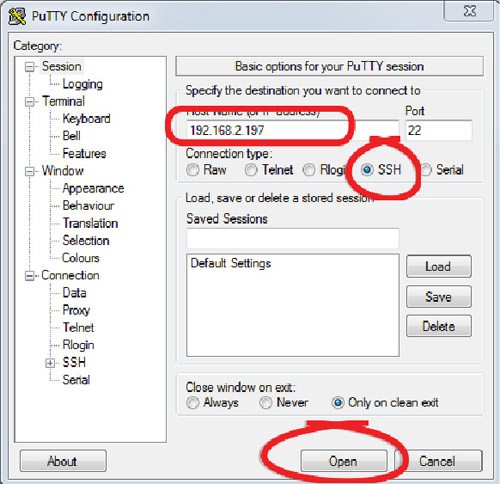
3. Run PuTTY on your computer, enter the IP address as shown in Fig. 7 and click ‘Open.’
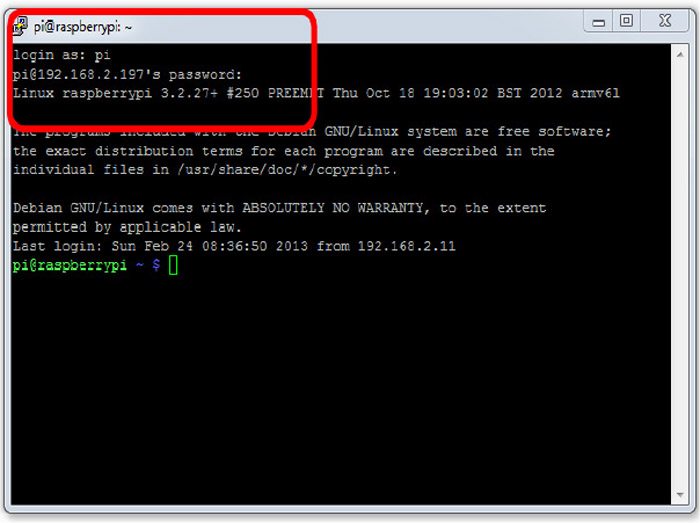
This brings on an SSH window. Ignore all the warnings.
Enter below-mentioned details to get your session up and running at Raspberry Pi:
Login: pi
Password: raspberry
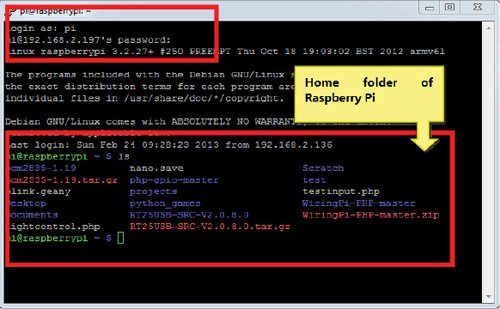
Now on entering ‘ls’ command in the terminal session, you will see all the directories of Raspberry Pi (see Fig. 8).
If you use Linux on your computer, follow these steps:
1. Open the terminal and enter command:
ssh xxx.xxx.x.xx -l pi
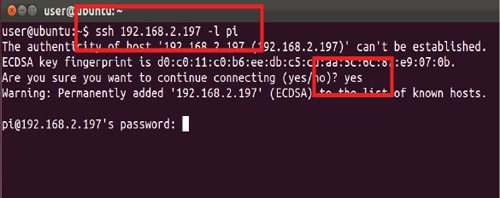
Replace xxx.xxx.x.xx with the IP address that you got after ‘ifconfig’ command. ‘-l pi’ indicates that you want to login as user ‘pi’ (refer Fig. 9).
2. Ignore any security warning and enter the password. The terminal will change into a terminal session at Raspberry Pi.
3. Enter ‘ls’ command to verify.
Now you have successfully accessed Raspberry Pi using the terminal session. For experienced Linux users, the terminal session is enough for everything they would like to do on Raspberry Pi, especially electronics interface. But for beginners, this can be a problem.
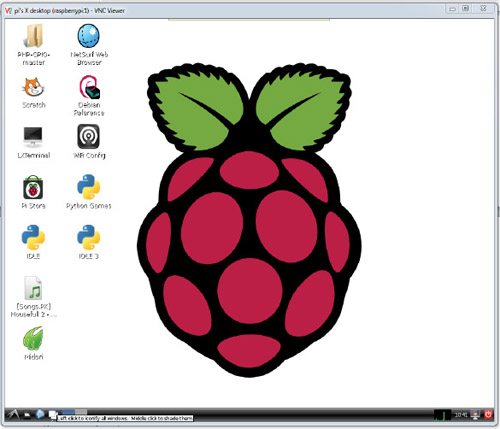
The next way to remotely access Raspberry Pi also allows you to see the GUI of Raspberry Pi just like the way you would see it on Raspberry Pi itself as shown in Fig. 10.
Remote access to Raspberry Pi using VNC
If you want to see the GUI of Raspberry Pi just the way it is and control it with a mouse, VNC (virtual network connection) is a tool just to do that.
In order to use VNC to see the graphical view with a remote, you will have to install some VNC application on Raspberry Pi.

Follow these steps:
1. Open SSH terminal and enter below-mentioned commands to install ‘tightvncserver’ on Raspberry Pi (refer Fig. 11):
sudo apt-get update
sudo apt-get install
tightvncserver
Type ‘Y’ when prompted for installation.
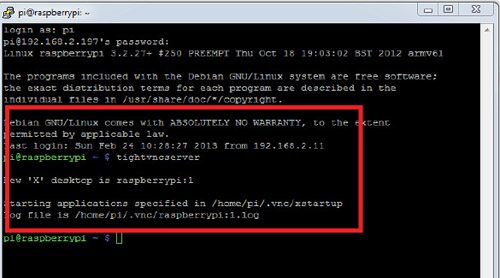
2. Run VNC server by entering the following command in SSH session (refer Fig. 12):
tightvncserver
This prompts you to put a new password and confirm it. Say ‘no’ to read only password when prompted.
Now VNC server is running on Raspberry Pi. Let us try connecting to it from the desktop computer:
3. Install some VNC client like VNC viewer from ‘www.realvnc.com,’ which works well with ‘tightserver.’
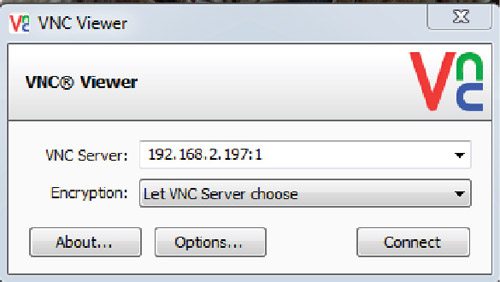
4. Run VNC viewer and enter the IP address as shown in Fig. 13:
5. Use append: 1 to indicate the port. Click ‘Connect.’
6. Ignore all the warnings.
7. Enter the password selected in step 2 and press ‘Connect.’
You will immediately see a window as shown in Fig. 10, which is actually Raspberry Pi accessed from your desktop. Now you can do everything that you would like to do with Raspberry Pi with the comfort of your own desktop/laptop computer.
The author is working as an assistant manager at Samtel Avionics & Defence Systems


