 You can use this laser-based intruder alarm conveniently at the entrance of a hall or any other similar location to protect the same from unauthorised access as and when desired. Its range can be extended further to protect the perimeter of a building from unauthorised intrusion by using a cascade arrangement of multiple alarms.
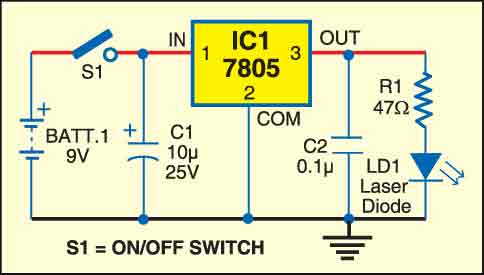
The circuit consists of a transmitter and a receiver. The transmitter circuit (shown in Fig. 1) is nothing but a laser diode (LD1) driven by a 9V PP3 battery. The output of IC1 is regulated 5V as long as its input remains equal to or more than 7.5V, thus ensuring a constant drive current for the laser diode. The battery (Batt1) is connected to the circuit through switch S1.

The laser diode (LD1) can be replaced with a laser pointer (torch) emitting red laser beam. The laser pointer itself can be used as a transmitter. The pointer has in-built series resistance, on/off switch and battery.
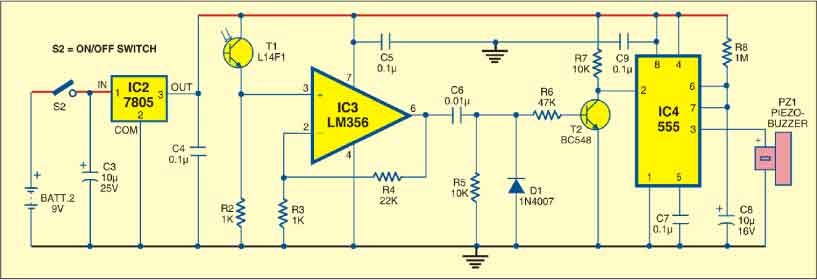
The receiver circuit (shown in Fig. 2) is basically a current-to-voltage converter built around IC LM356 (IC3). The output of IC3 is fed to the monostable built around 555 timer (IC4). The high output of the monostable drives the piezobuzzer to sound an audio alarm.

The receiver section operates off 5V DC generated from another 9V battery and voltage regulator IC 7805 (IC2). The battery (Batt.2) is connected to the circuit through switch S2.
When the laser light transmitted through LD1 falls on phototransistor T1,the output of the op-amp (IC3) at its pin 6 remains high. In this condition, the output of IC4 remains low and the buzzer does not sound.
When the laser beam falling on phototransistor T1 is interrupted by someone, the output of op-amp IC3 goes low and IC3 produces a pulse. This pulse triggers monostable IC4 and its output goes high to sound the alarm for a time period of about R8xC8.
Assemble the transmitter and receiver circuits on separate general-purpose PCBs and enclose in suitable cabinets. Mount the transmitter and receiver units on opposite pillars of the entrance, aligning the two such that the laser beam from the transmitter directly falls on the phototransistor. Block the laser beam with your hand and measure the op-amp output. It should not be low. At pin 3 of IC4, you should get a positive-going pulse of one-second duration beginning with high-to-low edge of the trigger pulse appearing at pin 2 of IC4 or collector of transistor T2.


plz send pcb layout
IT IS THE SAME TO USE LF356 BECAUSE I CANT FIND LM356 ANYWHERE
I HAVE THE LAYOUT 3X1.5PCB AND IM TO TEST THIS BUT ITS NOTWORKING I CANT FIND LM356 SO I USED LM358 INSTEAD BUT ITS NOTWORKING ILL SHOULD TRY LF356? I FOUND SOMEONE ON NET USE LF356 BUT ITS OK ? IF NO REPLY IT MEANS THIS PROJECT WONT WORK SAD TO SAY GG OODBYE SCHOOL!!!
use this TL071A, TL081, LF356 instead of using LM356 or LM
358
Hi.Has anyone designed this project? It works?