 Washing machines usually employ a single-phase motor. In semi-automatic washing machines, a purely mechanical switch controls the timing and direction of the motor. These switches are costly and wear out easily. Presented here is a washing machine motor controller for single phase motors of washing machines (Fig.1) that efficiently replaces its mechanical equivalent.
Basically, a single-phase motor requires a master timer, which decides the time for which the motor should keep rotating (washing time), and a spin direction controller, which stops the motor for 3 seconds after every 10 seconds and then resumes rotation in opposite direction.
Washing machine motor controller circuit

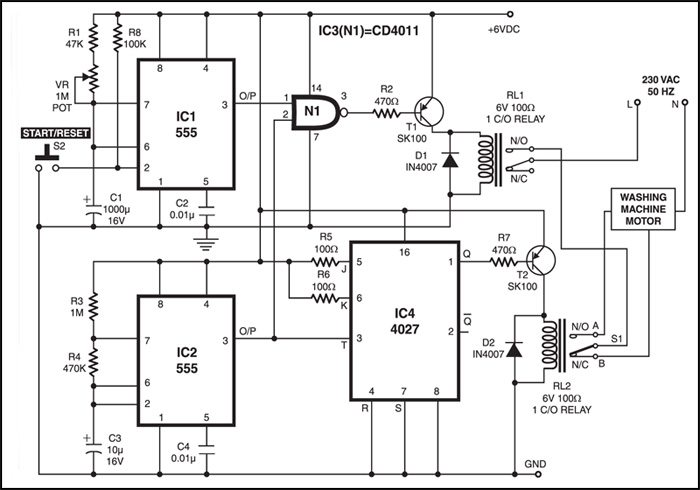
Fig.1: Circuit diagram of washing machine motor controller
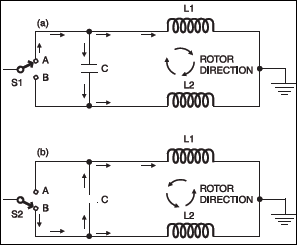
The direction of rotation can be controlled as shown in Fig.2. When switch S1 is in position A, coil L1 of the motor receives the current directly, whereas coil L2 receives the current with a phase shift due to capacitor C. So the rotor rotates in clockwise direction (see Fig.2(a)). When switch S1 is in position B, the reverse happens and the rotor rotates in anti-clockwise direction (see Fig.2(b)). Thus switch S1 can change the rotation direction.

The motor cannot be reversed instantly. It needs a brief pause between switching directions, or else it may get damaged. For this purpose, another spin direction control timer (IC2) is employed. It is realised with an IC 555. This timer gives an alternate ‘on’ and ‘off’ time duration of 10 seconds and 3 seconds, respectively. So after every l0 seconds of running (either in clockwise or anticlock-wise direction), the motor stops for a brief duration of 3 seconds. The values of R3 and R4 are calculated accordingly.
The master timer is realised with monostable IC 555 (IC1) and its ‘on’ time is decided by the resistance of 1-mega-ohm potmeter VR. A 47-kilo-ohm resistor is added in series so that even when the VR knob is in zero resistance position, the net series resistance is not zero.
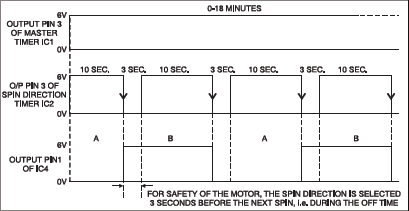
The on-off cycle in the master timer should go on only for the set time (here it is 18 minutes). Once the master timer goes off, the cycle should stop. To achieve this, the outputs of both the timers are connected to NAND gate N1 (IC3), which gives a low output only when both the timers are giving high outputs.The output pin 3 of N1 is connected to relay RL1 via pnp transistor T1, so the relay energises only when the output from NAND gate N1 is low. As the mains 220V line is taken through relay RL1,the monitor turns off during the 3-second off period after the set time of 10 seconds is over. The graph is shown in Fig.3.

During ‘on’ time of spin direction timer IC2, the output of negative- edge triggerd JK flip-flop at pin 2 goes low to energise relay RL2 and washing machine motor rotates in one direction. During the off time of IC2, the output of N1 goes high again to de-energise relay RL1, which cuts off the mains supply to RL2 and the monitor stop rotating.
Floating point trouble may occur at trigger pin 2 of IC1. Resister R8 over comes this problem by holding pin 2 high.
Feel interested? Check out other projects in the circuit section.


Can you explain how S1 changes from A to B in that 3 sec stopping time? What is its mechanism?
Dear Sir, Where can I buy the assembled circuit / or kit in Pune
regards
Comment:it’s good
Can we do the same thing for a fully automatic washing machine.
There are a lot of old machines that has good mechanical parts but with controller, timer or circuit failing, if that can be replaced, those will run forever as they are made with good materials, not flimsy new stuff.
It is the best circuit for washing machine. Please advice how we can add a buzzer to intimate the main time completion. Waiting for your early reply. Thanks and Best Regards, Shoaib Khan
You can connect a buzzer at pin 3 of IC3(N1).
Thanx and Best Regards
You are most welcome.
Sir, I am making this circuit and I am facing a problem because SK100 transistor not available in market.
I am not living in India. Please guide about equivalent transistors that may work instead. Thanx and Best Regards,
You can replace SK100 with CK100 PNP transistor. They are available online.
Sir….
I am little bit confused in (RL2) it has 2 out put to washing machine motor (point A and B) also you have contacted a (N) point from the source as per the ckt digram. But motor has to terminal so where I connect the A & B terminal,will I take A & B as an common point and connect to the single point of the motor and connect the (N) with another terminal of the Motor from the source.or their is any other solution for the same please guide me what to do in this.
Sir, please will you give me a brief introduction of motor because tomorrow I have a presentation on digital washing machine
Can we make Front load machine motor driver ???
Yes, it is possible