
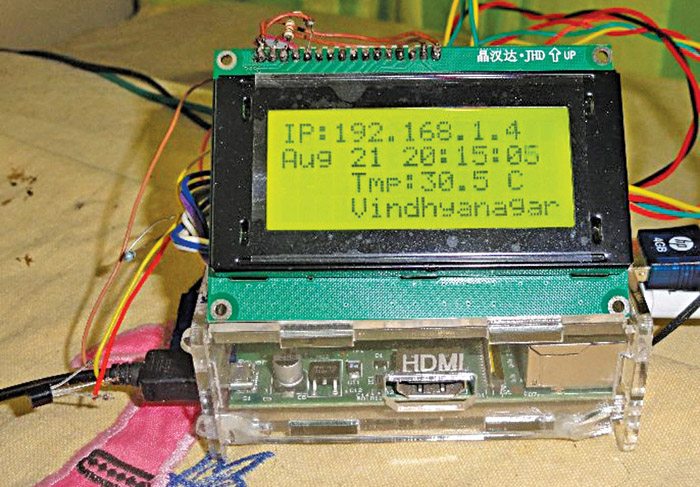
 With just two simple Python files, an inexpensive LCD display and a low-cost digital temperature sensor, you can turn Raspberry Pi into a beautiful LCD clock with IP address and temperature indication facility. There will still be a few GPIOs available to hook up other systems such as an alarm triggered by temperature or time threshold. Since we will be using quite a handful of data, it is better to use a four-line LCD display with characters not less than 16 per line. Fig. 1 shows the author’s prototype.
Circuit and working
Fig. 2 shows the pin configuration of the Raspberry Pi. The GPIO connector has seven true GPIO pins, I2C interface, SPI interface, serial TX/RX pins and PWM pins that can be used to control external hardware.
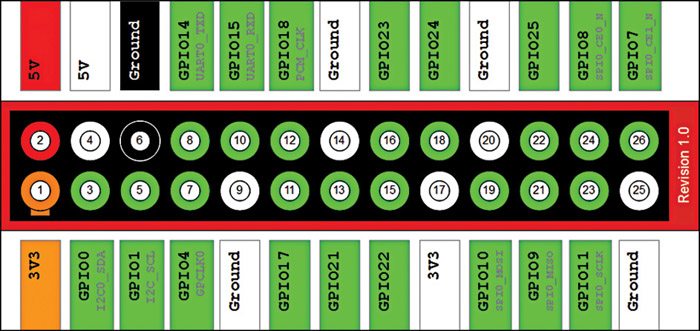
Fig. 3 shows the connection scheme for the clock. The main components used are Raspberry Pi board, temperature sensor DS18B20 (IC1) and 4×20 LCD module. IC1 is a heat sensor with an operating range of -55°C to +125°C. It can derive power directly from the data line, eliminating the need for an external power supply. But, in this project, we have used 3.3V output from Raspberry Pi to power it. The system works on one-wire protocol. Output of temperature sensor IC1 is read by GPIO4 (pin 7) of Raspberry Pi.

Make all the connections as per Fig. 3 and ensure that a small resistor (4.7K to 10K) is connected between data pin 2 and power pin 3 of IC1 to pull-down data-out signal.
Switch on your Raspberry Pi and touch the sensor (IC1) to see that it is not getting over-heated because of any wrong connection. Once all the connections are checked, follow the instructions in software section below to load the temperature sensor module and the clock. The IP and temperature will appear on the LCD.

Software
It is assumed that your Raspberry Pi is already set up with Raspbian ‘wheezy’ operating system. If not, you can refer ‘Getting Started with Raspberry Pi’ article published in April 2013 issue to set it up.
Now, all you need is a network connection for Raspberry Pi to install all the software. Refer ‘Set Up Network for Raspberry Pi’ published in May 2013 issue for getting the network connection up on your Raspberry Pi. Once done, you can either connect a keyboard and a display to Raspberry Pi and start following the installations using Lx terminal, or you can access Raspberry Pi remotely using SSH and execute all the commands directly.
After login to Raspberry Pi, load the DS18B20 module and get the temperature data ready for viewing, using the commands:

$ sudo modprobe w1-gpio
$ sudo modprobe w1-therm
You will need ID number of the DS18B20 module to read the temperature through the application program. You can get the ID using the command mentioned below, as shown in Fig. 5:
$ ls /sys/bus/w1/devices/
The ID in our case is 28-000004ee2c8a. In your case, it will be similar but certainly different. Note this ID as it will be used in the application program to get the temperature data.


Download Source Code: Click Here
The application program is written using Python programming language. Download the source code (iptalk1.py and iptalk2.py).
Create a new file with the name iptalk1.py and open it in nano editor, using the command mentioned below, as shown in Fig. 6:

$ sudo nano iptalk1.py
Copy the source code from the downloaded file iptalk1.py to this new file created in Raspberry Pi. Save it by using ctrl+o and then exit through ctrl+x.
Similarly, create another file with the name iptalk2.py in the same directory and open it in nano editor, using the command mentioned below, as shown in Fig. 7:

$ sudo nano iptalk2.py
Copy the source code from the downloaded iptalk2.py file to this new file created in Raspberry Pi. In this code, you will have to make the changes for the temperature module ID noted in Fig. 5. Change the ID in the section mentioned below and save the file using ctrl+o and then exit through ctrl+x.
try:
while True:
tfile = open(“/sys/bus/w1/
devices/28-0000049582dd/w1_slave”)
text = tfile.read()
tfile.close()
secondline = text.split(“\n”)[1]
temperaturedata = secondline.
split(” “)[9]
temperature =
float(temperaturedata[2:])
temperature = temperature / 1000
temp = ‘Tmp:’+str(temperature)+’ C’
Please note, the indentation of the copied code in above two files should exactly be the same. Python is sensitive to indentation.
Finally, run the source code using the command below, as shown in Fig. 8, and you will see the LCD display shown in Fig. 1:

$ sudo python iptalk2.py
For making it work on every boot, open the ‘/etc/rc.local’ file in nano editor, as shown in Fig. 9. Then, add the line ‘sudo python /where-your-file-is/iptalk2.py’ in the beginning.

Now, every time you boot your Raspberry Pi computer, the program will execute automatically and the LCD will display all the information, as shown in Fig. 1. Touch the temperature sensor and see the temperature on LCD increasing.
The author is an avid user of open source software. Professionally, he is a thermal power expert and works as an additional general manager at NTPC Limited.
