


 Noise pollution is a growing problem in modern cities, thanks to rapid population growth, urbanisation and new technologies. Moreover, at times, a noisy neighbour or co-worker can drive you crazy and affect your well-being.
Talking loudly is an annoying habit in an office environment. Having a loud co-worker can distract us from our work and harm our productivity. To help solve this problem, we bring to you today a noise detector with automatic recording system. This device notifies users whenever it detects loud noise (when the sound crosses certain limits), as well as it automatically records the sound and saves this recorded sound in a file.

This Noise Detector System can be used in library, office and classroom environments to identify noisy people so that necessary action can be taken against them.
To build this device, we need to first collect a few components.
Components Required
- Vibration motor/ Buzzer
- Bluetooth HC 05
- Sound sensor module
- Wires
- Arduino Nano
Coding
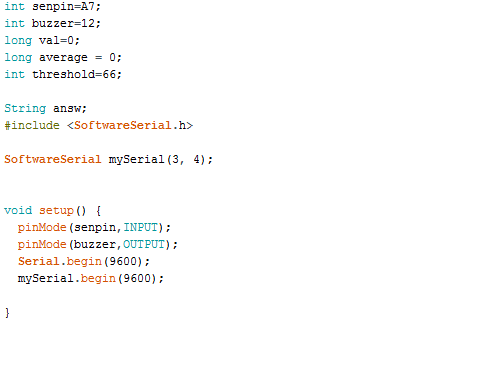
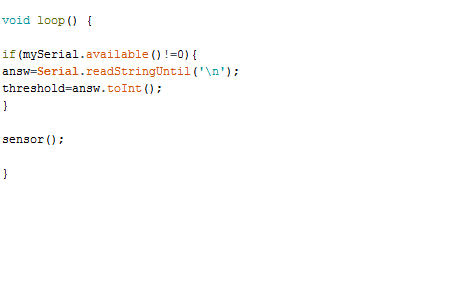
First, we will initialise the different variables in our code to store values and pin numbers and then include the Software Serial library. After this, we will set the Pin modes for the Arduino pins and the baud rate for Bluetooth. Following this, we will set a loop function where we will create an ‘if condition’ that checks the incoming number from Bluetooth. This number is used for setting the threshold level for noise sensor. Then the loop function jumps to other function (i.e. sensor) that collects the average sensor data (Refer Fig 1).
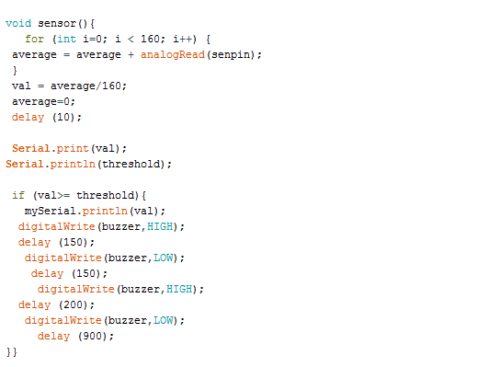
In sensor function, we will create a ‘for loop’ that collects the sensor data until the for loop ends (up to 160 times) and calculates the average of the collected data. After that an ‘if condition’ checks the average, if the average value is greater that the threshold value then it sends the value to an app that we are going to make in next part (Refer Fig 3).
App Making
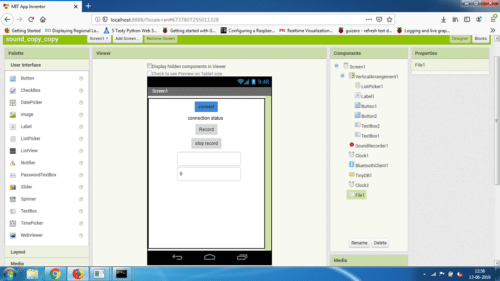
We are going to use the MIT app inventor for creating our app. In the first part, we need to create a layout and add the following components
- A list picker
- A text level
- 2 buttons
- 1 text view
- Sound recorder
- Tiny DB
- Bluetooth client
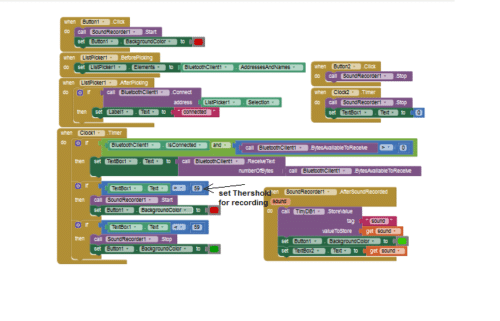
After that join the code blocks according to fig 4 .
Connection
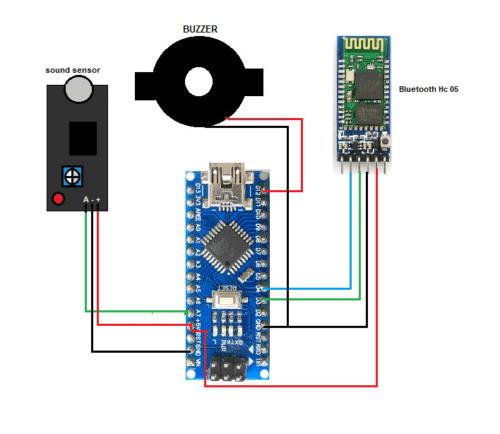
Now connect all the components as illustrated below (Refer Fig 6).
| Arduino Nano | Components |
| Pin A7 | Sound Sensor Out |
| 5v | VCC Bluetooth & Sound sensor |
| GND | GND Bluetooth & Sound senor |
| D4 | RX |
| D3 | TX |
| D12 | Buzzer VCC |
| GND | Buzzer GND |
Testing
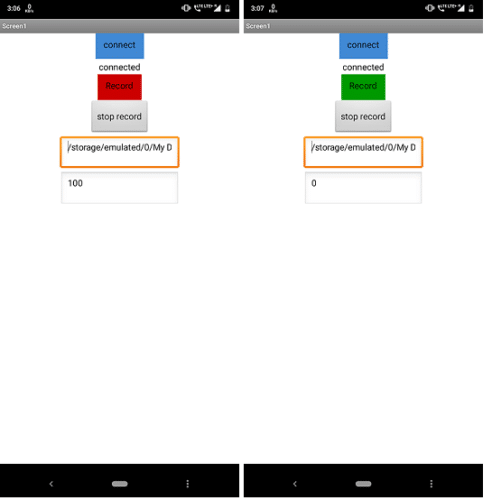
Now, power the Arduino and connect the Bluetooth with your app. After successful connection, you can test it by making loud noises. When your sound level crosses the threshold value, the Noise Detector device will buzz to notify about it and at the same time the app will start recording the sound and it will go on recording until the noise level comes down below the threshold level. (Refer Fig 7).
Download Source Code
If you found this IoT project useful then you may also like Top 30+ IoT Projects | IoT Project Ideas for Enthusiasts.
the project idea is nice.
But when i create the app it is not working.
i have also used the app provided by you.
could you please help me
Yes ,why not what problem are you facing can you elaborate.
Hi
Thanks for your help, you are doing well
But I need your help to my project.if it is possible we can talk to this email
: [email protected]
Thanks.
You can reach me out on what’s app 7061350809 for any more assist in project or modification as per you need
It’s showing BAD ARGUMENT error!How do I solve it?
Try to set hint text in some number like zero in text box that compare text.if still give same error send me the whole error details
Whenever I’m connecting the app to the arduino, it shows the error- cannot accept bad arguments [0][59].
Hi, I’m interested in building this project, so could you please tell me the specific parts that were used besides the Arduino nano, so I can buy them and create this project. Also if u could email me a picture of the actual setup that would also be really helpful. Thanks
Hi, My group would like to make this project for a course, so could you please advise what specific parts were used so it would be easier to buy them. Also if you could provide a picture of the Setup it would be really helpful.
Thanks
Hello, My group and I would like to build your project, so please let us know what the specific part models were that were used besides the arduino nano so it is easy to buy them, also a picture of the setup would really help us as well.
Thanks
You can easily buy the arduino nano from online store or from kits n spare. and other parts required are :- loudness sensor / sound sensor and Bluetooth HC 05 all of these are available at kits n spare as well as on online store websites
Hi, i am facing a few issues reagrding the setup. First the buzzer is always on despite no set threshold value. Then once any value is set it records it despite the volume level, then when a value is put, it records it for a few seconds and atomatically swtiches off despite the high level of sound.
check the value of sensor on serial monitor and watch what is the value of sensor on no noise and what is its value on high noise and set the threshold value according to your sensor high noise value.
Hi,
I keep receiving the following error messages when connecting the MIT application to my Mobile phone. Ive tried changing the numbers on the threshold recording as you stated above but i seem to keep having an issue.
“The operation > cannot accept the arguments: , [*empty-string*], [60]
Note: You will not see another error reported for 5 seconds.”
How do i resolve this issue?
This is because app is getting empty string from the arduino,
First try to tap out side the pop up message and then try to connect, or tap on back and re open and connect the app.
If didn’t solve then add block in code block if bluetoothbytes.aviliableto recive>0 then call Bluetooth receive bytes
The block which you are talking about is already there in the code block in clock1 block. plz tell!! what to do?
i get full making video
Kindly elaborate your query.
i just want to ask if is there a tutorial video of this project? i rlly cant understand it at all
Hey, is there any online simulator where i can burn this code ??
you can do it on Proteus
Hey Your Idea is really awesome and i simulate it on proteus. It works fine but i faced some issue because my buzzer sound not produce. can you please guide me how can i produce buzzer sound???
Some buzzer have integrated circuits inside hem that produces sound when connecting to power directly, some buzzer doesn’t have that circuit in that case you have to send the sound signal to make the sound. So you can use the Arduino Tone melody library
Some buzzer have integrated circuits inside hem that produces sound when connecting to power directly, some buzzer doesn’t have that circuit in that case you have to send the sound signal to make the sound. So you can use the Arduino Tone melody library
Hello how to do in Proteus can u explain please
It uses the android phone for recording the audio so hard to do in proteus, but you can check the noise detection and the command send by the BlueTooth module with the app
Hello please can u share the Proteus simulation of this project please
My MIT app does not connect the bluetooth with the bluetooth module of arduino. It says couldn’t connect “make sure the device is turned on”. Please help with this.
First power the Bluetooth module then turn on the Bluetooth of the phone then go to settings and click on pair a new device then pair the HC05. Now the Bluetooth HC 95 will appear in app and you can connect the Bluetooth HC 05
Thanks it worked!!
But now I’m getting error.. error while recording sound, pls help
What error Are you getting can you send it. Also, check the app permission for the mic and file storage access
where did the recorded sound come from (either through the sound sensor or through the mobile mic)
The sound sensor is only used for triggering the phone app to record sound. The actual sound is recoe=rded by phonemic
Hi ,could please any one help to solve my issue .I exceute this project using proteus software.but I got an error message Like “ERROR 507 UNABLE TO CONNECT. IS THE DEVICE TURNED ON?”when iam connecting with the laptop (which protues Bluetooth Hc-05 connected to laptop bluetoth) to andriod phone(MIT app)..
I follow this process such as bluetooth HC-05 in proteus connected to laptop bluetooth after that open MIT app try to connect with laptop bluetooth.does this process is right or not ?Please help me
hi i got error message like error 507:unable to connect .Is the device turned on? please solve my problem .iam using proteus software to perform this project.
Your idea is excellent but my Bluestack engine is not starting due to poor PC performance. May Iget .apk file from you because I don’t have knoledge to use MIT App Inventor. If possible please help me out.
.apk file is attached with code folder
i have no knowledge of how to make app
.apk file and code folder where i can find it??
When I give powersupply to the arduino my buzzer starts pee pee sound
What will I do??
Please can you tell values of Resistor and Capacitor you are using??
and is there Full video tutorials of working also?
and can i this app on Play store???
please reply must
Hi. What is your name on facebook so that I can add you. I just want to ask something about this project because all the comments i’ve red keep saying it have an error in coding.Thankss
Ashwini Kumar Sinha , You can reach me on what’s app if need help regarding the project 7016350809. The project is testedby me
Ashwini Kumar Sinha. insta ashwinikumar.sinha.73 you can send me the error code here as well. You might not selected right board in Arduino IDE or have done some change in code cause this error.
What is the scope of this project ..what can I add more and elaborate more in this project can anyone help me out!
Can you give thesis of this project
Can you give the code of this project