


In a previous initiative, the Speech GPT terminal was introduced, which allowed users to ask questions in the terminal and receive spoken answers. This device further enhances the design by using a more powerful board to transcribe audio in real-time.
Audio transcription is useful for recording meeting minutes, converting lectures to text, and various other applications. This device can also aid journalists in transcribing interviews. Here, GPT and a microphone are employed for transcription.
POC Video Tutorial In English
POC Video Tutorial In Hindi
Raspberry Pi Zero is utilised for speech recognition, a form of artificial intelligence programming. Understanding and reproducing phonetics requires significant training and refinement. However, some free open-source software, including Google-STT, can be used for this purpose.

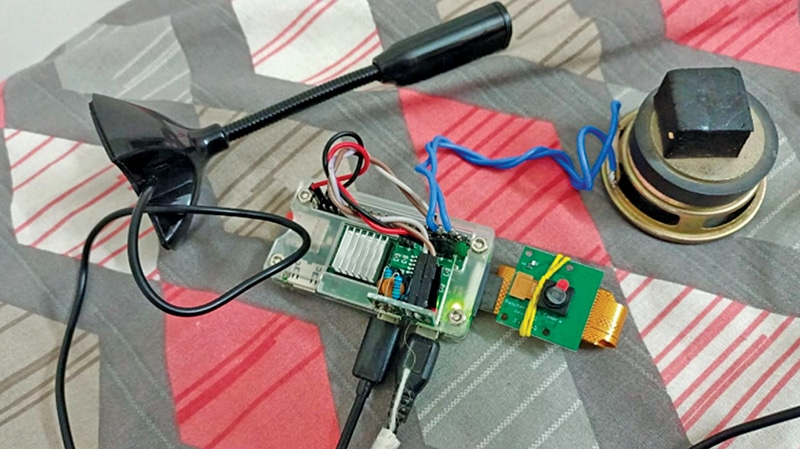
The author’s prototype is shown in Fig. 1. The components needed to build this device are listed in the Bill of Materials table.
| Bill of Materials | |
| Components | Quantity |
| Raspberry Pi Zero | 1 |
| PAM8403 | 1 |
| USB microphone | 1 |
| OTG cable for connecting USB microphone | 1 |
| Capacitor C1, C2 (0.1µF) | 2 |
| Capacitor C3, C4 (10µF, 16V) | 2 |
| Resistors R1, R2 (270-ohm) | 2 |
| Resistors (R3, R4 (150-ohm) | 2 |
| 8-ohm, 0.5-watt speaker | 2 |
| On/off switch | 1 |
Circuit and Working
Fig. 2 shows the circuit diagram for speech transcription on Raspberry Pi Zero. It is built using Raspberry Pi Zero, PAM8403 amplifier, two speakers, and a few other components.

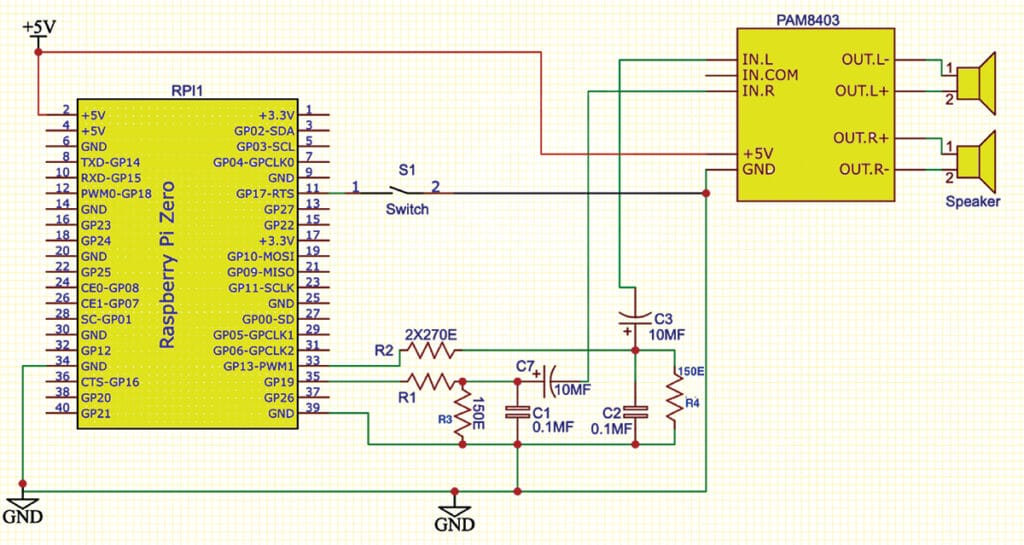
There is no sound output on the Pi Zero board. An HDMI device (for example, a TV) must be connected to the Pi Zero to get sound.
However, there is an easier way, as shown in the schematic. Any two of the four PWM GPIO pins 12, 13, 18, and 19 can be used to force audio output by adding just one line in the ‘/boot/config.txt’ file – [dtoverlay=audremap,pins_18_13].
Open the file, go to the bottom, and add this line, followed by a reboot. Next time, the audio signal will be available on those two GPIO pins. Just add a headphone to the IN-L and IN-R to get sound on the headphones. The PAM8403 amplifies the sound further for a speaker.
Fig. 3 shows the image of the OTG cable for connecting the USB microphone.
$> sudo nano /boot/
config.txt
Add the above line and reboot. For Pi-5 the config.txt may be in another place. This PAM8403 is rated for 5V but works on 3.3V too.
Software Configuration

