 This robot with a camera is placed in a remote location to capture the environment in visual form using Raspberry Pi (RPi). The captured visuals are displayed on the user’s virtual reality (VR) headset.
An added feature allows the camera to move in the direction of the user’s head movements. This gives the user a real-time experience as if he is present where the virtual telepresence robot is located.
The virtual telepresence robot can also be moved in any direction through an app installed in the user’s smartphone.
Virtual reality
The video captured by RPi camera can be viewed on a smartphone placed in the virtual reality (VR) headset. The project lets the user experience virtual reality through VR headset. Dual-screen mode is enabled in the smartphone for this purpose.
The smartphone reads the accelerometer and magnetometer data of the direction in which the user turns his head, say, right or left. This data is sent to the modem over Wi-Fi and to the RPi board, which, in turn, provides these values as inputs to the servo motors.
Two servo motors are used to move the camera—one for the vertical movement and the other for the horizontal movement. So when you turn your head along with VR headset to the right side, the RPi camera will also turn to the right direction.
Circuit and working
The block diagram of virtual telepresence robot is shown in Fig. 1. RPi is the brain of the system. It receives input from the smartphone via Wi-Fi, and then sends controlling pulse to the servo motors to move the RPi camera.
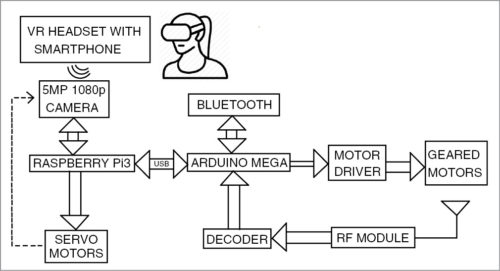
The smartphone also provides input to the Arduino Mega (Board2) for the purpose of navigation or movement of the virtual telepresence robot. The motor driver IC and geared motors are connected at the end of the navigation circuit.
The commands to run the virtual telepresence robot can be sent via Bluetooth or RF module from the smartphone. In this example, Bluetooth is used.
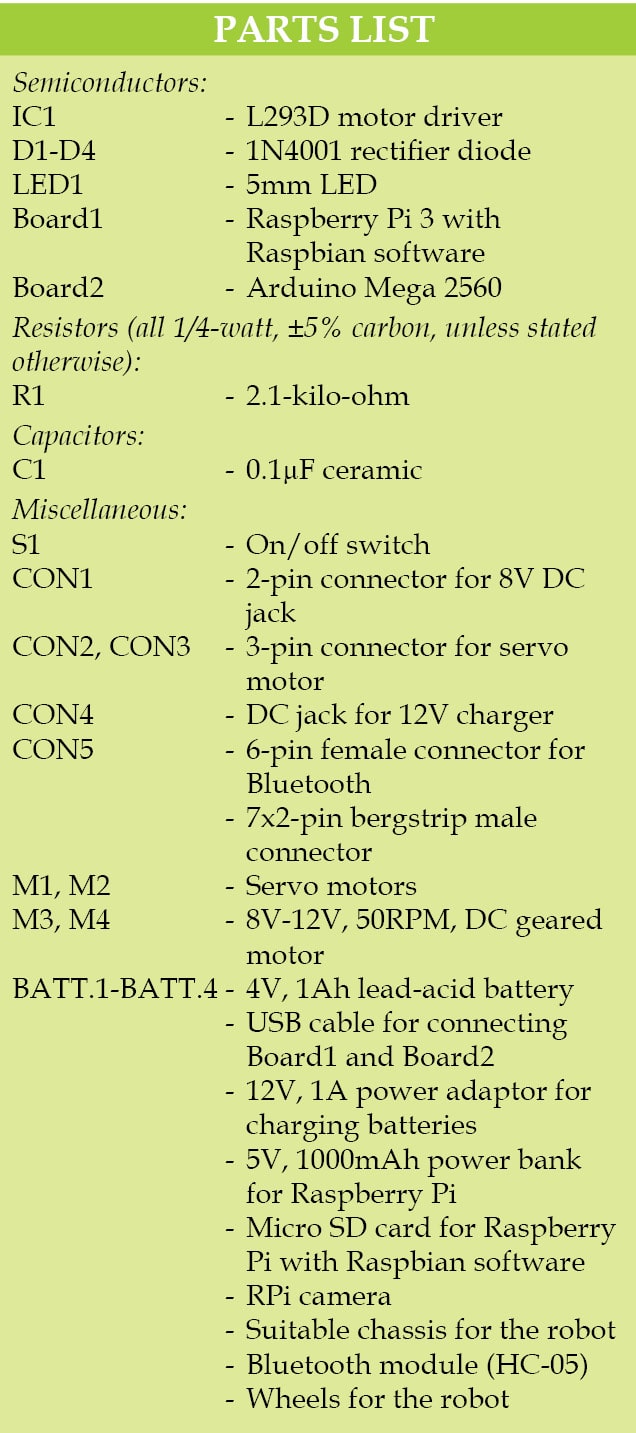
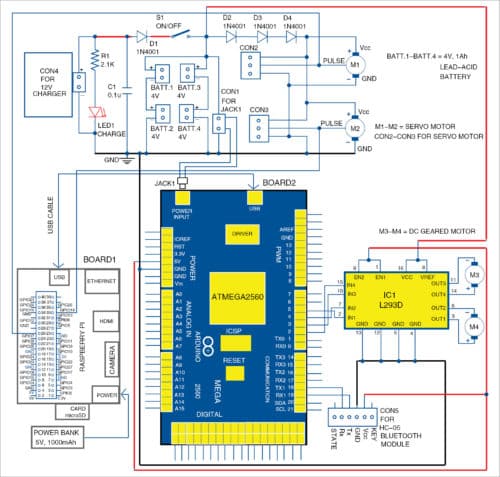
The main circuit diagram of virtual telepresence robot is shown in Fig. 2. The project has following sections: 12V charger, 8V power supply, Raspberry Pi board, Arduino Mega 2560 board, servo motors, DC geared motors and Bluetooth module. Along with these you also require an Android smartphone with relevant app, Python and PHP codes for Raspberry Pi, and Arduino sketch for Arduino board.
Power supply
The first stage of the circuit is a 12V charger for charging rechargeable batteries. Four lead-acid rechargeable batteries, each of 4V, 1Ah, are arranged in series and parallel combination to provide 8V power supply. If the batteries are connected in series, the final voltage gets added up and current remains the same. If the batteries are connected in parallel, current adds up and voltage remains the same. Thus, you get 8V, 2Ah power supply by connecting two each in series and then the two sets in parallel.
Diode D1 is used to block discharging of the battery through LED1 and capacitor C1. The diode also makes the circuit stable and controls temperature while charging.
The 8V power supply is used to power the Arduino, motor driver IC and other modules. When switch S1 is open, the battery supply to servos is cut off. Three series diodes (D2 through D4) reduce the voltage to around 6V for safe operation of servo motors.
A 5V power bank is used to power the Raspberry Pi.
Navigation
The navigation circuit controls movement of the robot. It consists of Arduino Mega 2560 board (Board2), HC-05 Bluetooth module, L293D motor driver (IC1), and two DC geared motors M3 and M4.
Directional data or command from the smartphone is sent to the navigation circuit through HC-05 Bluetooth module. It is processed by the Arduino and then fed to the motor driver IC, which drives the geared motor in the required direction. Commands are given to the Bluetooth Electronics app installed in the smartphone.
First, you need to open the Bluetooth Electronics app and pair with the HC-05 module as shown in Fig. 3. Once the two devices are paired, the buttons are edited in the app and configured with English alphabet characters. Each direction (forward, backward, right and left) is assigned a character. Four buttons are used as shown in Fig. 4. When these buttons are pressed, the corresponding characters get transmitted.

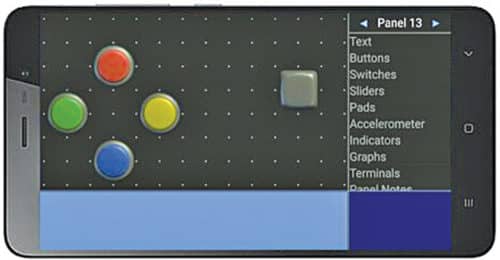
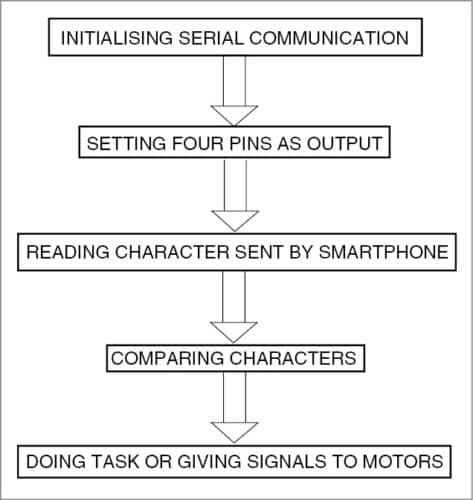
HC-05 Bluetooth module receives the characters and sends these to the Arduino pins (transmitter and receiver). The Arduino processes this data and compares with the Arduino program. The corresponding digital values are sent to input pins of L293D IC. The driver IC provides more current in order to make the motor move in the required direction.
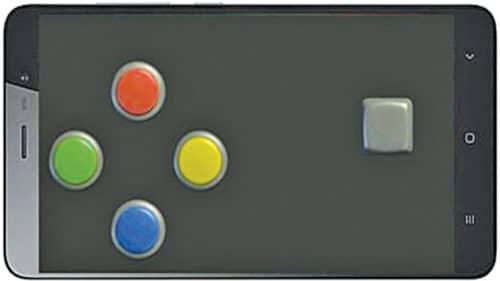
Depending on the data received from the Bluetooth module, the motor moves in forward or backward direction.
There are four wires connected to the geared motors from Board2 having ATmega2560 microcontroller (MCU). Arduino Mega is used because it has 16 analogue channels and can be used to connect different sensors. The flow-chart (Fig. 6) depicts the algorithm used in the navigation program (arduino_bluetooth.ino) burnt into the MCU of Arduino.
Capturing live video. Servo motors are connected to GPIO pins of RPi. In order to control the position of the camera, two servo motors (M1 and M2) are used to move the camera in X and Y directions.
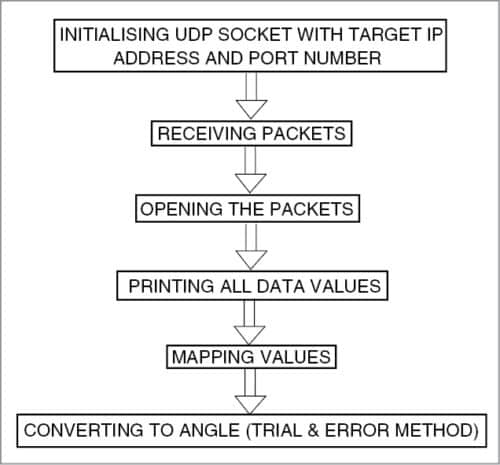
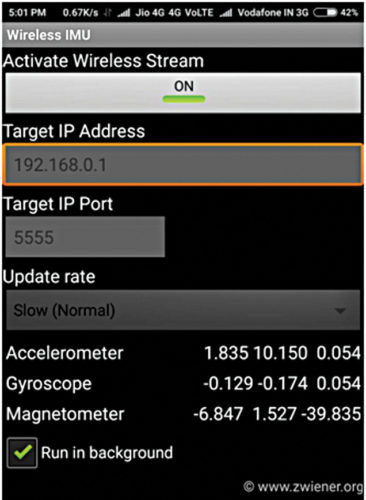
Download the Wireless IMU app from Play Store and install in your smartphone. The app supports accelerometer, gyroscope and magnetometer, and can be made to run in the background. The values from this app are sent to the RPi through UDP protocol. The magnetometer values make the servos move in either right or left direction. The accelerometer values make the servos move up and down. Only Z direction is used in the project. The algorithm for servo control is shown in Fig. 7. Thus, the camera can capture live video at different angles.
Arduino Mega 2560
Arduino Mega 2560 is a microcontroller board based on the ATmega2560. It has 54 digital input/output pins (of which 15 can be used as PWM outputs), 16 analogue inputs, four UARTs (hardware serial ports), a 16MHz crystal oscillator, a USB connection, a power jack, an ICSP header and a reset button. It contains everything needed to support the microcontroller; simply connect it to a computer with a USB cable or power it with an AC-to-DC adaptor or battery to get started. The Mega 2560 board is compatible with most shields designed for the Uno. It is an update to the Arduino Mega.
The Arduino board acts as the directional processor of the virtual telepresence robot. Commands to drive the virtual telepresence robot in the specified direction are processed and given by the Arduino to a driver IC, which, in turn, causes the motors to run. The Mega 2560 board can be programmed with the Arduino software (IDE). ATmega2560 on the board comes preprogrammed with a bootloader that allows you to upload new code to it without using an external hardware programmer.
The Mega 2560 board can be powered via USB connection or with an external power supply. The power source is selected automatically. External (non-USB) power can come either from an AC-to-DC adaptor (wall-wart) or battery. The board can operate on an external supply of 6-20 volts. The recommended power supply range is 7-12 volts.
ATmega2560 has 256kB of flash memory for storing code (of which 8kB is used for the bootloader), 8kB SRAM and 4kB EEPROM. The Mega 2560 board has a number of facilities to communicate with a computer, another board or other microcontrollers. An ATmega16U2 on the board channels one of these over USB and provides a virtual COM port to software on the computer.
Geared motor
Geared motors are a specific type of electrical motors that produce a high torque while maintaining a low-horsepower or low-speed motor output. These can be either AC (alternating current) or DC (direct current). They also have two different speed specifications—normal speed and stall-speed torque.
DC geared motors are primarily used to reduce speed in a series of gears, which, in turn, creates more torque. This is accomplished by an integrated series of gears or a gear box attached to the main motor rotor and shaft via a second reduction shaft. The second shaft is then connected to the series of gears or gearbox to create what is known as a series of reduction gears.
Two DC geared motors are used in this project.
Servo motor
Servo motor is a rotatory actuator or linear actuator that allows for precise control of angular or linear position, velocity and acceleration. It consists of a suitable motor coupled to a sensor for position feedback. It also requires a relatively sophisticated controller, often a dedicated module designed specifically for use with the servo motors. It is not a specific class of motor, although the term servomotor is often used to refer to a motor suitable for use in a closed loop control system. Two servo motors are used in this project.
Bluetooth module
HC-05 module is an easy-to-use Bluetooth SPP (serial port protocol) module designed for transparent wireless serial connection setup. Serial port Bluetooth module is a fully qualified Bluetooth V2.0+EDR (Enhanced Data Rate) 3Mbps modulator with complete 2.4GHz radio transceiver and baseband. It uses CSR Bluecore 04-External single-chip Bluetooth system with CMOS technology and AFH (adaptive frequency hopping) feature. Its default baud rate is 38400, has eight data bits, one stop bit and no parity. It supports following baud rates: 9600, 19200, 38400, 57600, 115200, 230400 and 460800.
L239D motor driver
L293D is a typical motor driver IC that allows DC motor to drive in either direction. L293D is a 16-pin IC that can control a set of two DC motors simultaneously in any direction. It means you can control two DC motors with a single L293D IC.
Camera module
A camera module is an image sensor integrated with a lens, control electronics and an interface like CSI, Ethernet or plain raw low-voltage differential signaling. The Raspberry Pi camera module can be used to take high-definition videos as well as still photographs. The module has a five megapixel fixed-focus camera that supports 1080p30, 720p60 and VGA90 video modes as well as stills capture. It attaches via a 15cm ribbon cable to the CSI port on the Raspberry Pi. It can be accessed through the MMAL and V4L APIs, and there are numerous third-party libraries built for it, including the Picamera Python library.
Raspberry Pi and video configurations
RPi is used in this project because it allows easy video transmission over Wi-Fi. The RPi is considered as the CPU of the virtual telepresence robot. The Raspberry Pi 3 (RPi 3) Model B used here is the third-generation RPi. This powerful credit-card sized single-board computer can be used for many applications. RPi 3 Model B released in February 2016 is bundled with on-board Wi-Fi, Bluetooth and USB boot capabilities. The RPi 3 uses a Broadcom BCM2837 SoC with a 1.2GHz 64-bit quad-core ARM Cortex-A53 processor, with 512kB shared L2 cache.
The next main step is the setting up of the RPi
After initial configuration of RPi is done, the RPi board is connected to Wi-Fi. An IP address is programmed and setup is linked to the RPi. The video captured by the RPi camera is sent over the Wi-Fi modem. This video can be viewed in your smartphone by connecting to the same Wi-Fi connection and IP address of the RPi.
The RPi is powered up using a 5V, 10000mAh power bank (Xiaomi). Then an SD card with the Raspbian software is inserted into the slot provided in the RPi board. The board is connected to a monitor for further configuration. The RPi configuration tool in Raspbian allows you to easily enable features and change your specific settings like keyboard layout. The procedure for the initial setting up is as follows:
1. Access the Terminal window on the Mac (or equivalent on another machine)
2. Run wirelessly with a static IP for each SD card
3. Automatically startup
4. Set the time zone
5. Skip the GUI of the RPi
Once the above setup is complete, we can see the desktop screen on RPi monitor. In order to view the desktop again we need to access via the remote desktop.
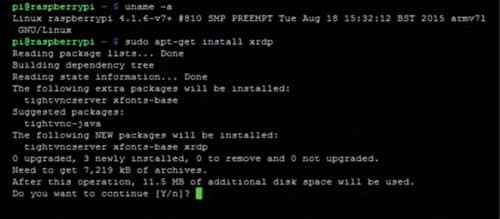
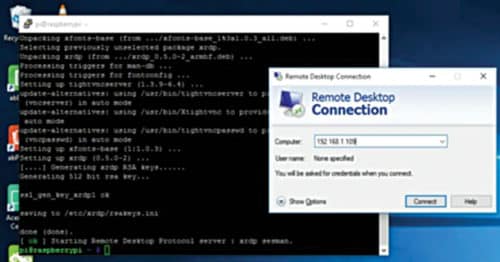
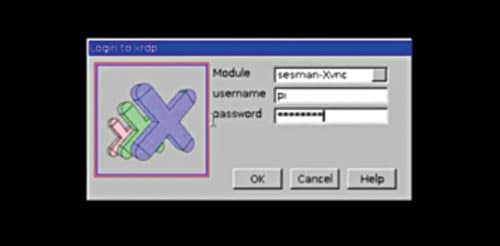
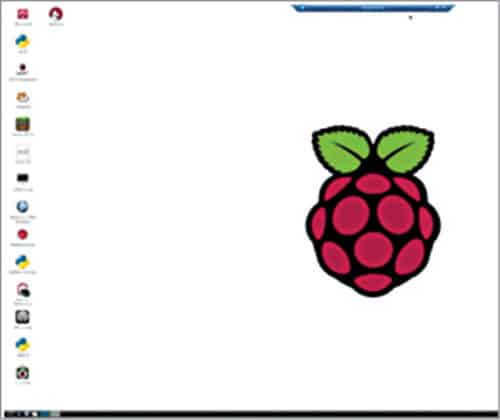
To get the remote desktop in some laptops it is mandatory to install the XRDP software, as shown in Fig. 8. The user name and password are entered in the screen. Then IP address of the computer is entered as shown in Fig. 9. The RPi is accessed by entering the username and password as shown in Fig. 10. The desktop of the RPi opens up as shown in Fig. 11.
Software
Apache web server
Apache is used in this project to configure RPi as server. Apache is a popular web server application that you can install on the RPi to allow it to serve web pages. Apache can serve HTML files over HTTP, and with additional modules it can serve dynamic web pages using scripting languages such as PHP. First install the Apache package by typing the following command in the Terminal:
Sudo apt-get install apache2 -y
By default, Apache puts a test HTML file in the web folder. This default web page is served when you browse http://192.168.1.98 from another computer on the network. Browse the default web page either on the RPi or from another computer on the network; you would see the default page. Next, install PHP5 by giving the following command in the Terminal:
Sudo apt-get install php5
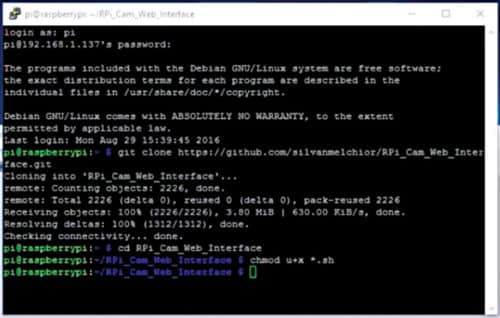
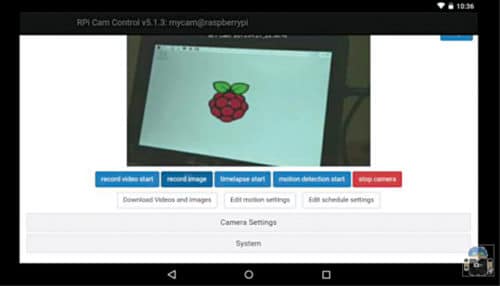
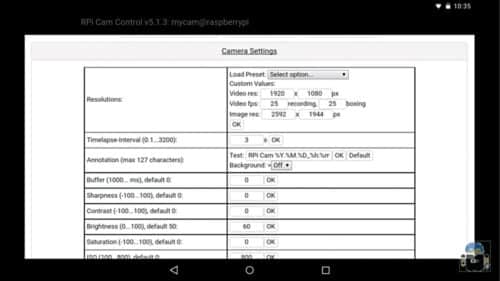
RPi cam web interface. The RPi is connected to the Ethernet and configured to access the Internet. It is then made to connect to the LAN via Wi-Fi. Then an RPi camera module is connected to Board1. Still images are captured and the result is checked in the RPi cam web interface page of the Raspberry Pi. The same configurations are done to get video transmission. Installation of RPi Cam Web Interface is shown in Fig. 12, final web page in Fig. 13 and camera setting in Fig. 14.
The final set up of video transmission is done by installing DualScreen app in your smartphone that is placed in the VR headset. This is done to increase the effect of the VR experience.
Python
Python is a widely used high-level programming language for general-purpose programming. Python programs don’t need to be compiled before running them. However, the Python interpreter must be installed on the computer to run them. The Python interpreter is a program that reads Python files and executes the code. The python_camera.py code is used in the RPi board to control the servo motors.
Arduino IDE
The open source Arduino software (IDE) makes it easy to write code and upload it to the board. It runs on Windows, Mac OS X and Linux. The environment is written in Java and based on Processing and other open-source software.
PHP
PHP (recursive acronym for PHP: Hypertext Preprocessor) is a widely-used open source general-purpose scripting language that is especially suited for web development and can be embedded into HTML. It is especially suited to server-side web development, in which case PHP generally runs on a web server. Any PHP code in a requested file is executed by the PHP runtime, usually to create dynamic web page content or dynamic images used on websites or elsewhere. PHP5 is used in this project to run and edit default webpage.
Wireless IMU app
This app (Fig. 16) measures and reports a body’s specific force, angular rate and sometimes the magnetic field surrounding the body, using a combination of accelerometers and gyroscopes, and sometimes magnetometers. An inertial measurement unit (IMU) works by detecting the current rate of acceleration using one or more accelerometers, and detects changes in rotational attributes like pitch, roll and yaw using one or more gyroscopes. And some also include a magnetometer, mostly to assist calibration against orientation drift. The accelerometers are placed such that their measuring axes are orthogonal to each other. Three gyroscopes are placed in a similar orthogonal pattern, measuring rotational position in reference to an arbitrarily chosen coordinate system. Magnetometers allow better performance for dynamic orientation calculation in attitude and heading reference systems.
Dual screen
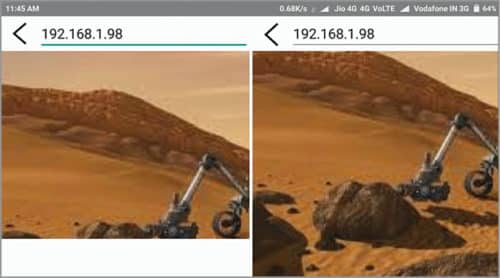
The DualScreen app by Goestoweb allows the screen of the smartphone to be shown in two different parts. This is done to get accurate visuals through the VR lens. There are two eyepieces in VR headset, hence dual-screen mode is used.
Bluetooth Electronics
This application by Keuwlsoft has to be installed in the smartphone. It allows the user to drive the motor from the smartphone. The directions of the virtual telepresence robot are sent via Bluetooth.
Download Source Folder
Construction and testing
An actual-size PCB layout of the virtual telepresence circuit is shown in Fig. 17 and its components layout in Fig. 18. Mount the components on the PCB, connect the boards (Board1 and Board2) and the four batteries. Use a suitable chassis for the virtual telepresence robot. Fix all the batteries underneath the chassis. Mount the PCB and boards on top of the chassis. Connect servo motors M1 and M2. Attach the RPi camera on these two motors for horizontal and vertical movements.
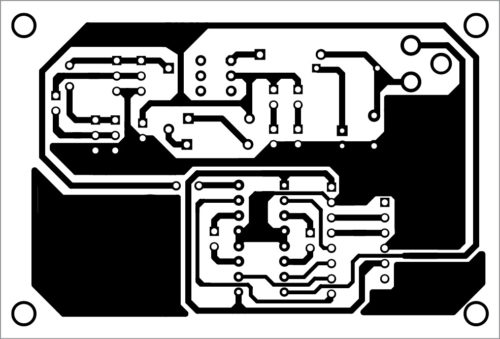
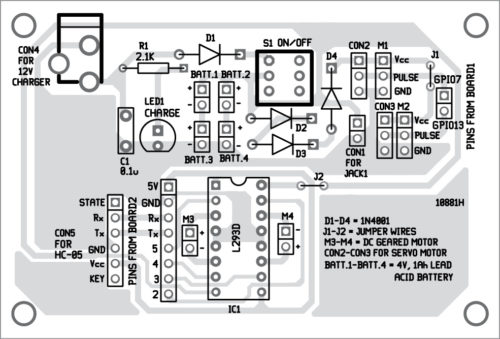
Download PCB and component layout PDFs: click here
Connect the two DC geared motors to the chassis of the virtual telepresence robot for moving forward, backward, left and right.
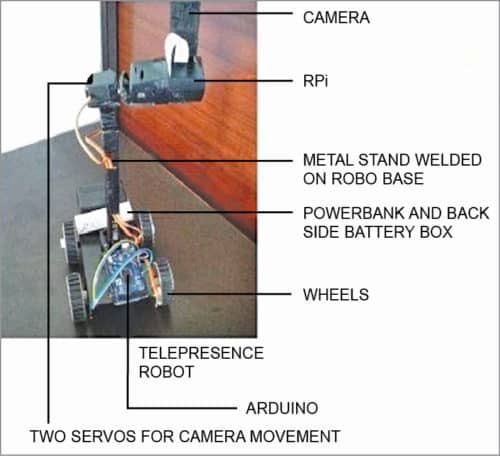
When hardware assembly is done, install all the required apps in your smartphone as mentioned earlier. Enable dual screen mode. Place your smartphone on the VR headset such as a VR Box. Now, put the VR headset on your head. Adjust the right and left lenses of the VR glasses to make sure that the image is being displayed properly. If everything is fine, turn your head left and right, the camera fitted on the virtual telepresence robot will also move in the same direction accordingly. You can also control the virtual telepresence robot (without VR) using Bluetooth Electronics app. The author’s prototype is shown in Fig. 19.
If you are looking for the difference between Microprocessor and Microcontroller, you can read it here.
This article is a part of the Top 15+ Microcontroller Projects. If you want to read more projects based on Microcontroller, can go through this article.


THE CAMERA CAN ALSO TURN HORIZONTAL AND VERTICAL BY A SINGLE MOTOR
Two motors are used to move camera in horizontal and vertical directions
Thanks for your great idea!.
I have successfully done this project as per your instruction.
But I have facing problem in using android applications that you suggest.
I can’t use “Wireless IMU” application in the background and also I can’t find the application “Dual Screen” in the PlayStore.
Now I have done this project by using Split Screen( “Wireless IMU” app and “RaspiCam remote” app).
Kindly please give me a solution for this problem.
search in google. dualscreen app apk file is available. its not available in playstore.
How much estimated cost spent on this project ?
What will be the expected budget for this project??
why two micro controller used here.Is it not possible that we use only one micro controller or all function can be controlled by respberry pi?
1.I faced some video transmission delay with all functions through raspberry PI the SoC in Raspberry PI is not that much Powerful to handle all stuffs .
2. Suppose if the navigation controller is hanged and not working You can program the entire navigation control remotely through Raspberry PI .
Me ask one question why we use to microcontroller in by the raspberry pi
Can I get a proper budget?
I am facing error in raspberry pi code.
I’m using Xiami Redmi Note3 and Raspberry Pi 3B+.
Rasp Pi didn’t get the value of sensor from mobile so fast that the servo can move.
Actually Raspberry Pi get the accelerometer value and gyroscope value but the problem is in magnetometer value.
The data of magnetometer is not receiving to rasp pi.
Can you help me with this.
I faced this issue with mi phones.Use sansung galaxy phones that gives better sensor values.the current code is for decoding accelerometr nd magnetometer value.MI phone send 3 sensor value thats y you face this issue
Thanks for such great information?
But sir,
Can you please? post clear picture of coading of this model and a video of prossesing it will certainly help us to make this project easier☺
Hi Yash, thank you for your valuable feedback. I have escalated the request to the concerned person.
Thanks for your great idea!.
I have successfully done this project as per your instruction.
But I have facing problem in using android applications that you suggest.
I can’t use “Wireless IMU” application in the background and also I can’t find the application “Dual Screen” in the PlayStore.
Now I have done this project by using Split Screen( “Wireless IMU” app and “RaspiCam remote” app).
Kindly please give me a solution for this problem.
Can u suggest me which VR headset u used for this project?
hi
Hi, how can I help you?
Hi,
I cannot use the ” wireless imu ” application in the background.
When I minimize the application, The data send to the pi will automatically stop after 1 min.
Kindly please give me a solution for this problem.
Me ask one question why we use to microcontroller in by the raspberry pi
Hi,
I am not getting dual screen video through that app. Kindly help in solving
Hi
i am facing some issues regarding this project
1. Wireless imu application is not running in the background (Mobile used is Honor 9 Lite)
2. How to get this dual screen application. I dint find that application in google play store. Can u help me which app will suite for this.
Thanking in advance..
Hi,
Can you please share how have you found the exact position or angle of rotation using the gyroscope data?
Thanks.
is there coding for arduino mega 2560 ?
where did u use RF module? pls can you tell me
RF module is not used here but possible. Bluetooth is used as mentioned in the article.
Sir,
could you plz upload the code of this project !!
Hi Vishwa, the source code is present within the article. Please refresh the page.
Sir..which app should I use to open this folder !?
Hello sir, I couldn’t understand how to display the visuals on VR headset
Use a VR headset having a smartphone holder. After installing all the required apps in your smartphone, enable dual screen mode. Fix the smartphone in the holder in VR headset. Now, put the VR headset on your head. When you turn your head left and right, the camera fitted on the virtual telepresence robot will also move accordingly. You can see the surrounding area of the robot from your VR headset.
Hello sir, I have 2 requests.
1) Can you please specify the components, maybe give the example links from Digikey for each part? So I can examine your choices and build mine accordingly.
Like how much torque should the servo motors have and the other details like RPM, size, voltage? Or what details are important when buying the VR headset etc.
2) Can you put a video of the process? Maybe not with explanations but small pieces of the moments when constructing the whole project.