


 A lot of development boards with different distributions of Linux are available in the embedded market. These boards come with different processors and therefore require different methods/libraries to handle their GPIOs (general-purpose input/output). To simplify this, one can use SYS file system (SYSfs) interface on any Linux-based board. This article focusses on SYSfs interface and sheds some light on shell scripting and application program to access GPIOs using this interface.
Linux is playing a significant role in the constantly-changing embedded electronics market. Day by day, the use of embedded Linux in modern embedded product development is becoming popular. Also, hardware platform plays an important role whilst implementing embedded Linux system. There are a lot of Linux-based development boards available in the market such as Raspberry Pi, BeagleBoard family, Panda board, Wand board and the others. These boards support various distributions of Linux such as Debian, Ubuntu, Angstrom, ArchLinux, Fedora and Android. The major problem in using GPIO pins in a Linux board is that the method to access them depends on the processor used and library support. Since there are a large variety of processors being used in embedded Linux boards, it becomes difficult to learn all the processors and then use the GPIOs. Linux, however, simplifies this by using what is called a ‘file system.’
File system, in simple language, can be explained as an interface (or rule) to store and access files on a storage device. Usually, in small embedded systems, file system is not used. Instead, the data is accessed directly using memory address through user program. This works fine when the amount of data is small. But as the system grows, it becomes very difficult to manage huge data in this way. This problem is overcome by the use of OS (operating system) and a file system. The OS can handle data from storage devices (memory card/HDD) efficiently with the use of file system.

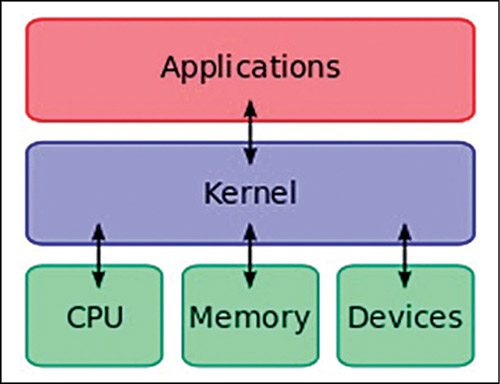
Linux file system has a feature that simplifies GPIO access. In Linux, memory is separated into two spaces, i.e., kernel space and user space. Kernel space is part of memory occupied by the kernel modules, device drivers and everything that is under kernel’s control, whilst user space is the memory area which all user applications use. Linux treats all devices as if they are files. For instance, GPIOs are just files to the Linux. Thus, accessing GPIOs is like reading/writing of/to these files. Usually these GPIO pins are in kernel space (i.e., directly managed by kernel modules), but there is an easy way to manage these pins from user space.
Accessing GPIO using SYSfs interface
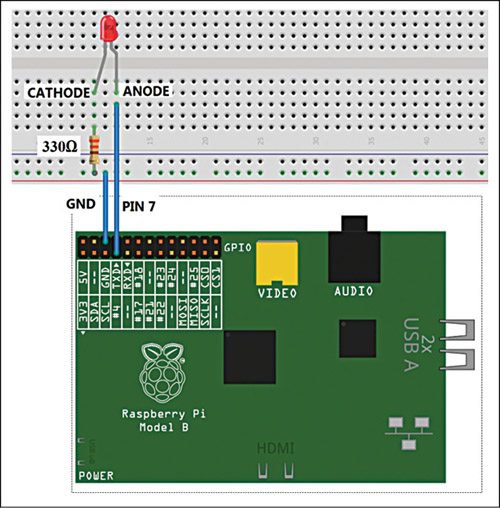
The process of accessing (setting or clearing) the GPIO pins of Raspberry Pi is given below:
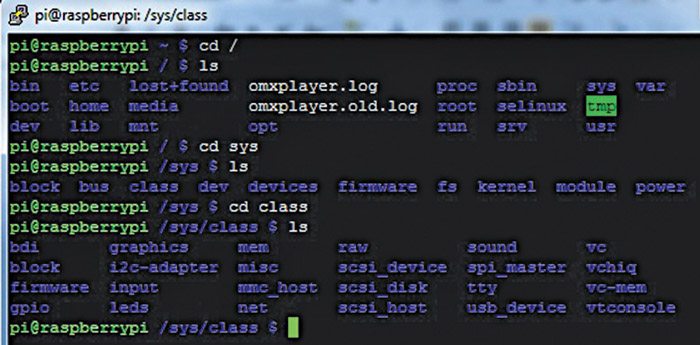
Start the terminal of Raspberry Pi, type ‘cd /’ and press the Enter key from keyboard to change directory to root. Now type ‘ls’ and press the Enter key to see contents of directory. Now you are in root file structure of Linux with lots of subdirectories. One of the directories is ‘sys,’ which is nothing but SYSfs. SYSfs exports information about devices and drivers from the kernel space to user space. This mechanism is implemented as file system in ‘sys’ directory.
Now write the following and press Enter key after each command:
[stextbox id=”grey”]$ cd sys
$ cd class
$ ls[/stextbox]
You will see devices supported by the development board as shown in Fig. 2.
A class gives a higher-level view (overview) of a device and hides implementation details (how internal logic is implemented). This class allows users to handle devices based on what they do, rather than how they work. In simple words, it is like a steering wheel of a car; driver just knows what it does and does not care how it is implemented inside the car.
Download Source Code: Click Here
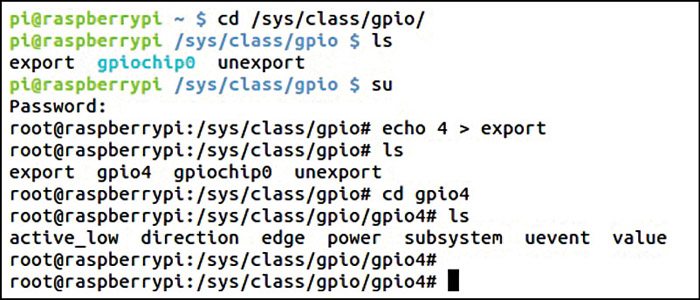
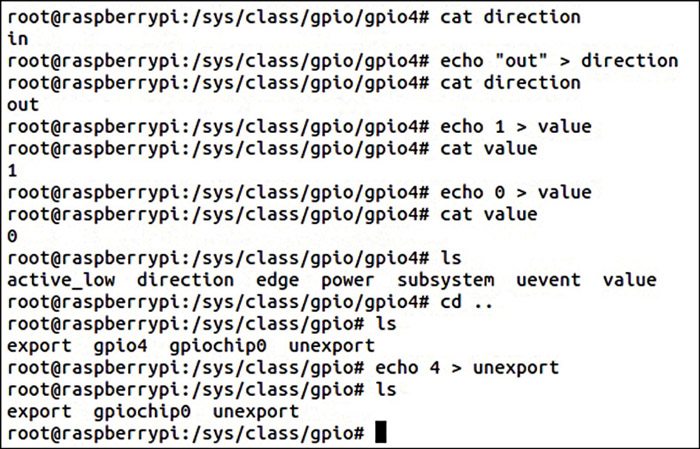
Now write ‘cd gpio’ to enter the GPIO directory which contains two files, namely, export and unexport as shown in Fig. 3.
export. By writing GPIO number to this file, GPIO pin control is exported (or transferred) from kernel space to user space. This is equivalent to enabling the GPIO pin.
[stextbox id=”grey”]Example: $ echo 19 > export[/stextbox]
This will create a ‘gpio19’ node (folder) for GPIO #19. This folder contains files which can be read/written to access GPIO 19 pin.
unexport. Reverses the effect of exporting.
[stextbox id=”grey”]Example: $ echo 19 > unexport[/stextbox]
