


During the summer, most people are too lazy to water the potted plants on their rooftop gardens every day. So, we build a simple and exciting automatic plant watering system that you can build yourself in just a few hours.
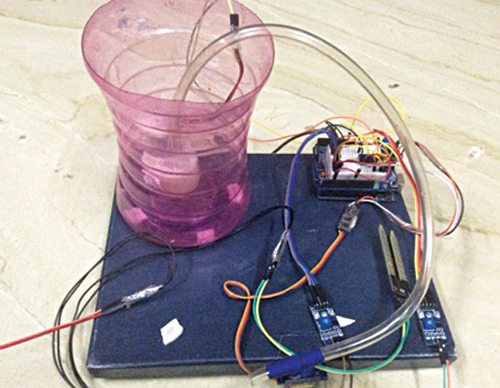
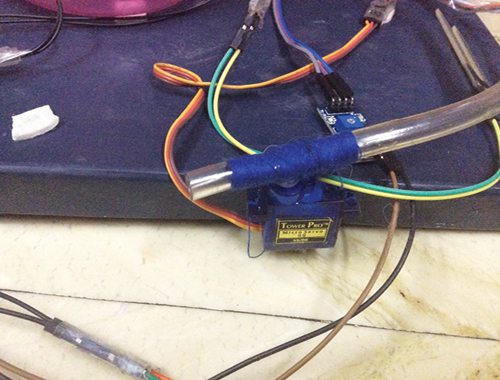
It is an Arduino based automatic plant watering system that uses a soil moisture sensor. The author’s prototype is shown in Fig. 1.
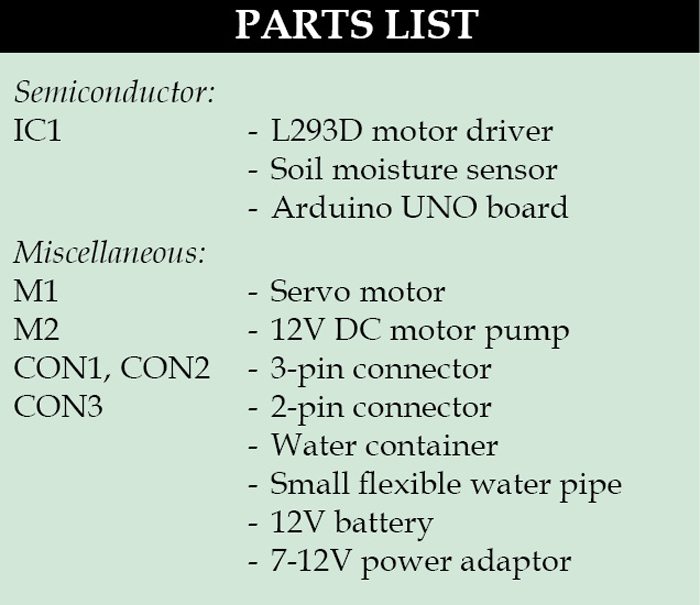
Components Required
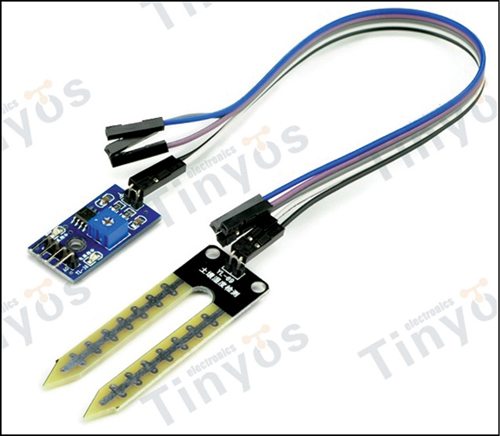
Soil Moisture Sensor
Two types of soil moisture sensors are available in the market—contact and non-contact sensors. A contact soil sensor is used in this project because it has to check soil moisture to measure electrical conductivity.

Automatic Plant Watering System Circuit
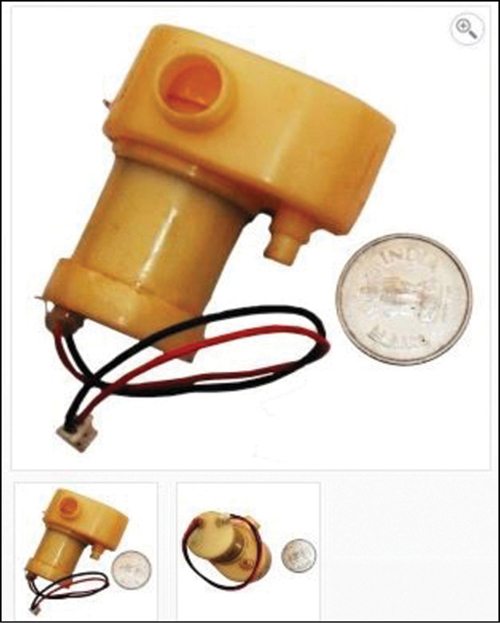
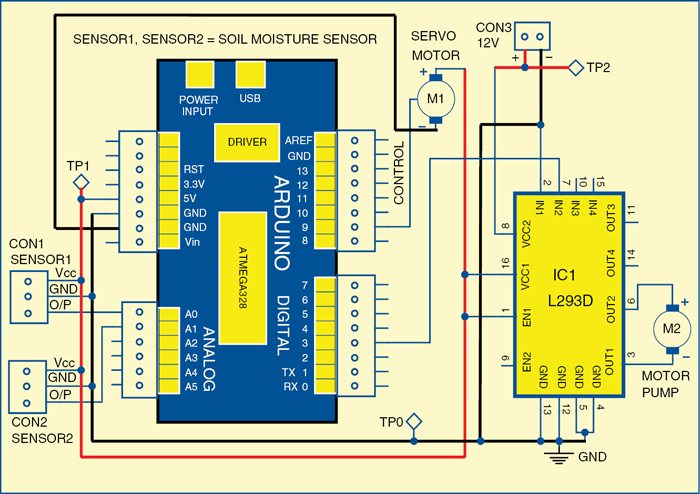
The circuit diagram of the automatic plant watering system is shown in Fig. 2. The circuit comprises an Arduino UNO board, a soil moisture sensor, a servo motor, a 12V water pump, and an L293D (IC1) motor driver IC to run the water pump.
You can power the Arduino board using a 7V to 12V wall wart or plug-in adaptor or solar panel. You need a separate 12V battery or power supply or solar panel for the pump motor.
The moisture sensor provides an analog output, which can easily be interfaced with Arduino. In this project, two sensors can be connected to analog pins, A0 and A1 of the Arduino board. Each sensor has four pins (Vcc, Gnd, Ao, and Do) available for interfacing with the Arduino board.
Here, a digital output pin (Do) is not used. The water pump and servo motor are controlled by Arduino connected to digital pins 3 and 9, respectively. That is, the servo motor signal control pin is connected to pin 9 of the Arduino board.
The program in the Arduino reads the moisture value from the sensor every 20 seconds. If the value reaches the threshold value, the program does the following three things:
- It moves the servo motor horn, along with the water pipe fixed on it, toward the potted plant, whose moisture level is less than the predetermined/ threshold level.
- It starts the motor pump to supply water to the plant for a fixed period of time and then stops the water pump.
- It brings back the servo motor horn to its initial position.
Automatic Plant Watering System – Code
The program is written in Arduino programming language. The code is well-commented and easy to understand. Compile the autowatering.ino code and upload it to the microcontroller, using Arduino IDE version 1.
The sensor will calibrate by itself once it is kept in the soil and the threshold value will be shown on the serial monitor in Arduino. Serial debugging is available in this program. Comment out if you do not wish to use the serial monitor.
Download Source Code
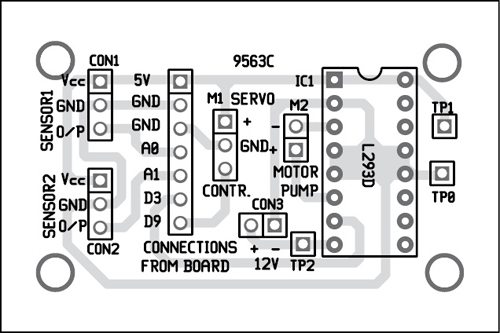
PCB Design
An actual-size, single-sided PCB layout of the automatic plant watering system and its component layout is shown below.
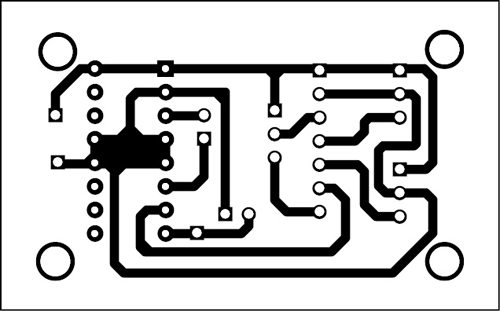
Assemble the components on the PCB to minimize errors. Alternatively, you can assemble them on a breadboard or Arduino prototyping shield, or a general-purpose PCB. Upload the code to the Arduino UNO board and install the sensors in the soil of the potted plants. Do not immerse the sensors fully inside the soil.
Download PCB and Component Layout
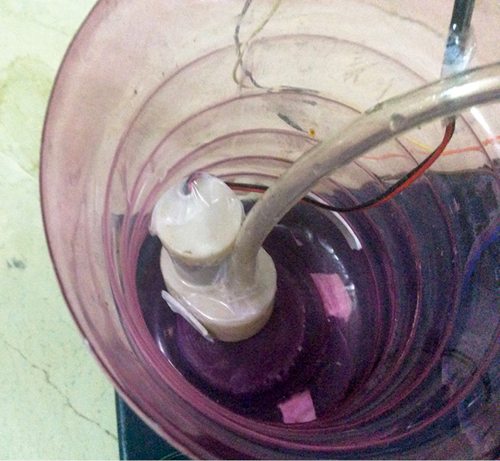
Automated Plant Watering System Working
Install the pump in a water container that can hold a few litres of water. Attach the water pipe to the servo motor horn.
Before powering the circuit on, you need to keep in mind the following macro definitions in the code:
- Changing the angle of rotation of the servo horn toward the first pot and second pot. The default values are 70 degrees and 145 degrees.
- Changing the watering time according to the size of the pot. The default values are five seconds and eight seconds.
- Changing the threshold value according to your need. The default value is 600.
Place the flower pots where the pipe from the servo motor horn can easily reach them. When the moisture level dips below 600, the servo horn rotates at an angle of 70 degrees.
That is after the servo motor horn moves 70 degrees toward the first pot, the motor pump will be on for five seconds and then stop automatically. Then, the servo returns to its original position.
Similarly, if you are using a second sensor, the servo motor horn will move to 145 degrees to the second biggest pot, and the motor pump will be on for eight seconds and then stop automatically. The servo returns to its original position.
Further Application
Using the Arduino UNO board, you can water six different potted plants. By adding a few more lines in the code, you can water even more plants—by using the Arduino Mega 2560 board which has more analog input pins.
You can also add an Ethernet or Wi-Fi shield and use the Twitter library, which will tweet from your plant’s side to send messages like: I need water, the tank is empty, refill the tank, thanks for the water, and so on.
A 16×2 LCD can be added to indicate moisture levels.
You can also enable the circuit to refill the tank after a few days, depending on the volume of the tank.
Check more such Interesting Arduino Projects.
Related Projects:
The author is a student of applied electronics and instrumentation engineering at JRE School of Engineering, Greater Noida. He likes making projects with Arduino.
This article was first published on 5 October 2016 and was recently updated in November 2025.
i am having a problem in simulation on proteus. the two connectors that u hav used instead of sensor in diagram are showing an error while simulation. the proteus analyzer is showing a dialouge ‘no model specified for sensor1’ and similarly for sensor2. can u help me out that how can i solve this simulation problem and changes i’ll have to make in the code just for simulation.
Thankyou very much.
Hi
Can this system be operated from a remote locations.
No. The current design cannot be operated from remote location
give me components name
Please see Parts List for component detail
Why my arduino cant install. Its error
Please check for connection errors.
when I click Download PCB and Component Layout PDF: Click Here, the download opens up with 5 files all related to pg 90 (Fire Extingushing Robot)-May 15_Fig 6_PCB.pdf
The link has been updated.
why pcb layout is wrong??
From our side PCB layout is fully verified.
how would it measure in rainy reasons if garden is too wet??
would it will be any device which remove the moisture ??
is it possible to do using single sensor?
and also can u tell me how to connect servo and pump to aurduino?
can u tell why should we use servo ?
is it possible to with out using servo
Source code file is not opening it is in the form of rar file who can I open it say me plzz
Dear Balu,
You need a WINRAR software to decompress the file.
pls send that zip file to me
The zip file is already sent to your email address.
Can you please send zip file to my email address ([email protected])
Hi Bhavesh,
You can download the zip file from end of the project
EFY Team! can you send pcb source code to me?
Hi, the source code is present in the article itself.
How do you really fix the servo to the pipe?.can you elaborate?i could not quite understand that part
i am getting error in code,please help me .
Arduino: 1.8.2 (Windows 7), Board: “Arduino/Genuino Uno”
SERVO_WITH_PUMP:27: error: ‘plantServo’ does not name a type
plantServo.attach(9);
^
SERVO_WITH_PUMP:28: error: ‘plantServo’ does not name a type
plantServo.write(20);
^
SERVO_WITH_PUMP:30: error: expected constructor, destructor, or type conversion before ‘(‘ token
pinMode(pump,OUTPUT);
^
SERVO_WITH_PUMP:31: error: expected constructor, destructor, or type conversion before ‘(‘ token
digitalWrite(pump,LOW);
^
SERVO_WITH_PUMP:32: error: expected declaration before ‘}’ token
}
^
exit status 1
‘plantServo’ does not name a type
This report would have more information with
“Show verbose output during compilation”
option enabled in File -> Preferences.
In this project you are shown that we are using pcb layout,but the images you are showing in this project the pcb is not there.so can you please help me where i can use this pcb in this project.
thank you,
Dear Chakri Reddy, The PCB layout is present on the second page.
The motor driver should have something to protect the chip from reverse emf. That would usually be a diode to prevent the power from coming back to the chip.
can you send me the source code WhatsApp +265884842082
The source code is present within the article.
I have everything setup completely according to the requirement.Just custom the coding by adding temperature sensor and lcd display.The problem is why the motor is running all the time although the coding program shown stop at initial start?Im really appreciate your help sir! Thank u
how to do it on a large scale,like watering for crops in farm for farmers.waiting for ur reply
Please send me the code
I couldn’t open the source even with an winrare file. kindly help me with the code
Please download the source code again.
if didn’t use the battery and the servo motor, can you show the source code to me?
what if i use 6v battery and motor instead of 12v battery and motor
from where can i get the programming codes
Source code is present at the end of the article.
Thank you team EFY.
I made one, it was nice and challenging experience, i used 5 sensors with slight changes in the code and it works flawless.. Thank you.
https://youtu.be/qSRJwkbwmkI
Why driver ic heated when arduino supply go to ic?
you make this project for me ?
its cost =
The pcb layout just cointains two images, no proteus file. I cant see the schematics file
Hi Saga, the schematic is already shared within the article.
the motor pump is not working at 6 and 3 pin what alternative can we do?
12v battery of what ampre is required
In battery 12v How many amperes it must be??
Actually i want to know 12v battery vof what ampre is required here
why soil sensor one light is working second light is not blowing?
You can also add an Ethernet or Wi-Fi shield and use the Twitter library, which will tweet from your plants side to send messages like: I need water, the tank is empty, refill the tank, thanks for the water, and so on.
how to do this. please guide me
Nice idea in the whole world
Hii Ayan
Thanks for your great project . now a days with a busy life we hardly remember to water the plants or when we are out of town for many days . plants dont get water as result they dry out . with this project no human involment is needed . very helpful project
Thank You for your feedback.
Hi can you send me the codes to my email pls.. I cant download the codes through winrar. Pls send me the codes to my emails: [email protected]. Thank you so much
Please send me program and the code.
Hi Martha, program and code both can be downloaded from the article itself.
can i use breadboard instead a PCB layout?
and also the source code, i can’t open it.
If you are unable to download the source code, please try to open the page in incognito mode and retry or temporarily turn off the antivirus before downloading.
Yes, you can use it.
Can give me the source code
We have shared it with your email ID.
using 8051 details please share
Kindly elaborate your query.
Can you please send me links to shop all components online, In my place apart from basic and routine electronic items only are availablw
i am unable to open source code after downlordings the code.please email me the course code
We have sent you an email, please turn off the antivirus from your system before download the source code.