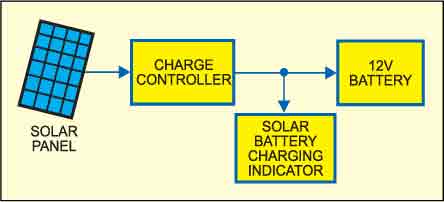
 Here is a battery charging indicator circuit of a simple charging monitor that indicates whether the storage battery of a solar power unit is being charged or not. It, however, does not tell the state of the solar panel.

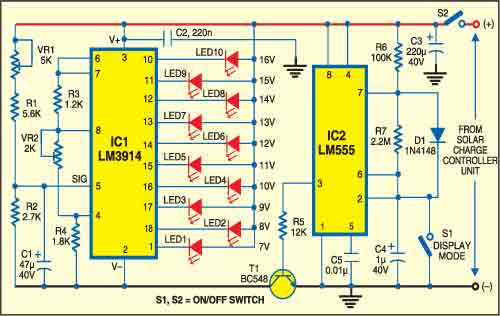
The circuit consists of two common ICs, an NPN transistor, ten 5mm red LEDs and a few discrete components. It can be divided into two parts: voltmeter and a display controller.
Battery charging indicator circuit

The voltmeter, built around IC LM3914 (IC1), is a low-power, expanded-scale type LED voltmeter that indicates small voltage steps over the 7-16V range for 12V solar panels. The meter saves power by operating in a low-duty-cycle ‘flashing’ mode where the LED indicators are on (and hence consuming power) briefly. The circuit may be switched to steady mode where the active indicator remains on at all times.
The input for IC1 (LM3914) is derived from the solar panel voltage via a potential divider network comprising preset VR1 and resistors R1 and R2. This variable input is about 3V for a DC potential of 12V.
The display range depends on the internal voltage reference and resistors R3-VR2-R4. The lowest LED (LED1) glows when the input voltage at pin 5 of IC1 is 1.8V. The topmost LED (LED10) glows when the voltage exceeds 4V. As the input signal is divided by 4, the display ranges should be multiplied by this figure. So the actual display range is 7-16V, i.e., 1V per LED.
The display controller is built around IC LM555 (IC2) that is wired in astable (free-running) mode with a narrow-pulse output. The duty-cycle of IC2 is controlled by the ratio of resistors R6 and R7. If you want faster blinking, use a smaller value resistor R7. A preset may be substituted for R7 if a rate adjustment is desired. Increase the value of resistor R6 to get a longer ‘on’ time for LED indicators. The frequency of oscillations is determined by the combination of capacitor C4 and resistors R6 and R7.
Circuit operation
The output of timer IC2 is fed (through current-limiting resistor R5) to transistor T1. This in turn, controls the power to IC1. Capacitor C1 filters the control voltage input to IC1 and capacitor C3 provides DC filtering for the entire circuit. When you press switch S1 across capacitor C4, the output of IC2 remains high, and the display switches to steady mode from flashing mode. Switch S2 is the master power-on/off switch.
Construction & testing
Assemble the circuit on a small, general-purpose printed-circuit board (PCB) and enclose in a suitable plastic box. After necessary calibration, connect the circuit to the output cable of the charge controller unit with correct polarity.
For calibration, lock preset VR1 at the centre position and then set VR2 to its maximum resistance with the help of a digital multimeter. Now close both the switches (S1 and S2) and connect the circuit to a variable-voltage DC power supply unit with its output level set to 12V (1%). Adjust VR1 until LED6 (at pin 14 of IC1) lights up. Finally, lock presets VR1 and VR2 using glue.
This project was first published in May 2011 and has recently been updated.


