


The use of 3D printing has become extensively popular over the last few years. Software has taken up a gamut of responsibilities to aid the process. In this article, we explore one such useful software called Slic3r – a 3D slicing software for 3D printers, available to users as a free open source entity.
Familiarising with Slic3r
Built using C++ 11 and Python (for graphical interface), Slic3r is a toolpath generator for 3D printers based on digital prototypes. This means that Slic3r generates G-codes from created 3D digital models, which can be used as instructions by the 3D printer to generate the physical object.

Slic3r works on all major operating systems, namely, Mac OSX, Windows and Linux. It has support for all major G-code languages including Marlin, Repetier, Mach3, Makerware, Smoothie, Sailfish, LinuxCNC and Machinekit. The motive of this software is to feed in existing 3D model files, generate G-codes from these and, eventually, print the object from a connected 3D printer.

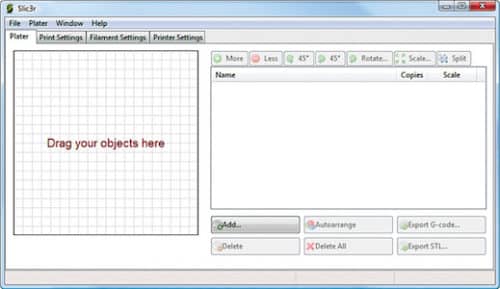
Slic3r’s interface is compact, clutter-free and easy to use. At the top, there is the general menu bar containing File, Plater, Window and Help tabs. These can be used for various operations like loading existing files and more. Below this are four essential tabs that allow you to set up the 3D model files and the printer to ensure proper printing of the model. These tabs are: Plater for configuring the digital model and setting it for print, Print Settings for choosing various printing preferences, Filament Settings for proper arrangement of the print filament and Printer Settings for configuring the preferred printer with the system to develop the model.
The main workspace is split in two. Under Plater, the left side holds the main visual representation of the file. It is a graphical bed interface with clearly-specified X and Y axes. The right panel consists of the list of imported files and a number of actionable buttons to make limited modifications to the file. Opening an existing file can be either done by clicking Add or by simply dragging-and-dropping. You can add multiple files, all of which are listed in the left panel. File formats supported by Slic3r are StereoLithography files (STL), Wavefront OBJ and Additive Manufacturing Format (AMF).
On the right panel, actionable buttons can help you reconfigure the digital object to get the best printed output. Rotate and 45 Degree help rotate the digital model around selected axes. Scale helps resize the model as desired. If the model contains multiple portions, Split helps separate an object into multiple parts for ease of configuration. More and Less, respectively, increase or decrease the number of copies of the selected file to be printed.
The tabs below the list allow you to modify the list itself. Then, there are buttons to add new files, delete listed files, auto-arrange files to get optimal print results, export G-codes from files or collate all listed files into a single STL.
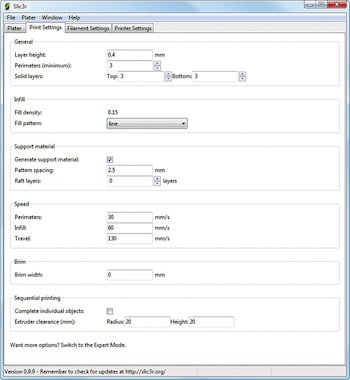
Print Settings tab contains a large number of fields that may need to be updated in accordance with the desired print quality. You can set up print options by filling in the desired print options such as layer height, perimeter, fill density, fill pattern, pattern spacing, speed of print, brim width, extruder clearance and so on. Expert Mode allows you to make advanced changes for more intricate printing.
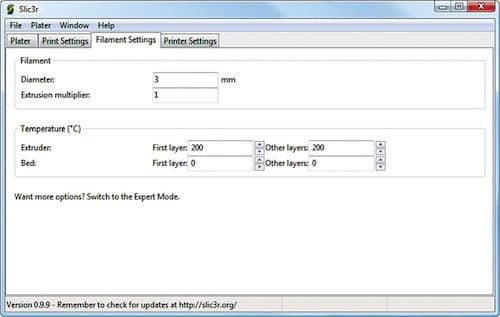
Filament Settings is required when a new filament is introduced for the printer. Changeable fields include filament diameter, extrusion multiplier, temperature of extruder and of the bed in first and other layers.
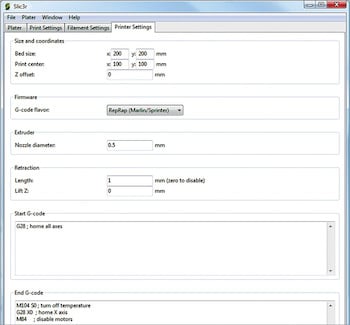
Printer Settings are used for synchronising the printer with the system. You can set the bed size, configure the printer centre, insert Z axis offset value, select firmware for G-code flavour, set nozzle diameter for the extruder and set up retraction values. For a particular printer being used, these parameters do not need to be changed often.
Features in the latest version
The latest version of Slic3r comes with a host of features and improvements.
• It supports interconversion between file formats like STL, OBJ, AMF, 3MF and POV.
• It has an auto-repair feature for basic errors in the digital files before printing.
• During G-code generation, it can export SVF files of the splices made from the original 3D file.
• It provides a visual preview while cutting meshes into solid parts.
• Expert modes of settings allow you to configure their 3D printing platform with higher accuracy.
Slic3r brings a host of other features like a built-in serial host controller to support multiple printers simultaneously, OctoPrint integration, 2.5D TIN mesh intrusion and more.
Developed within RepRap community, Slic3r also has great online support and presence. The official website contains elaborate documentation that makes using the software quite simple. Slic3r is one of the most-recognised 3D toolpath generator software globally. It is also a great tool to use!
