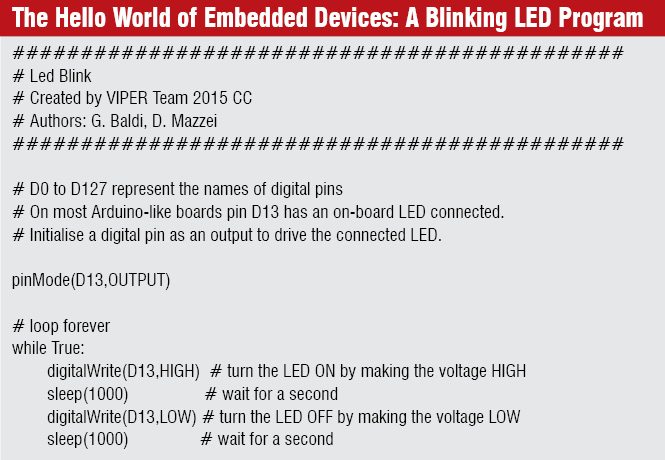
VIPER, the acronym for Viper Is Python Embedded in Real-Time, is a solution for making your design interactive and connected to the Internet of Things (IoT) easily. The package offers a set of software and hardware tools to seamlessly implement your embedded design ideas, without worrying about actually putting together stuff using solders to make your design work.
The suite is open source and released under general-public licence version 3 (GPL3), Apache2 and Massachusetts Institute of Technology (MIT) licences, depending on the libraries and codes put to use. For commercial usage, their respective websites offer a separate package along with added support. Built to be cross-platform, VIPER is a development suite for high-level design of interactive objects, artistic installations and Internet/cloud-connected devices.

What it offers
VIPER provides a platform for developing embedded designs in Python, using paradigms and features typical of personal computers and mobile programming. It lets you make your object connected and smart with just a few lines of code and almost no wiring.
Multi-board compatibility. Converting your product idea into a prototype can be easily achieved with VIPER, which can run on all 32-bit ARM processors and professional hardware based on ARM microcontrollers (MCUs). It also offers support to do-it-yourself MCU boards like Arduino, UDOO, ST Nucleo, Particle and all Spark products. Creators of VIPER, Things On Internet (TOI), have also come up with their own TOI shield, a multi-sensor board with ready-to-plug communication ports. The shield claims to be a first of its kind, enabling plugging on Arduino and Particle boards without any adaptors. To program using VIPER, you just have to make sure you install the universal serial bus (USB) driver corresponding to your board. The board has to ‘viperised’ before you can use it, and this involves installing VIPER virtual machine (VM) and the required real-time operating system (RTOS) on the board.
A multi-threaded RTOS. Using ChibiOS as the embedded device OS, VIPER permits hardware-architecture-independent design implementation. Implementing multi-threading on top of the OS has brought a new dimension to VIPER. Every VIPER thread is an RTOS thread with a specific priority, and these are synchronised using a global interpreter lock that is released when a higher priority one requests processing.
Elegant handling of peripherals. Abstraction layer of ChibiOS supports basic peripherals like general-purpose input/output (I/O), pulse width modulation (PWM), analogue-to-digital converters, inter-integrated circuits, serial peripheral interfaces, timers, external interrupts, serials and USBs. The required interface codes can be found as modules in Python library. For other drivers, all that is required is C-function that can be embedded in the script. What this means is that, most Raspberry Pi drivers you work with can be easily adapted and ported into VIPER Python scripts.
Libraries for scripting. Useful modules from the standard Python library, like json, math and urlparse, have been ported to VIPER, and these can be used while working with codes. Along with these, VIPER adds a set of built-ins that can be used directly. You can also import modules while working with sensors, shields or even specific ones pertaining to VIPER threads and connections.

Efficient management. Memory and space management are up to the mark with VIPER. With an intentional effort at minimising object space, built-in functions occupy just four bytes, against 16 for a normal one. It implements a novel memory management system and a memory allocator with specialised garbage collector to suit embedded operations.
VIPER converts local and global names to 16-bit integers instead of saving it as strings. While this saves resources spent by the MCU, names information is not available during runtime. Also, for time-constrained functions, you can write the fast code in C and call it from Python script.
Customisability. As the embedded machine being used is virtual, you can customise it to your application. Customisation referred to here is in terms of the number of drivers initialised, functioning of ports, level of optimisation and so on. This results in saving precious flash and random access memory.
VIPER tools. A compiler reads the input code and produces an optimised byte-code that can be understood by the VM. Optimisation here involves saving code objects on flash for direct access and analysing the code for static reachability. A VM builder allows you to configure and create a VM that suits your application better, for better functionality and to help you work within your constraints.
 There is also a VIPER Up-linker that prepares the packages required by the VM for executing the expected design. All of these are integrated into the integrated development environment (IDE) to enable one-click execution of the entire process.
The latest release, VIPER 0.2.0.0009, also includes a photon Wi-Fi driver, Adafruit neopixel light emitting diode (LED) matrix driver, an infrared read-and-write control module, drivers for servomotor and thermal printer and an animation module. Inclusion of these additional features promises an enhanced and smooth user experience.
What VIPER Suite is
A comprehensive development environment, VIPER Suite consists of three main components. With the help of these you can easily and quickly design your embedded system and integrate with sensors and the cloud. Let us see each of these components one by one.
VIPER IDE. A browser based dedicated development environment, the IDE provides a platform for developing your Python code and managing your boards. It includes a compiler, debugger and an editor, alongside tutorials and example projects for an easy learning experience. A code editor based on Code Mirror makes it easy to navigate through your code, while providing a comfortable user interface. The integrated debugger has built-in support for exceptions, which although not Python exceptions, are faster to raise and handle. The IDE also allows you to inspect low-level VIPER VM byte-codes.
A serial console allows you to control communication with ports on the board. Managing connected devices is easy, thanks to the board management toolbar. A registered user is also automatically connected to VIPER cloud, where she or he can store data and access sessions from different devices/places, without affecting continuity. Thus, all you need to do is develop scripts locally using the IDE and sync it with the cloud.
VIPER VM. The aim of VIPER VM is to bring Python into the embedded world. It uses a sub-set of Python, neglecting features not required by the embedded world. What the VM lets you do is develop board-independent Python scripts that can be easily re-used and simulated. VIPER supports most high-level features of Python like modules, classes, multi-threading, callback, timers and exceptions. In addition to these, it allows one to use custom hardware-related features like interrupts, PWM and digital I/O.
VIPER app. This is how you access your object. The app provides an interface for all network- or Bluetooth-powered VIPER objects. Easily downloadable through Android, iTunes or Windows stores, the app allows you to control your object using your smartphone or tablet. On launching the app, it automatically displays a list of viperised devices in the vicinity, which you can then connect to.
Although VIPER is in Python, app interfaces are based on Hyper Text Mark-up Language (HTML) or Java, making it easy for you to connect to your MCU or mobiles. You do not need to write any separate code for Android or iOS.
How to start using VIPER
With a zero-install development environment, all you need to do is unpack the packages that come with VIPER.
Find example projects on VIPER hackster platform (www.hackster.io/viper). Clear your doubts that crop up by posting on their community forum (www.community.viperize.it). For anything else, get onto their website, www.viperize.it
Priya Ravindran is a technical journalist at EFY


could not find VIPER in above links. Now this rebranded to ZERYNTH
Thank you for the comment, we have updated the article