 Usually, LED lamps require rectifier when connected to the AC mains power supply. Electrical isolation of the LED lamps from the mains is also required in most cases. But rectifiers create a switching noise and also add to their cost. Presented here is a simple circuit for A AC-Powered LED lamp that doesn’t require the use of rectifiers.
 There is a wide range of low-power mains transformers available with one or more secondary voltages like 2.5 Vrms (3.5 Vpeak), 3 Vrms (4.2 Vpeak), 3.3 Vrms (4.7 Vpeak), 4.5 Vrms (6.4 Vpeak), 5 Vrms (7.1 Vpeak), 6 Vrms (8.5 Vpeak), 6.3 Vrms (8.9 Vpeak) and with power rating from 1.3 VA up to 12 VA. The primary current of these transformers is relatively low—around 15 to 80 mA—and, when needed, can be limited with resistors without producing a lot of heat.
Most of these transformers are PCB-mounted and easy to use. On the other hand, LED lamps with power rating of 1 W to 10 W are good enough to produce light for your workstation and for a small room. Most LEDs today have forward drop voltage of 1.6 V to 3.7 V depending on the technology and the colour. The working current for these LEDs is usually 20 mA to 100 mA and sometimes higher. The parameters of the LEDs match very well with the parameters of small 2.5Vrms-6.3Vrms transformers mentioned above.
Circuit and working
This LED lamp with a transformer does not need rectifiers. The circuit uses the internal resistance of the transformer and low-cost protecting resistors to limit the current through the LEDs. The LED lamp with four levels of power is described here.
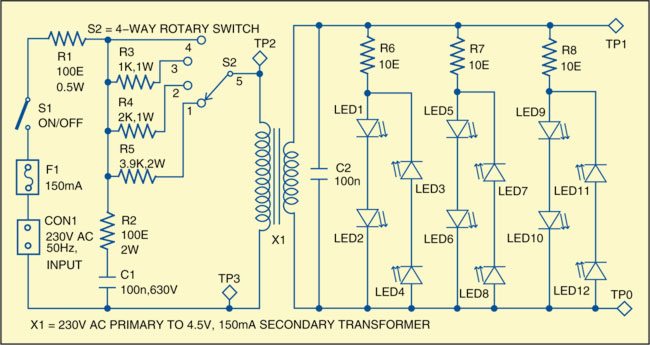
Fig. 1 shows the circuit of an LED lamp using transformer X1 with secondary voltage of 4.5 V. Resistor R1 limits the voltage and current peaks over transformer X1. Resistor R2 and capacitor C1 protect the transformer from the noise from the mains. Although R1, R2 and C1 are not strictly necessary for the lamp, they should not be removed, especially in noisy urban or industrial environments.
The power for the LEDs is controlled with switch S2. In position 4 full power supply is applied, whereas in other positions (3, 2 and 1) the power and the light will be lower.
The LEDS are connected in a series and in couples in order to take the full power supply from the transformer as the forward voltage drop of LEDs is around half the secondary output voltage of the transformer. In one branch, the LEDs should be of the same type in order to have consistent forward voltage drop. The number of the branches of the LEDs depends on the type of the LEDs and transformer X1. The values of resistors R6 through R8 is selected based on the forward current rating of the LEDs.
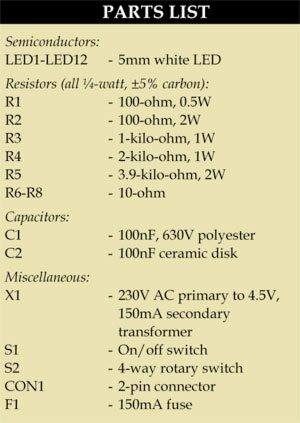
After the selection of LEDs and transformer X1, simple calculations are needed to determine the values of current-limiting resistors and their power dissipations. The circuit does not require any adjustment and will start working immediately when switch S1 is switched on.
Construction and testing
A single-side PCB for the AC-powered LED lamp is shown in Fig. 2 and its component layout in Fig. 3. After assembling the circuit on a PCB, enclose it in a suitable case. Fix all the LEDs in such a way that they stick out of the enclosed case. Use external wires to connect four-way rotary switch S2 to the PCB.
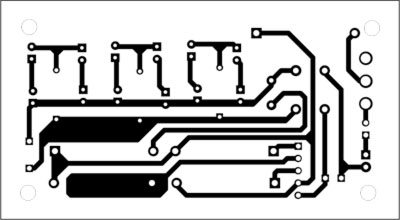
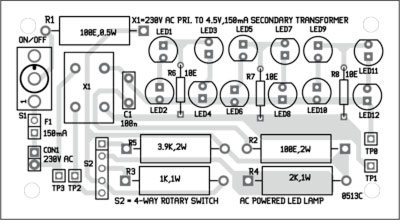
Download PCB and component layout PDFs: click here
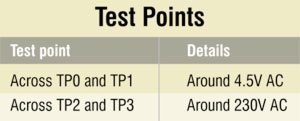
To test the circuit, power it on using switch S1 and keep switch S2 at position 4. Now measure voltages across the test points shown in the table.
Warning. The input section of this circuit is directly connected to 230V AC mains, which is potentially lethal! So take all necessary precautions while assembling the circuit!
The author worked as a researcher and assistant professor in the Technical University of Sofia (Bulgaria) and as a lecturer and expert-lecturer in the Kingdom of Morocco. Now he is an electronics engineer in the private sector in Bulgaria


