 What binoculars do to improve your vision, this personal sound enhancer circuit does for listening. This light-weight spy ear gadget produces an adjustable gain on sounds picked up from the built-in high-sensitivity condenser microphone. So you can hear what you have been missing. With a 6V (4X1.5V) battery, it produces good results.
Circuit Overview:

As shown in Fig. 1, a small signal amplifier is built around transistor BC547 (T1). Transistor T1 and the related components amplify the sound signals picked up by the condenser microphone (MIC). The amplified signal from the preamplifier stage is fed to input pin 3 of IC LM386N (IC1) through capacitor C2 (100nF) and volume control VR1 (10-kilo-ohm log). A decoupling network comprising resistor R5 and capacitor C3 provides the preamplifier block with a clean supply voltage.
Audio amplifier IC LM386N (IC1) is designed for operation with power supplies in the 4-15V DC range. It is housed in a standard 8-pin DIL package, consumes very small quiescent current and is ideal for battery-powered portable applications.
The processed output signal from capacitor C2 goes to one end of volume control VR1. The wiper is taken to pin 3 of LM386N audio output amplifier. Note that the R6-C4 network is used to RF-decouple positive-supply pin 6 and R8-C7 is an optional Zobel network that ensures high frequency stability when feeding an inductive headphone load.
Capacitor C6 (22uF, 16V) wired between pin 7 and ground gives additional ripple rejection. The output of LM386N power amplifier can safely drive a standard 32-ohm monophonic headphone/earphone.

Construction & Testing:
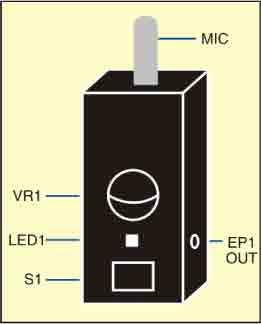
Assemble the circuit on a small general purpose PCB and house in a suitable metallic enclosure with an integrated battery holder and headphone/earphone socket as shown in Fig. 2. Fit the on/off switch (S1), volume control (VR1) and power indicator (LED1) on the enclosure. Finally, fit the condenser microphone (MIC) on the front side of the enclosure and link it to the input of the preamplifier via a short length of the shielded wire.
Key Features and Considerations:
- Potential Applications: The Spy Ear can be used for a variety of purposes, including wildlife monitoring, listening to lectures from a distance, and assisting persons with hearing loss.
- Adjustable Gain: The volume control allows users to tailor the amplification level to their listening environment, making it suitable for both quiet and boisterous situations.
- Portability: The Spy Ear’s tiny form and battery operation make it extremely portable, letting customers to take it with them for on-the-go audio augmentation.
- Customizable Features: Users can experiment with other microphone types or tweak the circuit to improve certain frequency band for more personalized listening experiences.
- Safety Considerations: Use the gadget properly and ethically, respecting privacy and regulatory restrictions governing sound amplification in public places.
The article was first published in April 2010 and, has recently been updated on 30 October 2024.


iam doing project on listening bug using lm386…can i have a making video?
pcb layout please
Advantages and disadvantages