 This bipolar transistor tester can indicate the type of the transistor as well as identify its base, collector and emitter pins. The circuit is very simple. The direction of current flow from the terminals of the transistor under test (TUT) is indicated by a pair of LEDs (green-red).
An NPN transistor produces a red-green-red glow, while a PNP transistor produces a green-red-green glow, depending on the test point that connects to the terminal of the transistor. Emitter and collector are differentiated by pressing pushbutton switch S1 that actually increases the supply voltage of the circuit by about 5.1 V.
Bipolar transistor tester circuit
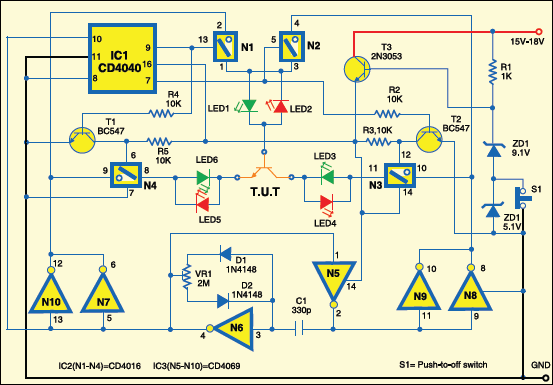
At the heart of the circuit is IC CD4069 (IC3), which oscillates and produces pulses required to test a pair of transistor leads for conduction in both the directions. Different combinations are selected by an arrangement of counter CD4040 (IC1) and bilateral switch CD4016 (IC2).

Above is the circuit of the bipolar transistor tester. A pair of LEDs is connected to each test point through which current flows in both the directions. Each LED corresponds to a particular direction. In this manner, both junctions of the transistor can be tested.
The LEDs are arranged to indicate the type of the semiconductor across the p-n junction. The counter is clocked by the AC generator built around gates N5 and N6. This makes the LEDs glow continuously for easy observation, revealing the direction of current flow between different test points.
So, if the red LED connected to certain point glows, it means that n-type of the junction is connected to that test point, and vice versa. Thus a red-green-red glow indicates an NPN type of the transistor, while a green-red-green glow indicates a PNP transistor. From this observation, you can easily detect the base.
Collector and emitter are differentiated based on the principle that the base-emitter junction breaks down under reverse bias much more easily than the base-collector junction. Thus under increased AC voltage, you can easily see that the emitter conducts more in the reverse direction (associated LED glows significantly) than the collector. Use of transparent or semi-transparent LEDs is recommended.
Adjust preset VR1 (2-megaohm) to get an equal glow when any two test points are shorted. Unregulated 15V-18V is regulated by the Zener-transistor combination to power the circuit.
Circuit operation
The testing procedure is simple. Normally, the transistors can be plugged in any orientation as they come in a variety of possible arrangements of the base, collector and emitter pins, such as CEB, BEC and CBE. Simply plug the TUT in the possible combinations of three points. A red-green-red glow means that it is NPN transistor and the pin associated with green LED is base.
To identify the emitter and collector, simply press switch S1 and observe green LEDs adjacent to already glowing red LEDs. The green LED glowing with a high intensity indicates the emitter side, while the low-intensity LED indicates the collector side.
Similarly, a green-red-green glow means that the transistor is PNP type and the pin associated with the red LED is the base. To identify the emitter and collector, simply press switch S1 and observe red LEDs associated with the already glowing green LEDs on the sides. The LED glowing with a high intensity indicates the emitter side, while the low-intensity LED indicates the collector side.

Construction & testing
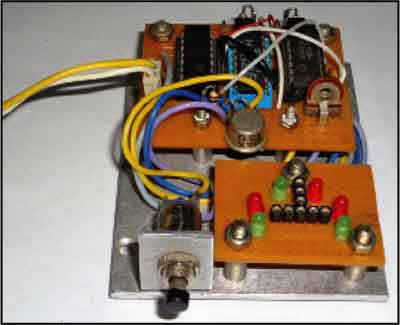
Assemble the circuit on a general-purpose PCB and enclose in a small box. Keep the preset knob in the middle. In order to make it easy to plug the TUT, you can increase the number of test points as shown in the author’s prototype here.
The project was first published in August 2010 and has recently been updated.


PCB Layout Please