


In this project, we are going to learn how to design a smart AI robot that can recognise a person’s face, can recognise that person’s voice, and thus receive various commands for welcoming guests or for security purposes. One can also preview live streaming with a camera through face recognition.
Note: This is the first version of the robot. We published the updated version.
Components Required
For this AI robot, we need the following components.
- 2 Servo Motors
- 2 OLED SSD1306s
- 2 Arduino boards
- Raspberry Pi 4 board
- Raspberry Pi camera
- Amplifier
- Bluetooth HC 05
- Bluetooth Audio receiver
- 3 thin metallic rods (7cm long)
- A hard-cardboard or wooden base to mount the robot head
- USB data cable
- 5V power adapter
- Connecting wires
- Last but not least, a robot face mask (Here we are using an open-source INMOOVE robot head).
NOTE: As the sensors and parts are customizable, the above bill of materials can vary.
Also Check: Unveiling Our Open-Source Facial Expression Recognition Technology
Assembling the AI Robot’s Face
This may vary according to the different shapes and sizes of the robot head design. Here, I am using the Open Source INMOOV robot head that has been created using a 3D printer. You can even 3D print your own face and use it as a robot head, or get various 3D printed robot heads from thingiverse.com.
NOTE: Before assembling the OLED display for the robot’s eyes, first solder it to make the proper connections (as explained later).
Make sure to securely screw the OLED displays onto the eye piece of the robot head as shown in Fig. 1
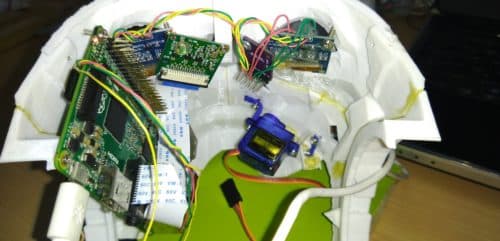
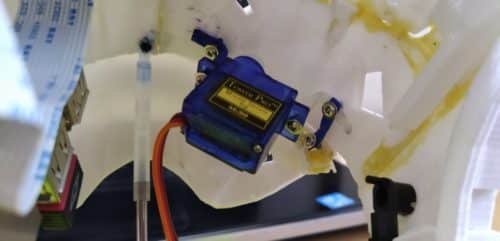
After this, mount the Raspberry Pi camera (connected to the Raspberry Pi board) carefully beside one of the OLED displays. Attach a servo motor near the mouth of the robot head. This will allow the robot’s jawline to open and close (See Fig. 2, 3)

Supporting the Robot head
First, firmly fix another servo motor on a cardboard or wooden base with the help of a screw or hot glue. This will provide up and down movement to the robot’s head.
To make a sturdy support, screw three thin metallic rods in such a way that they surround the servo motor in a triangular shape. Make sure to connect one end of a metallic rod with the shaft of the motor. (See Fig. 4, 5, 6).


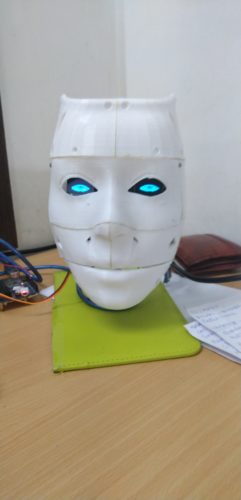
Now the basic assembly portion is done. The final AI Robot head will look like this (See Fig. 7).
Now, let’s move on to the coding part.
Prerequisite
Before we begin, go to the Library Manager of Arduino IDE and install the following libraries:
- Adafruit GFX
- SSD1306 OLED
Similarly, install the following modules in the Raspberry Pi for a Python 3 environment.
- Numpy
- Scipy
- Open cv
- Cv2
- Face recognition
- Espeak
- Matplot
- Keras
To install these libraries, follow the library installation instructions available in the documentation folder of each library.
Coding for the Face Recognition Robot’s Eyes
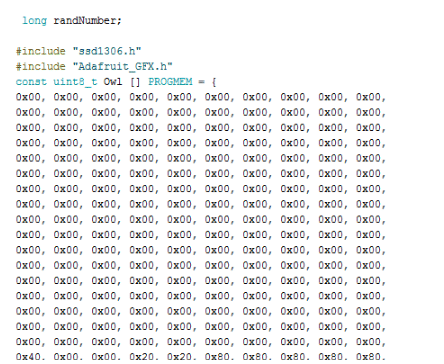
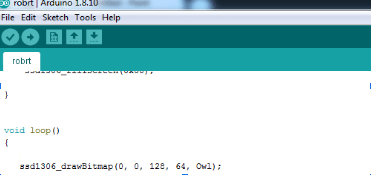
We will add the above Arduino libraries into the code using the ‘include’ function and then insert the bitmap hexadecimal code for the eyes (See Fig. 8).
Next, we create a loop function to call the above bitmap codes to preview them on the OLED display. (See Fig. 9).
Coding for Face Recognition
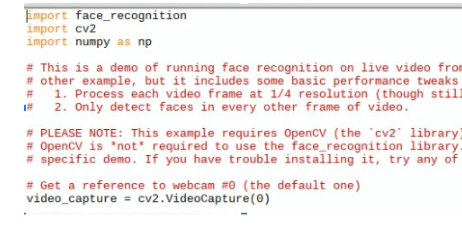
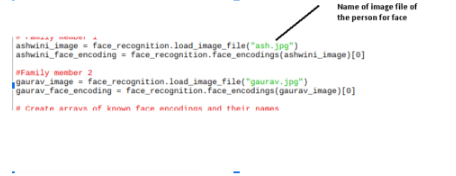
This is to recognize the person in front of the robot (known or unknown). In this code, we will import 3 modules: face recognition, cv2 and numpy. We will create different arrays for recognising faces and names. Make sure to write the image file name of that member for correct face recognition. (Refer fig 10 and 11).
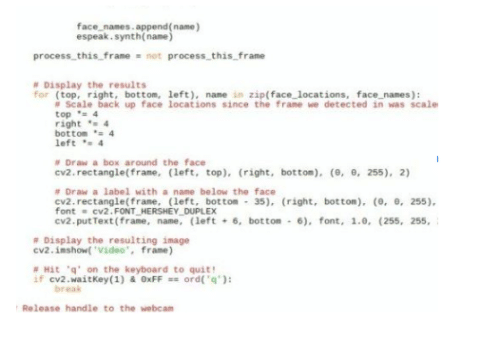
In the next part of code, we will try to match the face that has been captured by the camera with the array of known faces. If the face matches, then the code will run the espeak synthesizer to speak the person’s name using the syntax ‘espeak.synth ()’ as in the pic below (See Fig.12)
Circuit Connection
OLED to Arduino Connection

| Arduino | OLED |
| GND | GND |
| 5V | VCC |
| SDA(A4) | SDA |
| SCL(A5) | SCL |
To get audio output with the help of a Raspberry Pi, you can follow the two processes below:
- Connect any small speaker via the TTRRS (aux) audio output of the Raspberry Pi to TTRRS(Aux) of speaker, or
- Use a small speaker with an amplifier.
Now connect one end of the Raspberry Pi camera’s ribbon cable to the Raspberry Pi camera input present on the board. Then, power the Arduino Mini connected with the OLED display via the 5V pin of the Raspberry Pi.
Now our AI Robot is ready to work.
Testing
After booting the Raspberry Pi, open the face recognition script that we have made and run that script. Now, on the OLED display, you can see the robot’s eyes move. Whenever you go in front of the camera, the robot will recognize your face and say your name.
Download Source Code
Check more such AI and Machine Learning projects.

do you sell or teach how to make this project
Total cost of this project?
What is the cost of it
please make a video how to assemble it i face some problems
Hi, Looks like this could be a great project with some extra information. Have you a wiring diagram for this? especially for the Pi/Arduino connection as I’ve not done that before and also you have some code in screenshots that I can’t find? Thanks Darren
Sir please give me source code and diagram
Hi Selva, the source code is present at the end of the project.
Please provide your Email ID as I want to make this project and want some suggestions.
please share the circuit diagram as well as the block diagram and the connections of the project
Where to by the robo face mask?
Hello
sir,
humbly request you that i want to create that project but, where these component will available
if we purchase all component how we assemble,
sir we want to help from your
we must submit the project and this project is my choice
please give me your whats app or other contact Number
my cell no 00929150293
email: [email protected]
Regard
Habib Ullah
waiting for your response
Thank you!
can w get more information on this project like connections and all plaease
ph no. 7022054482
hello if you willing to sell this project, please let me know. my email address is [email protected]
You can make this project by yourself. You can buy the parts and kits needed in the project from kits n spares http://kitsnspares.com/user2/default.asp
thank you so much for the useful information. I am humbly requesting whether you can sell/share the wiring diagram. I am planning to use this project as my student’s final year project. We will put your name in the acknowledgement section.
sir need the block diagram with the circuit diagram and a compl;ete video to setup the robot and the environment
The only connection needed is OLED display and Arduino that is described in Table and then you only need to add the camera and Raspberry and run the code.IF face any problem please let me know in comments
where you installed the camera to recognize the face?
Please provide the code with Python Environment. Also the code at the end is not working. Kindly ponder upon this.
The code is tested and working , But you haven’t set the inputs in code. You need to set the image and file name and path with your image and file and path name .
Can you upload the circuit diagram of this project? Because it’s difficult to figure out connections based on instructions and connection pics shown above. Or email will also be fine. Thanks.
Email: [email protected]
There is Not much connection , You only Need to put the Camera into Raspberry PI camera port .
ANd then Connect the OLED display to Arduino to Arduino SDA and SCL pins tof arduino to OLED display pins. If you need more help contact me on whats app 7061350809