 A dew sensor is used in sensitive electronic equipment like cameras and copiers etc, to protect them from moisture failure by fast detection of dew. You can easily build one yourself using the readily-available dew sensor element as described here. Alternatively, you can use the tiny dew sensor element of your old VCR or video camera.
This simple but highly responsive circuit protects equipment from dew (condensed moisture) can also be used to prevent condensation on surfaces like cold water pipes and windows.
Dew sensor circuit

The working of the dew sensor element (DS1) is based on the change in resistance of a conductive polymer in a thin film on a small ceramic substrate. When the sensing polymer becomes wet, its resistance increases drastically because the polymer expands o increase the distance between the conductive particles.
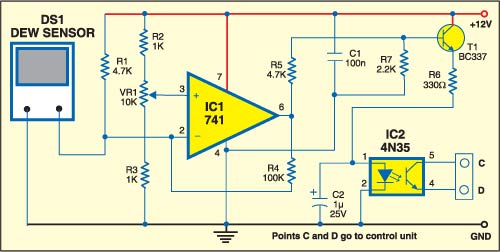
In the circuit, the dew sensor element (DS1) is connected to inverting input pin 2 of op-amp UA741 (IC1). Resistors R2 and R3 and VR1 preset provide the reference voltage at the non-inverting input pin 3 of the op-amp. When a high humidity is detected, the output of IC1 changes states to switch on galvanic-isolator IC 4N35 (IC2) through optocoupler driver transistor BC337 (T1).
Adjust preset VR1 such that IC2 is disabled when the sensor (DS1) detects ow humidity and enabled when humidity is high.
The circuit operates off 12V DC, which may be provided by a separate mains adaptor. It can operate off lower voltages as well, provided you select the right components.
Construction & testing
Assemble the circuit on a general-purpose PCB and enclose in a suitable aluminium cabinet. Mount the dew sensor element on the front panel of the cabinet using a double-sided bonding tape. For maximum bond strength, the metallic surface of the cabinet on which DS1 has to be mounted should be thoroughly cleaned and dried. You can use isopropyl alcohol as the cleaning solvent.
Use a long wire to connect sensor DS1 so that it can be extended to the desired distance. Using a shielded cable for the purpose would eliminate transient problems.
This dew-point sensor can precisely sense the dew-point and activate any externally connected relay or similar controller to sound an alarm. A small amount of hysteresis added to the comparator helps it to avoid oscillations of the information.
Note:
As shown in the circuit, safe and secure galvanic isolation is provided at the output of IC1 using optocoupler 4N35 (IC2). Both the terminals of the internal phototransistor of IC2 are hanging, so you can interface this circuit to an analogue/digital gadget after suitable modification at its trigger input. Further, for simple purposes, you can replace optocoupler IC2 with an electromagnetic relay. For this, just remove resistor R6, capacitor C2 and IC2 and connect the electromagnetic relay between the emitter of transistor T1 and ground. Don’t forget to add a free-wheeling diode in anti-parallel with the relay coil.
The project was first published in May 2011 and has recently been updated.


Can you please let me know about the specificatioins about this DSI sensor