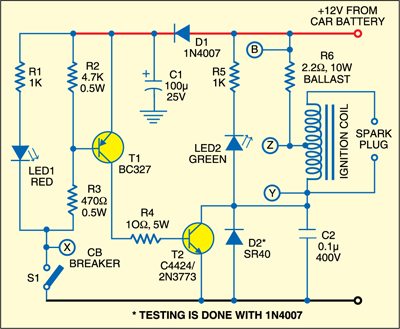
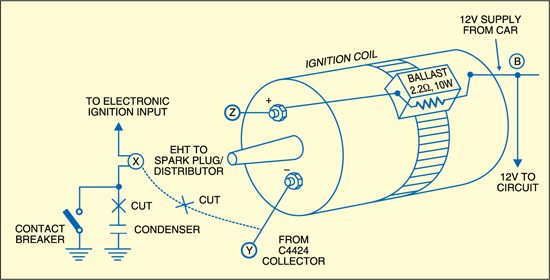
 In older carbureted cars, the contact breaker (CB) point ignition system is used to fire the spark plugs. You can convert the ignition system of your car from CB-point-cum-condenser type into electronic using transistorised switching. The circuit of the electronic ignition coil is shown in Fig. 1 and its electrical connections in Fig. 2.
Electronic ignition coil
In Fig. 1, when the CB point is open, both transistors T1 and T2 are cut-off and no current flows through the ignition coil. On closing the CB point, transistors T1 and T2 conduct and a very high current flows through the ignition coil. As a result, very high voltage develops in the ignition coil to drive the spark plug. A red LED (LED1) glows to show the pulsing action of the CB point. Ballast resistor R6 (2.2-ohm, 10W) limits current through the ignition coil.

The green LED (LED2) connected in the output section lights up with back emf and therefore it should be connected with reverse polarity as shown in Fig. 1. Use a proper heat-sink for power transistor C4424 (T2).
In Fig. 2, the ignition coil is shown along with a condenser and EHT to spark plug/distributor connection. The condenser is not required for electronic ignition. One pin of the CB point is already grounded and the other pin that goes to the ignition coil needs to be isolated. This pin is marked as ‘X’ in the diagram and senses the input to electronic ignition.

Note:
Do not remove the CB-point screw as there is no need to alter the switch gap that will change engine tuning. All you have to do is remove the capacitor from distributor and cut the wire that goes to the ignition coil (negative) point.
Care must be taken not to touch the ignition coil pins while wiring the circuit. Power supply for the circuit is derived from the existing wiring of the car battery at point ‘B’ (positive). Make sure that you do not short-circuit the wires as it may cause fire.
Circuit operation
In the ignition system, ground (negative) can be taken from any screw on the chassis of the car. Assemble the circuit on a general-purpose PCB and house the same in a metallic box with proper insulation. You can also use a plastic electronics switch box. However, care must be taken to isolate the heat sink of transistor C4424 from the box as it will be very hot.
As mentioned earlier, there is a condenser inside the distributor. You may have to remove the distributor cap by unlocking the two clips. Then cut one side of the condenser wire. Do it carefully. If you want, you can remove the condenser and keep it outside the distributor. Connect one point of the condenser to ground and leave its other point open after covering it with insulation tape. In the event of electronic ignition failure, you can start up the car by just reverting to the old system. So don’t throw away the condenser.
Note:
Avoid short-circuiting of any wire with ground. The car battery can supply as much as 100A current, which would be dangerous. So care must be taken while handling the ignition- circuit wiring.
For satisfactory working of the circuit, use ignition coil from Autolec/Lucas, spark plugs from Champion and any non-resistive-type ignition cable (when you measure the resistance of the ignition cable, it should be nearly zero).
Don’t replace C4424 with any other transistor as only C4424 can withstand back-emf from the ignition coil.
Regarding spark plugs, you don’t need to replace them. Also, never take out the distributor or its alignment nut. When you replace the older system with electronic ignition, ignition timing remains the same.
The article was first published in February 2008 and has recently been updated.


