MQTT is very useful for connections with remote client where a small code footprint is needed, or internet bandwidth is very low. For example, it has been used in sensors communicating to a broker using satellite link or in a range of home automation and small devices. Also, ideal for mobile applications because of its, low power usage, small size, minimized data packets, and well distribution of information to one or many receivers.
MQTT Protocol was first designed in 1999, but with the growth of the IoT, and the need to communicate between low-powered devices, MQTT has recently found it’s market. MQTT was designed with ability to run in an embedded environment where it would reliably and effectively provide an avenue for communication.
How It Works
MQTT protocol uses a publish/subscribe architecture where as HTTP uses its request/response architecture. MQTT protocol is event driven and enables messages to be pushed to clients. The heart of MQTT protocol is the MQTT broker, it is responsible for dispatching messages between the senders and receivers. Every client that publishes a message to the broker includes a topic into that message. The topic is routing information for a broker. Each client that wants to receive messages need to subscribe to a certain topic and broker delivers all messages with the matching topic to a particular client. The clients don’t need to know each other, they only communicate using the topic over MQTT broker.

Understanding MQTT By Practical Example
To understand it better, let’s do a practical for more clarity about MQTT. There is a free server, http://test.mosquitto.org/ where you can test your first MQTT message. The default port for MQTT is 1883, but this is not encrypted (Not Secure), So don’t use for commercial purpose.
What You Need:
Two android Phone or Two PC with Internet Connection
Testing Your MQTT message in Android Phone:
Step 1: Download an application named “MQTT Client” on both android Phone from this link
Step 2: Open application and Go to settings
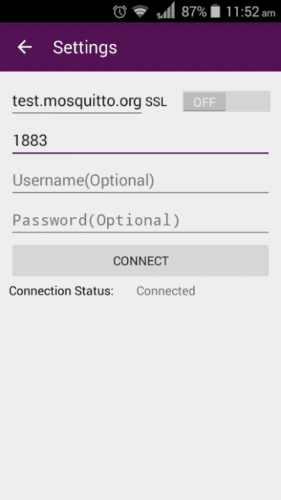
a. In First text box enter URL of MQTT Server/Broker that is test.mosquitto.org
b. Second Text box is for Port, type 1883
c. You have to left username and password blank.
d. Press Connect
e. Do the same thing other phone.
Step 3: Now you have to create a TOPIC in Phone 1
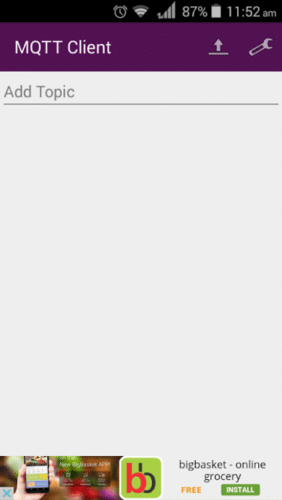
In the top Right corner of application, you can see an upload button symbol near setting button, press on that. You will see a page like below.
Fun fact: Facebook uses MQTT for its Chat Messenger.
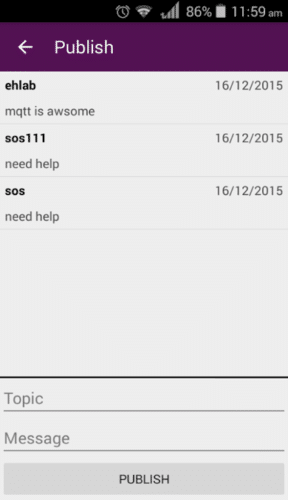
Create Topic On Phone 1
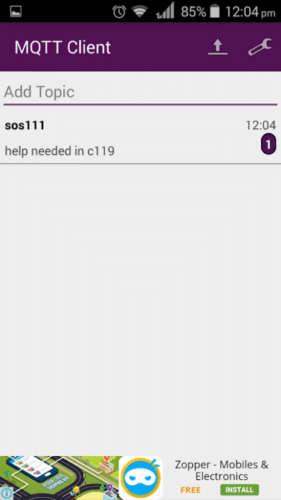
Subscribe to a Topic on Phone 2
In the above image, you can see there are two textbox One is Topic, and Other is message. Phone 1 needs to create a Topic, and Phone 2 should subscribe a topic. Let’s say I create a Topic Called “SOS111” and Message is “Need Help” from Phone 1, and from other Phone I subscribe to SOS111, then I will get the message “Need Help”. Is that not Cool. To subscribe to the topic on Phone 2, you need to go to Page 1 of application and in “Add Topic” Text box, you must type the topic name in phone 1, which is “SOS111” like shown in above screenshot.
Setup Your Own MQTT Server/Broker
You can setup your own MQTT server/Broker on any Cloud Server or on a local machine or everyone’s favorite Raspberry PI. In this article we will learn how to setup a local MQTT server at our Home on Raspberry Pi.
You Need:
a. Raspberry Pi 2
b. Internet Connection
c. 30 Min Time
Step 1:
We need to install few dependencies before we compile and run our own MQTT server.
a. sudo apt-get update
b. sudo apt-get install libssl-dev
c. sudo apt-get install cmake
d. sudo apt-get install libc-ares-dev
e. sudo apt-get install uuid-dev
f. sudo apt-get install daemon
Step 2:
Then we need to download and compile libwebsockets To download use below command
wget http://git.libwebsockets.org/cgi-bin/cgit/libwebsockets/snapshot/libwebsockets-1.4-chrome43-firefox-36.tar.gz
Unpack using following command
tar zxvf libwebsockets*
then change directory to using: cd libwebsockets*
Make a build directory inside libwebsockets using bellow command
mkdir build
cd build
Then to build
cmake .. #(note the ..)
Then run following command to install
sudo make install
Then we need to rebuild the library cache
sudo ldconfig
change the directory to Home by command
cd
Step 3:
Then we need to download the source code of MQTT broker, which is Mosquitto using following command
wget http://mosquitto.org/files/source/mosquitto-1.4.1.tar.gz
unpack using following command
tar zxvf mosquitto-1.4.1.tar.gz
cd mosquitto-1.4.1
open and edit config.mk in your favourite editor
change the line “WITH_WEBSOCKETS:=no” to “WITH_WEBSOCKETS:=yes”
Then compile using bellow command
make
Then to install use below command
sudo make install
Then we need to create a config directory inside /etc
sudo mkdir /etc/mosquitto
copy default config file to /etc
sudo cp mosquitto.conf /etc/mosquitto
Add the following two lines to /etc/mosquitto/mosquitto.conf at the end of file
listener 9001
protocol websockets
then add a user for mosquitto using following command
sudo adduser mosquitto
Then reboot and login user as mosquitto
after successful login run below command
mosquitto -v
Congrats, your first MQTT server is up and running. You can do same communication using any MQTT client that you did with your android Phone last time in previous section.
A small Automation Project using MQTT
The main objective of project to learn MQTT using it in home automation using ESP8266. We will make a project, by using which we can control one relay anywhere from world using a browser of a mobile application.
Requirements
1. ESP8266 (we have used ESP-12)
2. General Purpose PCB
3. Jumper wire
4. Soldering IRON
5. Multi-meter
6. PC/Laptop/Internet Connection
7. An account in Heroku.com
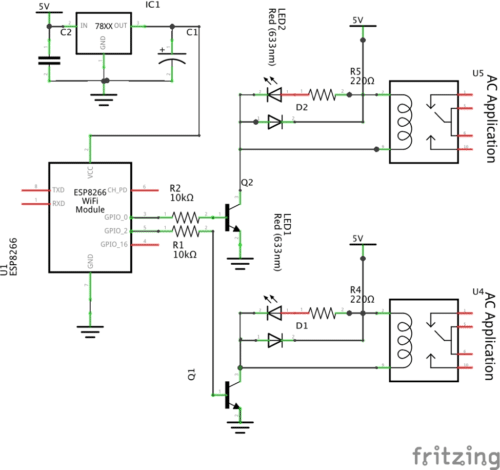
Schematic
Communication Diagram
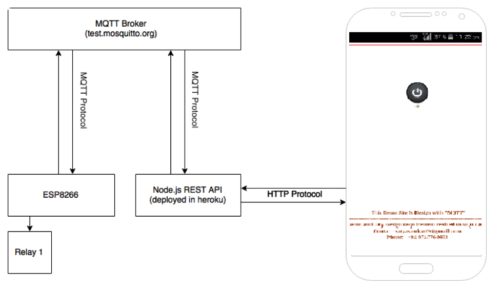
The Communication diagram is shown in above image. This article shows you how to make your own REST API server for the ESP8266 and your Mobile App to communicate to, via MQTT. You can use the existing REST API server that is deployed in heroku or you can deploy your own. If you don’t want to use “test.mosquitto.org” as your MQTT Broker as stated in previous chapter.
After assembling the SCH shown above you need to download the code to ESP8266. You can download the source code from below link.
To compile the code you need to install and ESP8266 Arduino library and PusbSUBClient Library which can be downloaded from bellow
https://github.com/embeddedhacks/pubsubclient
https://github.com/embeddedhacks/Arduino
Once you successfully installed library and compiled download the code to ESP8266 and You are ready to go.
ESP8266 Arduino Code Explanation
This code block connects the ESP8266 to the wifi network by specifying the SSID and password. This block also establishes a connection with the MQTT broker.
#include #include
const char* ssid = “your-wifi-ssid”;
const char* password = “your-wifi-passwd”;
char* topic = “device/control”;
You have to change above with your home wifi and password name.
char* server = “85.119.83.194”; // IP of test.mosquitto.org
WiFiClient wifiClient;
PubSubClient client(server, 1883, callback, wifiClient);
Now you need to make resapi based MQTT client You can host rest api on heroku server.
You can create your own server locally or by deploying it in the cloud. This node application requires two modules; Hapi.js is a REST API framework while MQTT.js is an mqtt client.
This block initializes the REST API server, as well as establishes a connection with the MQTT broker.
var Hapi = require(‘hapi’);
var mqtt = require(‘mqtt’);
var server = new Hapi.Server();
var port = Number(process.env.PORT || 4444);
server.connection({ port: port, routes: { cors: true } });
var client = mqtt.connect(‘mqtt://test.mosquitto.org:1883’);
This function is for publishing messages to the broker.
var mqttPublish = function(topic, msg){
client.publish(topic, msg, function(){
console.log(‘msg sent: ‘ + msg);
});
}
This block creates a route for the ‘/device/control’ POST Method, wherein if this route is being called it will execute the mqttPublish function. The ‘deviceInfo’ variable contains the message for the ESP8266 to translate, wherein ‘dev1-on’ turns the relay 1 on, ‘dev1-off’ off and same thing for ‘dev2-on’ and ‘dev2-off’.
server.route([
{
method:’POST’,
path:’/device/control’,
handler:function(request,reply){
var deviceInfo=’dev’ + request.payload.deviceNum + ‘-‘ + request.payload.command;
reply(deviceInfo);
mqttPublish(‘device/control’,deviceInfo,{
‘qos’:2
});
}
}
]);
server.start();
The first parameter in the mqttPublish function ‘device/control’ is the topic wherein our ESP8266 listens to, then the second parameter is where the message ‘deviceInfo’ is being passed to. The ‘qos’ means quality of service. It is a level of agreement between sender and receiver of a message regarding the guarantees of delivering a message.
Your server part is ready. Now you need a HTTP client which can make post request to your server. For that you can use different website or HTTP client. But I have made my own for this project.
The source code of this demo can be downloaded from here.
If you open index.html in notepad you can see, I have doing a post request to my rest api hosted on heroku. like shown in below
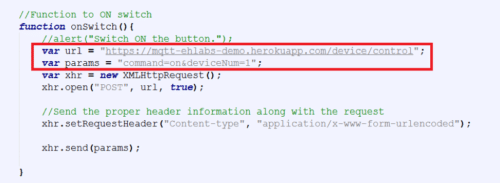
I have passed two parameter command=on and deviceNum=1
These two parameters are being parsed by esp8266 to make the relay on and off.


