


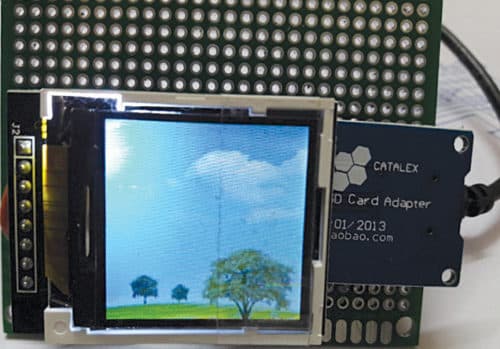
 A small TFT display connected to Raspberry Pi can display many pictures one after another. This can also be done using ESP32, using the same calculations and tricks. This project is used to create a picture slideshow using ESP32 and an SD card shield. The display can be ILI9163 TFT, Nokia 5110 LCD or equivalent. The author’s prototype is shown in Fig. 1.
Circuit and working
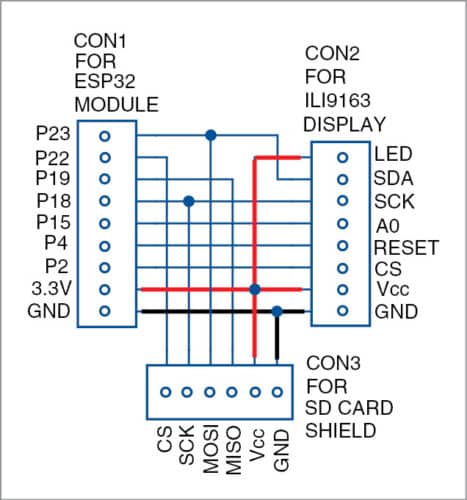
The circuit diagram of ESP32 picture slideshow is shown in Fig. 2. Main components used in this project are ESP32 module, ILI9163 TFT display module, SD card shield and SD card. Details of the connections of the modules and shield are given in the table.
ESP32
It is a low-power microcontroller (MCU) with integrated Wi-Fi and dual-mode Bluetooth—it is a successor of ESP8266 MCU. Once programmed, ESP32 never hangs, because it works on 3.3 volts and a single set of instructions, unlike Raspberry Pi. ESP32 is easy to handle and works well for small programs.

Pin map diagram of SparkFun ESP32 is shown in Fig. 3. The modified library and other associated files are packed in a folder for this project. Arduino IDE is used to upload the sketch to ESP32. (ESP-Wroom-32 version 1.1 was used at EFY Lab for testing purposes.)

TFT display
The 3.65cm (1.44-inch) coloured TFT screen display with SPI serial bus was used during testing. It is compatible with Nokia 5110 display, and is available on www.aliexpress.com

SD card shield
This requires a 5V DC power supply or smartphone charger. There are many SD cards available online, but 6-pin connector SD card shield was used at EFY Lab. It is available on www.ebay.in
Software
Arduino sketch esp_image.ino is simple to understand. The libraries required in the sketch include TFT_ILI9163C, Adafruit_GFX_Library and SD. Some library files are already inbuilt in Arduino IDE.

The sketch enables ESP32 to communicate with the TFT display and SD card. Then, it loads image files from the SD card to the loop. bmpDraw function in the sketch sizes the images and places these on the display, and the loop continues.
bmpDraw( ) function is available online from Adafruit and other TFT package suppliers for loading picture files (.bmp) to the SD card.
The header file (TFT_ILI9163C.h) for ESP32 was modified because images were not appearing on full screen.
ILI9163 TFT may have problems with full 128×128 resolution display. However, by tweaking TFT_ILI9163C.h file for the offsets variable, the problem can be resolved. To resize the images, use resize command on Ubuntu. The command is: convert -resize 128×128 source.xyz destination.jpg
Image files can be in any format, including .bmp and .jpg. Dump these in the SD card root directory as 1.bmp, 2.bmp, 3.bmp and so on. To convert picture files from .jpg or other formats to .bmp, use utility software like GIMP, PicsArt and MSPaint.
When you first switch on the power supply, the SD card may fail to load. Restart ESP32 to solve the problem.
This project shows that display-related projects can be made easily on ESP32 rather than Raspberry Pi.
Construction and testing
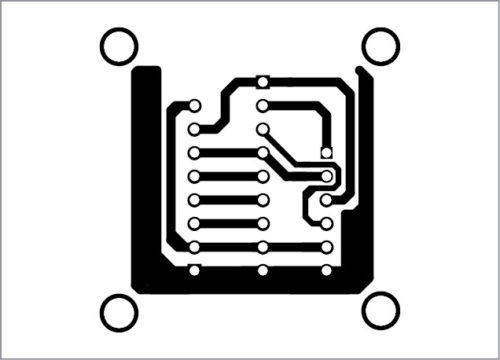
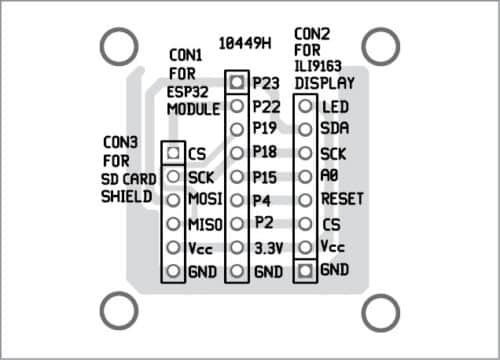
A PCB layout for the picture slideshow is shown in Fig. 4 and its components layout in Fig. 5. Assemble the components on the PCB, as per the circuit diagram.
The connections are easy. Use appropriate ESP32 pins. In this project, all data pin connections of ESP32 board are located on one side.
Download PCB and Component layout PDFs: click here
In the prototype, a double-sided, general-purpose PCB was used. ESP32 was soldered on one side, while SD card shield and TFT display on the other.
SD card should contain 128×128 pixel .bmp images, so that these can appear perfectly on the TFT display. Number of images to be displayed depends on the memory capacity of the SD card.
Somnath Bera is an avid user of open source software. Professionally, he is a thermal power expert and works as additional general manager at NTPC Ltd.
