 Using light effects for decoration on festive occasions is a normal practice. Designers are coming up with varieties of electronic circuits to fill the imagination of users. Here is an easy-to-assemble circuit for christmas lights used in decoration as shown in Fig.1.
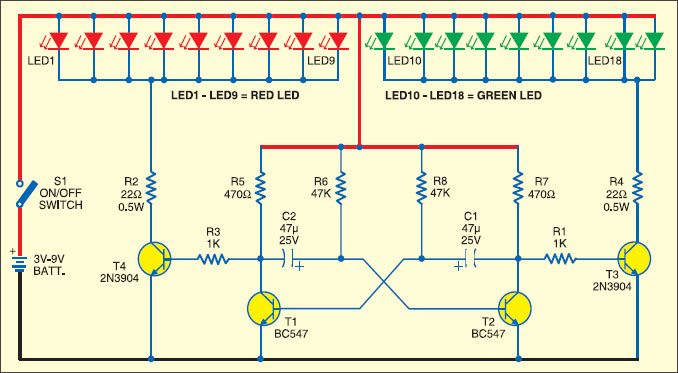
It comprises four transistors, eighteen LEDs, a few resistors and two capacitors. Transistors T1 and T2 are configured as an astable multivibrator, which means one of the two transistors is always conducting. Thus the combination produces clock pulses.
Christmas lights using LEDs
The values of time constants formed with R6-C2 and R8-C1 pairs have been selected to produce a low-frequency clock that is visible to human eye. The collectors of transistors T1 and T2 are connected to driver transistors T3 and T4. These are used to light up two rows of LEDs connected in parallel with alternate clock pulses. The frequency at which LED1 through LED9, and LED10 through LED18, alternately light up is about 2 Hz. You can easily change this frequency by changing the values of capacitors C2 and C1.

Resistors R2 and R4 are used to set the current through the LEDs. Red (LED1 through LED9) and green LEDs (LED10 through LED18) are used for simulating christmas decoration effects. For the brightness variation, you can change the values of resitors R2 and R4.
Construction & assembly
Take any general purpose PCB and cut it into a star shape. Thereafter, assemble the circuit and solder the colour LEDs onto it such that it looks like a christmas star.
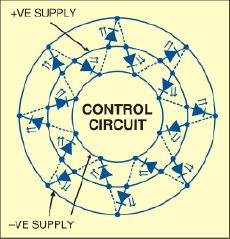
Alternatively, you can design the PCB in circular shape with a festive white lacquer finish on component side and conductor tracks on the other. Place the control circuit at the centre of the PCB board, with LEDs mounted along the outer edge as shown in Fig. 2. Along this edge, there are three circular tracks: The middle one is the positive supply, which goes to the anodes of all LEDs. The outer track is connected to the cathodes of the red LEDs and the inner tracks are connected to the cathodes of the green LEDs.

To obtain the best effect with the combination of red and green LEDs, mount them alternately on the PCB board. Exercise care so that you do not accidentally connect the red and green LEDs in parallel. The forward voltage drops of red and green LEDs are different.
The circuit works off a 3V-9V battery. It consumes little current, so two/four AA cells or a 9V battery can easily power the electronic star. You can also use a stabilised 3V-9V DC mains adaptor in place of the battery.
The article was first published in December 2007 and has recently been updated.


