 Sometimes, we need to know whether someone is still inside a building before it is locked. And if so, how many persons are still inside? There can be many other similar situations for which the circuit presented here can come handy. But it needs separate in and out gates to work and can count up to nine persons (inside) only. Though, it can be extended to count more.
Circuit and working
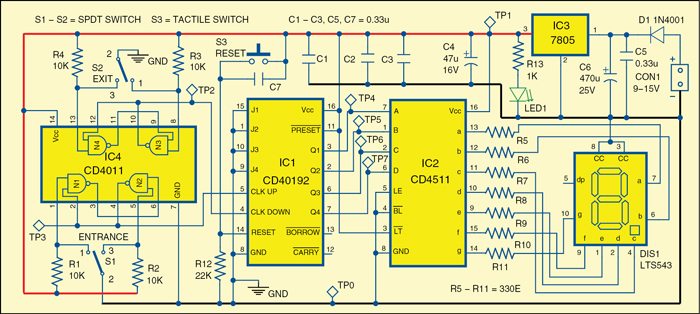
Fig. 1 shows circuit of the difference counter, built around four ICs, for use between entrance and exit doors. Switch S1, which is an SPDT switch, together with gates N1 and N2 of CD4011 (IC4) generates a pulse for incrementing counter CD40192 (IC1). CD40192 is a BCD pre-settable up/down (bidirectional) counter. The counter moves up or down with the positive clock edges applied to its corresponding pin 5 (clock up) or pin 4 (clock down).
When you press S1, its pole comes in contact with its terminal 3, which is connected to pin 5 of IC4. When you release S1, its pole returns to its original position at terminal 1. Thus, for every action of pressing and releasing switch S1, there is an increment in display DIS1 till 9. Pressing switch S3 momentarily resets the counter to 0.
 Switch S2 is also an SPDT switch that works exactly like switch S1, but it is used for decrementing the count in DIS1. Switch S2, together with gates N3 and N4 of IC4 generates a pulse for decrementing the counter in IC1.
The counter can be expanded to display more digits through the output pins 12 and 13 of IC1, if needed. High-level signal on pin 14 (reset) clears all internal triggers. That is, when switch S3 is pressed momentarily, IC1 is reset. Also, resetting occurs through capacitor C7 whenever power is switched on.
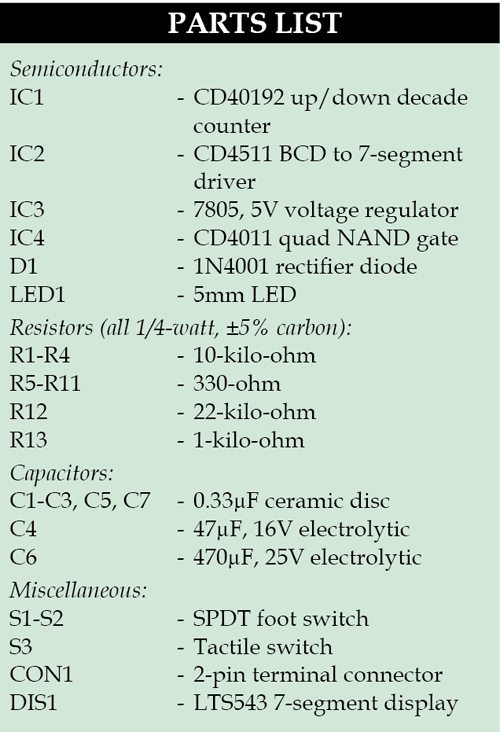
The outputs of IC1 are decoded by CD4511 (IC2), which has internal 4-bit latch, decoder and output drivers. The internal latch is always enabled because pin 5 (LE) is connected to ground permanently. The outputs of IC2 drive common-cathode 7-segment display LTS543 (DIS1). Since pin configurations may be different for the other displays, always check their datasheets before use.
Resistors R5 through R11 are usually in the range of 120 to 470 ohms, depending on the type of DIS1. Here, we have used 330-ohm resistors.
Power supply of the circuit is built around linear regulator 7805 (IC3). The input voltage is applied to connector CON1 and can be AC or DC in the range 9-15V.
Construction and testing
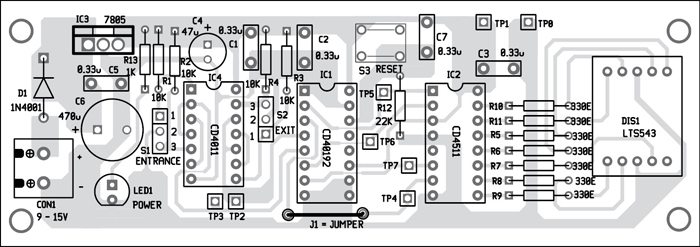
An actual-size, single-side PCB for the difference counter is shown in Fig. 2 and its component layout in Fig. 3.


Download PCB and component layout PDFs: click here
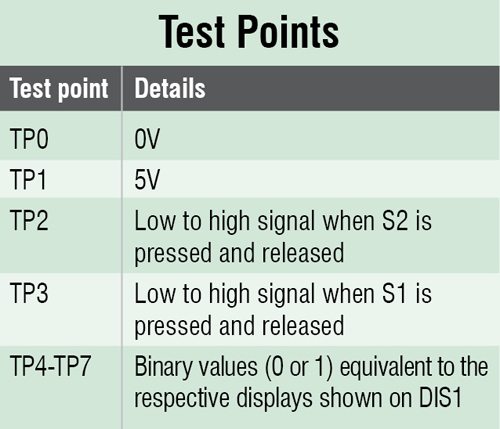
Mount the components on the PCB to save time and avoid assembly errors. Carefully assemble the components and double check for any overlooked error. Check/verify the voltages at various points as per the table.
You may use any type of SPDT switches (S1 and S2) to check the increment and decrement in DIS1 display. But for practical application, S1 and S2 should be SPDT foot switches, which could be fitted in level with the floor at the entrance and exit doors, respectively.
The author was a researcher and assistant professor in Technical University of Sofia (Bulgaria) and expert-lecturer in OFPPT (Casablanca), Kingdom of Morocco. Now he is working as an electronics engineer in the private sector in Bulgaria


how to expand the circuit for counting upto 99 using 12 and 13 pin of decade counter ic
I’m trying to make a circuit like this, but chose 4510 instead of 40192. (not found different yet)