Surface-mount device (SMD) LEDs are becoming popular because of their low power consumption and high brightness. These LEDs are readily available in the market in many colours both as single LEDs and LED strips.
Here we describe a microcontroller-based dynamic display system using LED strip that can be used for advertising message display. The display works by flashing characters sequentially and then the entire text together. Different lighting effects are possible, like flashing in zig-zag, increasing, decreasing and random patterns.
LED strip
An LED strip is made up of a number of SMD LEDs affixed to a PCB surface. LED strips are mainly of two types—flexible and rigid. These come in different lengths and light outputs.
The type of LED strip can be selected as per the desired application:
Bare strip. This LED strip is ideal for indoor (inside or under cupboards and stairs) and indirect lighting applications.
Silicon-covered strip. This LED strip is suitable for use in humid places like bathrooms and for outdoor use (accent lighting in houses and buildings).
Silicon-sleeved LED strip. This strip is fully encapsulated by a silicon sleeve and is suitable for use in swimming pools, saunas and outdoors where direct contact with rain or water is unavoidable.
The LED strip has in-built series dropper resistors and works off +12V, 400mA DC supply. It can be cut or trimmed to a smaller size of about 5 cm in length, and pasted on any flat surface (LED strips come with a self-sticking gum). In this dynamic display, we have cut the LED strip to form the word ‘EFY’.
Circuit description
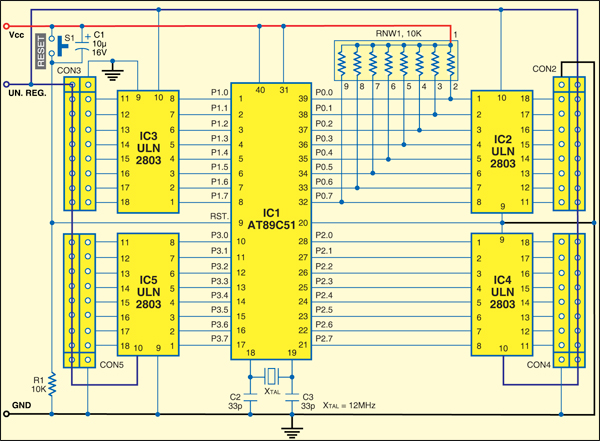
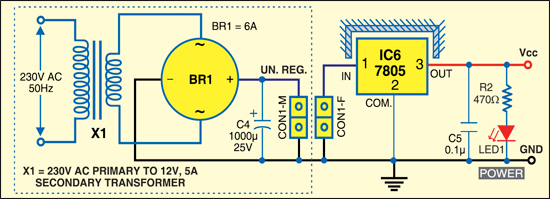
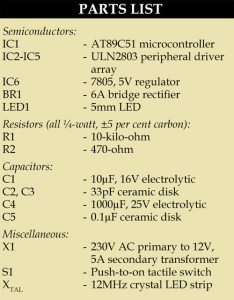
Fig. 1 shows the circuit for microcontroller-based dynamic display using LED strip while its power supply is shown in Fig. 2. It comprises microcontroller AT89C51 (IC1), octal peripheral driver array ULN2803 (IC2, IC3, IC4 and IC5), regulator IC 7805 (IC6) and a few discrete components.
Microcontroller AT89C51 is at the heart of the circuit. It is an 8-bit micro-controller with 4 kB of Flash programmable and eras-able read-only memory (PER-OM), 128 bytes of RAM, 32 input/output (I/O) lines, two 16-bit timers/counters, a five-vector two-level interrupt architecture, a full-duplex serial port, on-chip oscillator and clock circuitry.
Ports 1, 2 and 3 of the microcontroller are 8-bit bidirectional I/O ports with internal pull-ups but port 0 is an 8-bit open-drain bidirectional I/O port. Therefore port 0 is pulled up by resistor network RNW1. Port pins P0.0 through P0.7 of the microcontroller are connected to input pins 1 through 8 of IC2, respectively. Similarly, pins of ports 1, 2 and 3 are connected to input pins of IC3 through IC5, respectively, without pull-up resistors.
ULN2803 is a monolithic, high-voltage and high-current Darlington transistor array. It consists of eight npn Darlington pairs that have high-voltage outputs with common-cathode clamp diode for switching inductive loads. The collector-current rating of a single Darlington pair is 500 mA. ULN2803 has a 2.7-kilo-ohm base resistor for each Darlington pair to connect directly with the transistor-transistor logic (TTL) or complementary metal-oxide semiconductor (CMOS) devices.
LED strips are connected to output pins 11 through 18 of the ULN2803 ICs. The microcontroller drives the LED strips through ULN2803 according to the source program.
Power-on reset for the microcontroller is provided by the combination of resistor R1 and capacitor C1. Switch S1 is used for manual reset. A 12MHz crystal along with two 33pF capacitors connected between pins 18 and 19 provides the basic clock frequency to microcontroller AT89C51.
Fig. 2 shows the circuit for power supply. The 230V AC mains is stepped down by transformer X1 to deliver a secondary output of 12V, 5A. The transformer output is rectified by full-wave bridge rectifier BR1, filtered by capacitor C4 and regulated by IC 7805. Capacitor C5 bypasses the ripples, if any, present in the regulated supply. LED1 acts as the power indicator and R2 limits the current through LED1. Regulated 5V DC supply is used for the microcontroller section. Unregulated supply (12V) is used for the LED strips and ULN2803 ICs.
Download PCB and component layout PDFs: click here
Construction
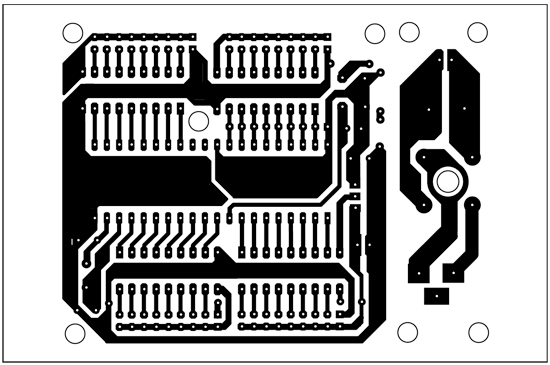
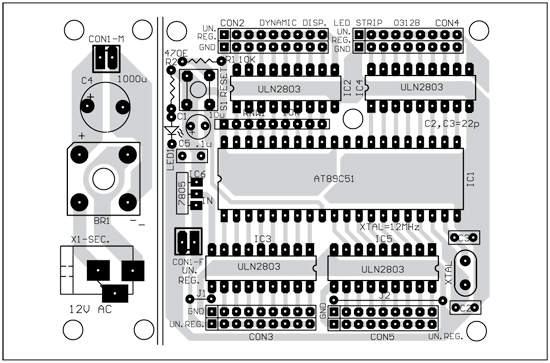
A single-side PCB for microcontroller-based dynamic display using LED strip is shown in Fig. 4 and its component layout in Fig. 5. Assemble the circuit on a PCB as it minimises time and assembly errors. Carefully assemble the components and double-check for any overlooked error. Use IC bases for microcontroller AT89C51 and driver array ULN2803. Before inserting the IC, check proper supply voltage.
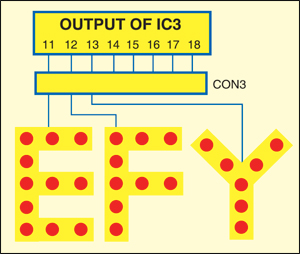
Construct ‘EFY’—a three-character word for display—using SMD LED strips as shown in Fig. 3. Normally, a 1-metre long LED strip consists of about 60 SMD LEDs with 20 segments or sections. There are three LEDs per section and each section has two points marked as ‘+’ and ‘-’ for connecting the power supply or control signal. Cut out each section as per the requirement to make the word ‘EFY.’
For example, for letter ‘E,’ cut some sections from the 1-metre LED strip, join them and connect between pin 11 of IC3 and 12V unregulated supply. Similarly, cut letters ‘F’ and ‘Y’ from the strip and connect them to pins 12 and 13 of IC3, respectively.
When the circuit is switched on, ‘EFY’ text glows in various patterns.
This circuit can also be used for lighting decorations or display during festivals or special occasions. Cut the LED strip into various segments and form the text as per your requirement. Connect each segment to the output of ULN2803 and 12V unregulated supply rail as shown in the circuit diagram.
Note that the PCB layout given here has the unregulated power supply connected to CON3 only, which is connected to port P1 of IC1. If you want to use ports P0, P2 and P3 of IC1, separate unregulated power supply shown within the dotted line in Fig. 2 has to be provided externally to each of CON2, CON4 and CON5, respectively.
An output pin of ULN2803 can drive one complete LED strip. So eight LED strips can be connected to eight outputs of a ULN2803 IC to form a big character for the display.
Software
The source program (strip.c) for microcontroller-based dynamic display using LED strip is written in ‘C’ language. It is compiled using the Keil µVision4 compiler to generate the hex code. The generated hex code is burnt into the microcontroller using a suitable programmer.
The source program allows for lighting effects like flashing in zig-zag, increasing, decreasing and random patterns. Different delay combinations make the lighting effect more attractive. Function rand( ) is used to generate the random lighting effects.
Download source code: click here
Prof. Suthikshn Kumar C.R. is working in the department of electronics engineering, Defence Institute of Advanced Technology (DIAT), Girinagar, and Shrinivas is an embedded engineer in Embedded Systems Group of Bosch (India), Bengaluru


Sir, Can i use 12V, 5A power supply kit insted of that transformer and rectifier circuit.
Yes, you can use 12V, 5A power supply with appropriate DC jack connector marked as ’12V AC’ on the PCB.
Hi friends , if anybody can give me ready assembled circuit board of led dynamic display( except led and power supply ) , I will be very much thankful to him , and shall pay for it . Please call me on 91 8237891514 or mail :[email protected]
Thanks.
where is the source code please?