 Life can be wonderful if everything around us can be controlled by simple gestures. Gesture recognition technology helps us to interact with machines naturally without any additional device. Gestures are interpreted via mathematical algorithms and corresponding actions initiated. Although this technology is still in its infancy, applications are beginning to appear. Kinect is one such application.

Though initially invented for gaming, Kinect is being used for different purposes. Kinect is a motion-sensing and speech recognition device developed by Microsoft for Xbox 360 video game console. The main idea was to be able to use a gaming console without any kind of controller.
This project uses Kinect technology to capture, process and interpret human gestures for controlling the motion of a robot.
Circuit and working of Gesture-Controlled Robot
Fig. 2 shows the block diagram of gesture-controlled robot. It comprises a Kinect sensor interfaced with a computer using USB port and a simple robot connected to the computer through USB-to-serial converter.

Kinect sensor
Kinect sensor is packed with an array of sensors and specialised devices to pre-process the information received. The Kinect and the computer—running Windows or Linux—communicate through a single USB cable.
Main features of Kinect sensor include:
Gesture recognition. It can recognise gestures like hand movements, based on inputs from an RGB camera and depth sensor.
Speech recognition. It can recognise spoken words and convert them into text, although accuracy strictly depends on the dictionary used. Input is from a microphone array.
The main components are the RGB camera, depth sensor and microphone array. The depth sensor combines an IR laser projector with a monochrome CMOS sensor to get 3D video data. Besides these, there is a motor to tilt the sensor array up and down for the best view of the scene, and an accelerometer to sense position.
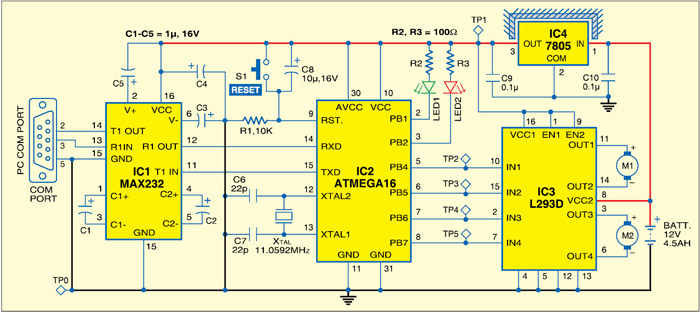
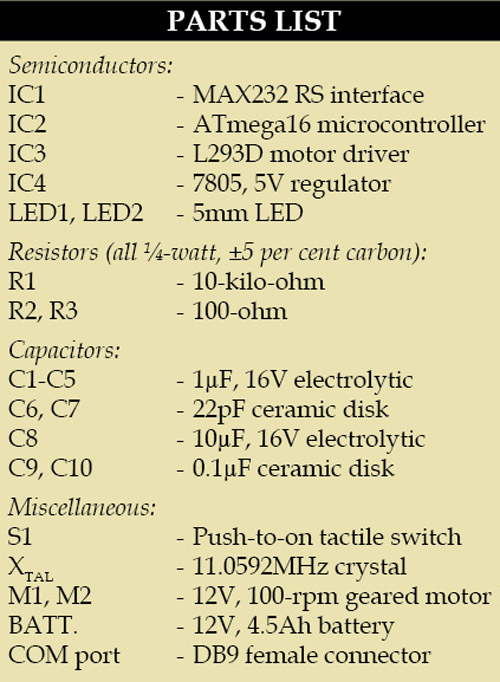
Robot. Fig. 3 shows the circuit of the robot. The robot is built around ATmega16 MCU (IC2), driver IC MAX232 (IC1), regulator IC 7805 (IC4), motor driver IC L293D (IC3) and a few discrete components.
COM port is connected to the computer using the USB-to-serial converter. Controlling commands to the robot are sent via serial port and the levels converted into 5V TTL/CMOS type by IC1. These TTL/CMOS signals are directly fed to the MCU (IC2) for controlling motors M1 and M2 to move the robot in all directions. Port pins PB4 through PB7 of IC2 are connected to input pins IN1 through IN4 of IC3, respectively, to give driving inputs. EN1 and EN2 are connected to VCC to keep IC3 always enabled. LED1 and LED2 are connected to ports PB1 and PB2 of IC2 for testing purpose.
Working of the project is simple. The Gesture-controlled robot is controlled via serial port and the controlling commands sent through the computer. These commands are generated by a software application running on the computer. This application interprets the gestures and sends corresponding commands to the robot through serial port. Each command initiates a process as shown in Table I.
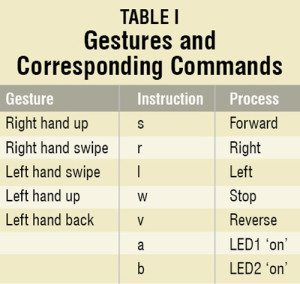
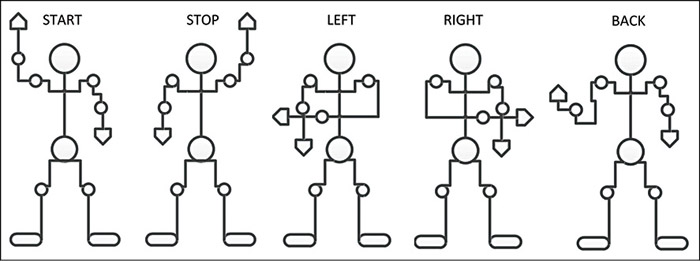
If the operator stands in front of Kinect sensor at a minimum distance of 180 cm (or about 6 feet) and raises right hand up, the Visual Basic (VB) based application running in the computer interprets this gesture and send ‘s’ to the serial port. The Gesture-controlled robot is programmed to move forward if it receives ‘s’ from the serial port. Similarly, for other gestures, corresponding letters as listed in the table are sent through the serial port to the robot.
Software
This gesture-controlled robot uses two software: a VB application running on the computer to interpret the gestures and a BASCOM program for the microcontroller to process the input signals and control the robot.
Download PCB and Component Layout PDFs: click here
Download source code: click here
Visual Basic application. The software uses skeletal models and monitors joints to detect and interpret gestures. The analysis here is done using the position and orientation of joints and the relationship between each one of them (for example, the angle between joints and the relative position or orientation).
Advantages of using skeletal models are:
1. Algorithms are faster because only key parameters are analysed
2. Pattern matching against a template database is possible
3. Using key points allows the detection program to focus on significant parts of the body
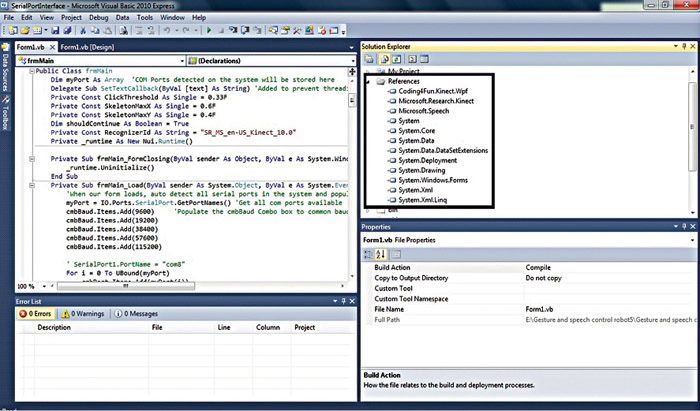
The software solution is built using Microsoft Visual Studio 2010 Express. To build the program again and make your own executable file, download the source code and open the solution file from ‘Gesture controlled robot\VB Application Program\SerialPortInterface’ using Microsoft Visual Studio 2010 Express. Before building the solution, make sure that the references in Solution Explorer window are correct as shown in Fig. 5.
If any of the references is not there, right-click ‘References’ to add it from .NET section. While building the solution, keep ‘Copy Local’ under ‘Properties’ as ‘True’ for ‘Coding4Fun.Kinect.Wpf,’ ‘Microsoft.Research.Kinect’ and ‘Microsoft.Speech’ so that these files are copied to the release folder also for convenience. ‘Path’ property of ‘Coding4Fun.Kinect.Wpf’ should point to the corresponding file in the release folder for error-free build.
BASCOM program. The software for the robot is written in BASIC language and compiled using BASCOM compiler. The program keeps comparing the commands received from the serial port with ‘s,’ ‘w,’ ‘v,’ ‘r,’ ‘l,’ ‘a’ and ‘b,’ and initiates corresponding processes as shown in Table I.
Construction and testing
Interface Kinect sensor
In order to set up Kinect sensor and interface it to the computer, below-mentioned software need to be installed before connecting Kinect sensor to the computer:
1. Microsoft Visual Studio 2010 Express or other Visual Studio 2010 edition
2. .NET Framework 4 (installed with Visual Studio 2010)
3. DirectX Software Development Kit, June 2010 or later version
4. DirectX End-User Runtime Web Installer
5. Kinect Software Development Kit – v1.0 – beta2 – x86
6. Microsoft Speech Platform – Server Runtime, version 10.2 (x86 edition)
7. Microsoft Speech Platform – Software Development Kit, version 10.2 (x86 edition)
8. Kinect for Windows Runtime Language Pack, version 0.9 (acoustic model from Microsoft Speech Platform)
The software versions need to be strictly respected for correct operation of the project.
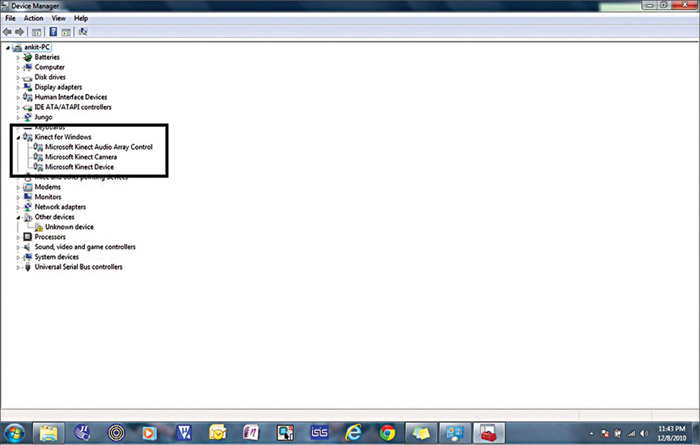
Once everything is installed, connect Kinect sensor to the computer’s USB port. It will be automatically detected and drivers installed. The correct detection and installation of the device is shown in Fig. 6. Kinect takes up COM port 3 by default.
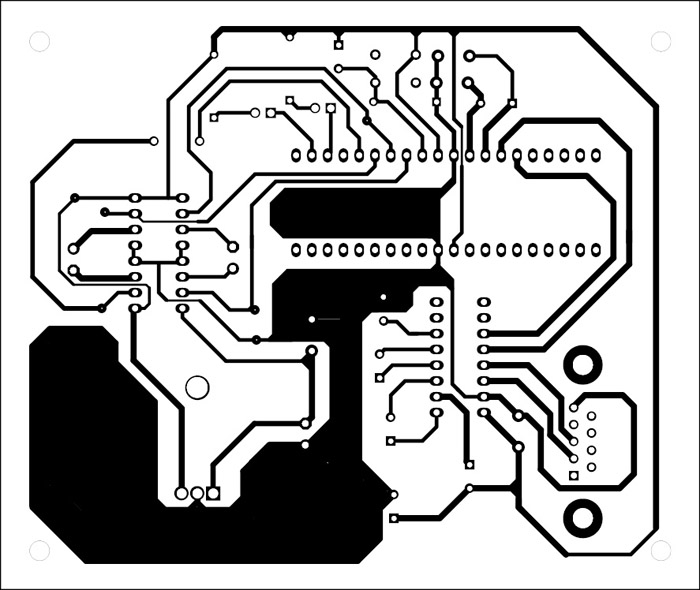
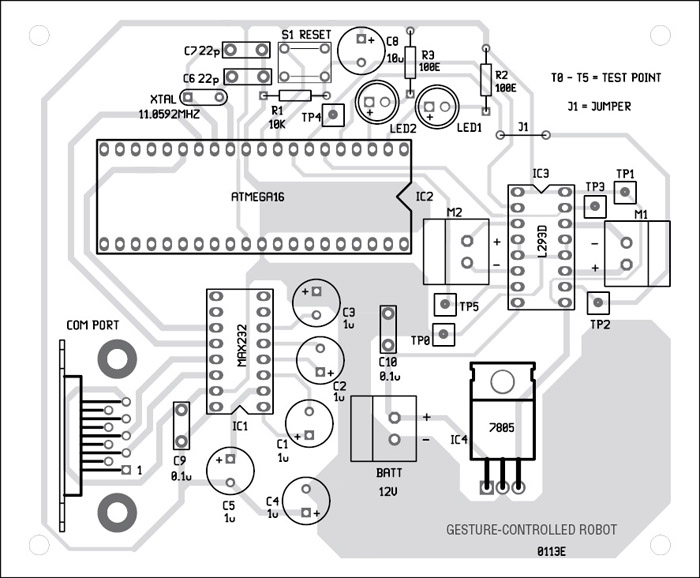
Interface robot to the computer. An actual-size, single-side PCB layout of the robot is shown in Fig. 7 and its component layout in Fig. 8. Assemble the components on the PCB and connect the motors and battery to build the robot. Use suitable bases for the ICs. Before inserting the MCU in the circuit, burn the program into it using a suitable programmer.
Connect the robot to the computer using the USB-to-serial converter as shown in the block diagram. Corresponding drivers for USB-to-serial converter may need to be installed. Check whether the USB-to-serial converter is detected in the device manager and change the COM port to ‘2.’
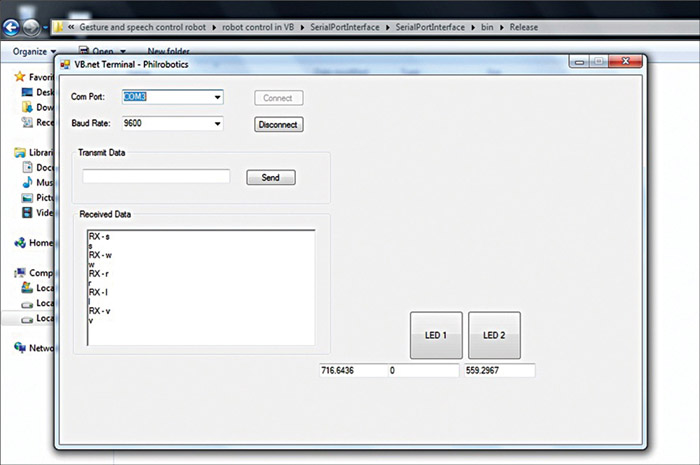
Run application. Once the robot and Kinect sensor are properly interfaced with the computer, download the required software and run ‘SerialPortInterface.exe’ from the location “Gesture controlled robot\VB Application Program\SerialPortInterface\SerialPortInterface\bin\Release.” The application program is shown in Fig. 9.
The COM port and baud rate are automatically selected. Now the movement of the operator in front of Kinect Sensor can be detected with the changing coordinates at the bottom of the application program. All the registered gestures that an operator does in front of Kinect sensor are reflected back in ‘Received Data’ section and sent to the COM port for the movement of the robot.
LED1 and LED2 buttons are for testing purpose. Once pressed, these will turn on the two LEDs by sending letters ‘a’ and ‘b,’ respectively, to confirm the serial connectivity.
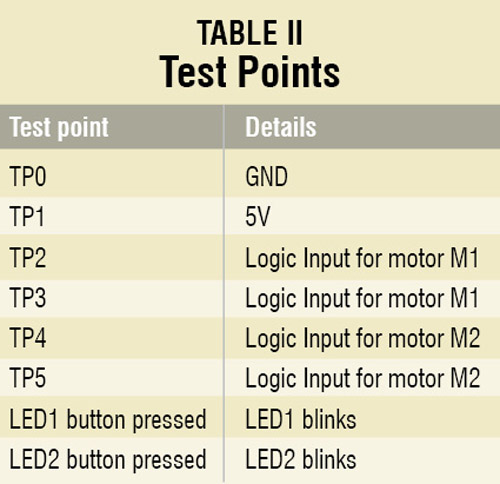
Check the correct power supply as 5V at TP1 with respect to TP0. Make some registered gesture in front of Kinect sensor and check corresponding logic inputs at TP2 through TP4.
Samarth Shah is an electronics geek who loves to explore new technologies. His areas of interest include image processing using OpenCV, human-computer interaction and robotics. Devanshee Shah and Yagnik Suchak like to work on microcontrollers and robotics. The authors are BE in electronics and communication from Nirma University, Ahmedabad


Helo
If having some video on installation of software (kinect base gesture robot)
Plz share with us
Having problems with software
whether accelerometer sense the action of hand movement in gesture hand controlled robot
how will they sense the action in hand gesture hand controller robot?