Normally, ATMEL’s AVR microcontrollers are programmed using programmers. There are many ways to program the AVR microcontrollers, such as in-system programming, parallel programming and using bootloader. Advantage with the bootloader method is that you don’t need any external hardware to load the hex file on the microcontroller. A bootloader program is placed inside the boot section of the Flash memory, to handle communication with the host PC and facilitate programming of both Flash and EEPROM.
Programming using bootloader
The bootloader firmware loaded on the microcontroller allows in-system programming directly via TXD and RXD pins of the microcontroller. The code responsible for in-system programming via serial port resides in the configurable boot memory section of the microcontroller. When signalled using external switch while resetting the microcontroller, it gets active and waits for communication from the PC for loading the hex file on the microcontroller’s flash memory. The PC sends the hex file to the microcontroller. The code residing in the boot section loads the hex file on the microcontroller’s flash memory.
Once the programming process is complete, newly loaded code can be executed by pressing reset. Once the code is loaded on the microcontroller, UART is free and can be used for other applications.
Note that the bootloader gets invoked only if boot switch is kept pressed while the microcontroller is reset using reset switch.

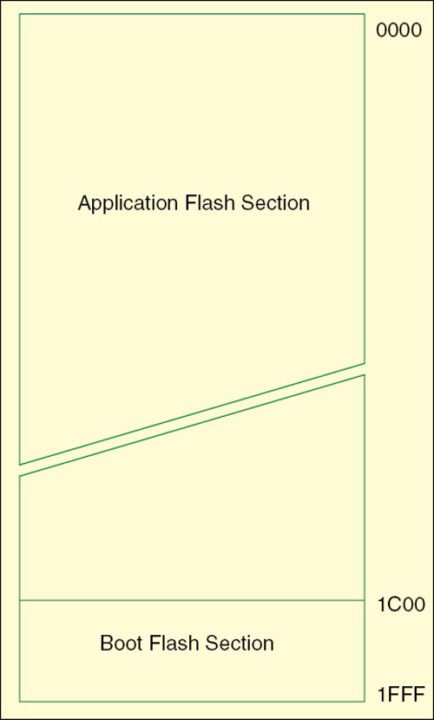
 The Flash memory is divided into two sections: application and bootloader. The application section contains the main code for the application, while the bootloader section contains the code for actual self-programming.
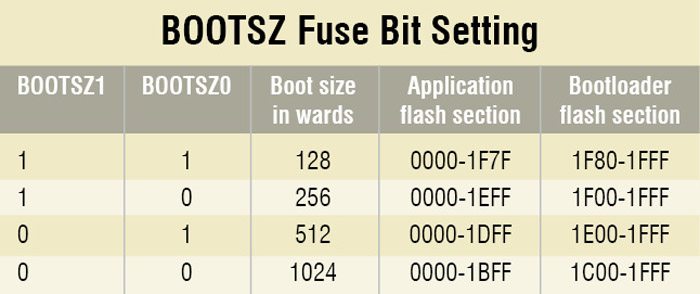
The store program memory instruction can be executed only from the bootloader section. The memory organisation is shown in Fig. 1. The size of the bootloader section can be selected using the BOOTSZ fuse bit setting (refer the table).
On starting/resetting the microcontroller, if the boot reset vector is enabled by setting BOOTRST flag in fuse bit, the program residing in the boot sector is executed first. The boot program can direct the code execution back to the beginning of the flash memory program section on certain pre-specified condition to start the normal code. The boot program monitors port pin PA0 of the microcontroller ATmega16.
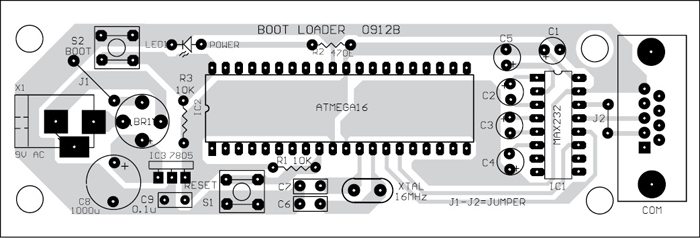
 So when the system starts after reset, you need to press switch S2 (boot) for the system to enter the programming mode. Any flash data from the PC is written to the flash memory after the system enters the programming mode. If S2 key is not pressed after the system is reset, the system will run the application code of flash memory without entering the programming mode.
Circuit description
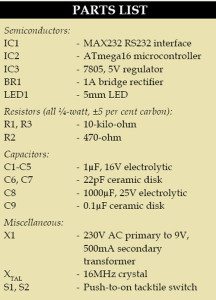
Fig. 2 shows the circuit to program the microcontroller using the bootloader. The MAX232 (IC1) is used for communication between the PC and the microcontroller to be programmed. The MAX232 converts signals from RS232 serial port into signals suitable for use with TTL-compatible circuits. The MAX232 is a dual driver/receiver and typically converts the RX, TX, CTS and RTS signals. Port pins PD0 and PD1 of the microcontroller (IC2) are used to interface with pins 3 (TXD) and 2 (RXD) of COM port, respectively, through MAX232. A 16MHz crystal along with two 22pF capacitors provides the basic clock frequency to the microcontroller ATmega16.
To derive the power supply for the circuit, the 230V AC mains is stepped down by transformer X1 to deliver a secondary output of 9V, 500 mA. The transformer output is rectified by a full-wave bridge rectifier, filtered by capacitor C8 and regulated by IC 7805 (IC3). Capacitor C9 bypasses the ripples present in the regulated supply. LED1 acts as the power indicator and R2 limits the current through LED1.
Construction
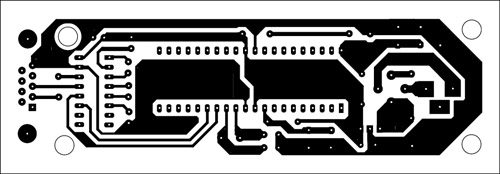
An actual-size, single-side PCB for programming using the bootloader is shown in Fig. 3 and its component layout in Fig. 4. Assemble the circuit on a PCB as it minimises time and assembly errors. Carefully assemble the components and double-check for any overlooked error. Use IC bases for the microcontroller and MAX232. Before inserting the ICs, check the supply voltage.
Connect the assembled PCB to your PC’s serial port (say, COM1). Press switch S2 and then reset switch S1. Release reset switch S1 while keeping switch S2 pressed. The device enters programming mode. Burn the hex code of application program into the microcontroller using Avr-Osp II. Configure Avr-Osp to use 19,200 baud rate and select correct COM port (say, COM1) before programming. Avr-Osp II is freely available.
Software
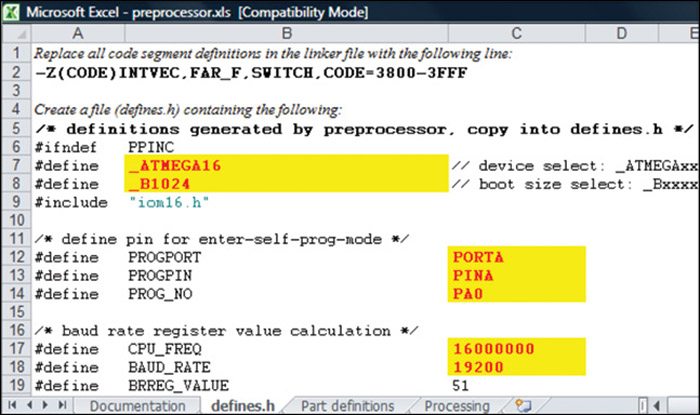
The software is based on ATMEL application note AVR109: Self-Programming. It can be downloaded from ATMEL’s website www.atmel.com. Extract the downloaded zip file to a separate folder on the desktop. Open the preprocessor.xls file and go to ‘defines.h’ tab as shown in Fig. 5. Now edit the highlighted (yellow) grids to the device settings.
Port pin PA0 of the microcontroller is connected to the switch that will be used to enter the programming mode. So the PROGPORT is port A, PROGPIN is pin A, and PROG_NO is PA0. Set the fuse bits for a 16MHz external clock, with the CPU_FREQ setting as 16000000 and baud rate as 19200 (refer Fig. 5).
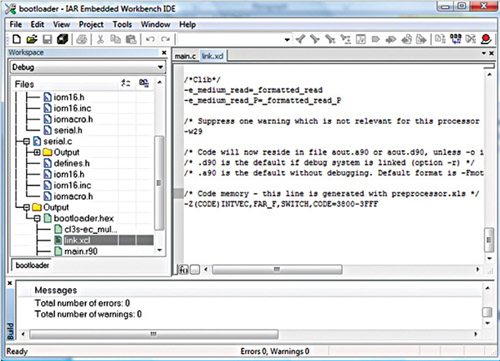

Go to ‘Processing’ tab and verify that the bootloader size is within the allowed range. Copy the defines.h results of the preprocessor.xls file to the defines.h file of the folder having all the project files (leaving only the first three lines of the defines.h tab of the preprocessor.xls file). Now open the bootloader.eww embedded workbench file using IAR Embedded Workbench. Edit the linker file ‘link.xcl’ and add the second line (refer Fig. 6) from the define.h tab of the preprocessor.xls file to the last line of the link.xcl file on IAR Embedded Workbench platform as shown in Fig. 6. This defines the memory segment that will contain the bootloader code.
Compile and link the project file. Your Intel standard hex file will be generated in ‘Debug\Exe’ folder of the project. Burn the generated hex code into the ATmega16 microcontroller using any programmer as per the fuse bit setting as shown in Fig. 7.
Download PCB and Component Layout PDFs: click here
Download Source Code: click here
The author is a PhD scholar at IIT, Delhi.


Dear Arun ji,
After Searching a lot over internet, a suitable, Explicit and Properly explained article i found.
I have a few more question on this:
a. IAR Embedded Workbench is mandatory for this project? Can we use AVR Studio instead?
b. Is it possible to program bootloader & then our application program for ATmega2560 also?
Dear Pronab,
Answers to your queries is as follows:
1. No, IAR Embedded Workbench is not mandatory. One can use nay GCC based compilers like AVR Studio (in Windows), Eclipse (in Windows and Linux platforms), etc. with slight modifications in included header files.
2. Yes you can progran your chip with the bootloader first using any ISP programmer and then you need to use your standard serial programming interface like AVR OSP MK II as suggested in the article. But you could not use ISP Programmer to program your own code on the chip once bootloader is embedded, as this would erase the bootloader.
Thanks for the appreciation.
Best Wishes,
Arun Dayal Udai
please help me to burn bootloader on atmega 128 using 328….
Do you have the actual photo of this project?
Sorry its not available now.