 Radar systems have a number of defence as well as civil applications. Air traffic control uses radars to track aircrafts on the ground and in the air, and to guide planes for smooth landings. Police use radars to detect the speed of passing vehicles. Geologists use radars to map the Earth and other planets. Military uses these for surveillance. Meteorologists use radars to track storms, hurricanes and tornadoes. The list is endless.
A radar system consists of a transmitter that transmits a beam towards the target, which is then reflected by the target as an echo signal. The reflected signal is received by a receiver. This receiver processes the received signal and provides such information as the presence of a target, distance, position (moving or stationary) or speed, which is displayed on a display unit.
Microcontroller based ultrasonic radar circuit
Actual radar systems are built with high-power transmitters and receivers, huge antennae, complex processing systems using digital signal processors and large displays.
This microcontroller based ultrasonic radar circuit demonstrates the working of a radar system. It uses ultrasonic waves to detect an object and measure its distance and angular position, and displays the same on a 20×4 LCD screen. It can detect multiple objects at different angles and distances as new objects are detected. This means that the distance and angle of all objects are displayed one by one on the same LCD screen.
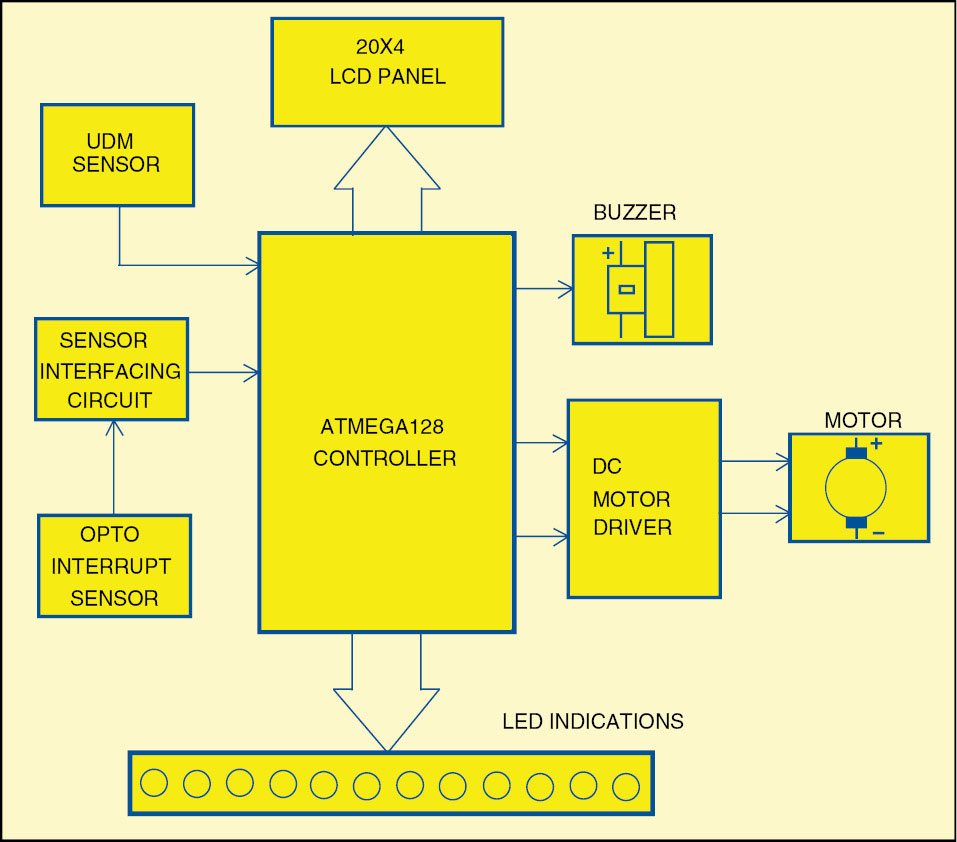
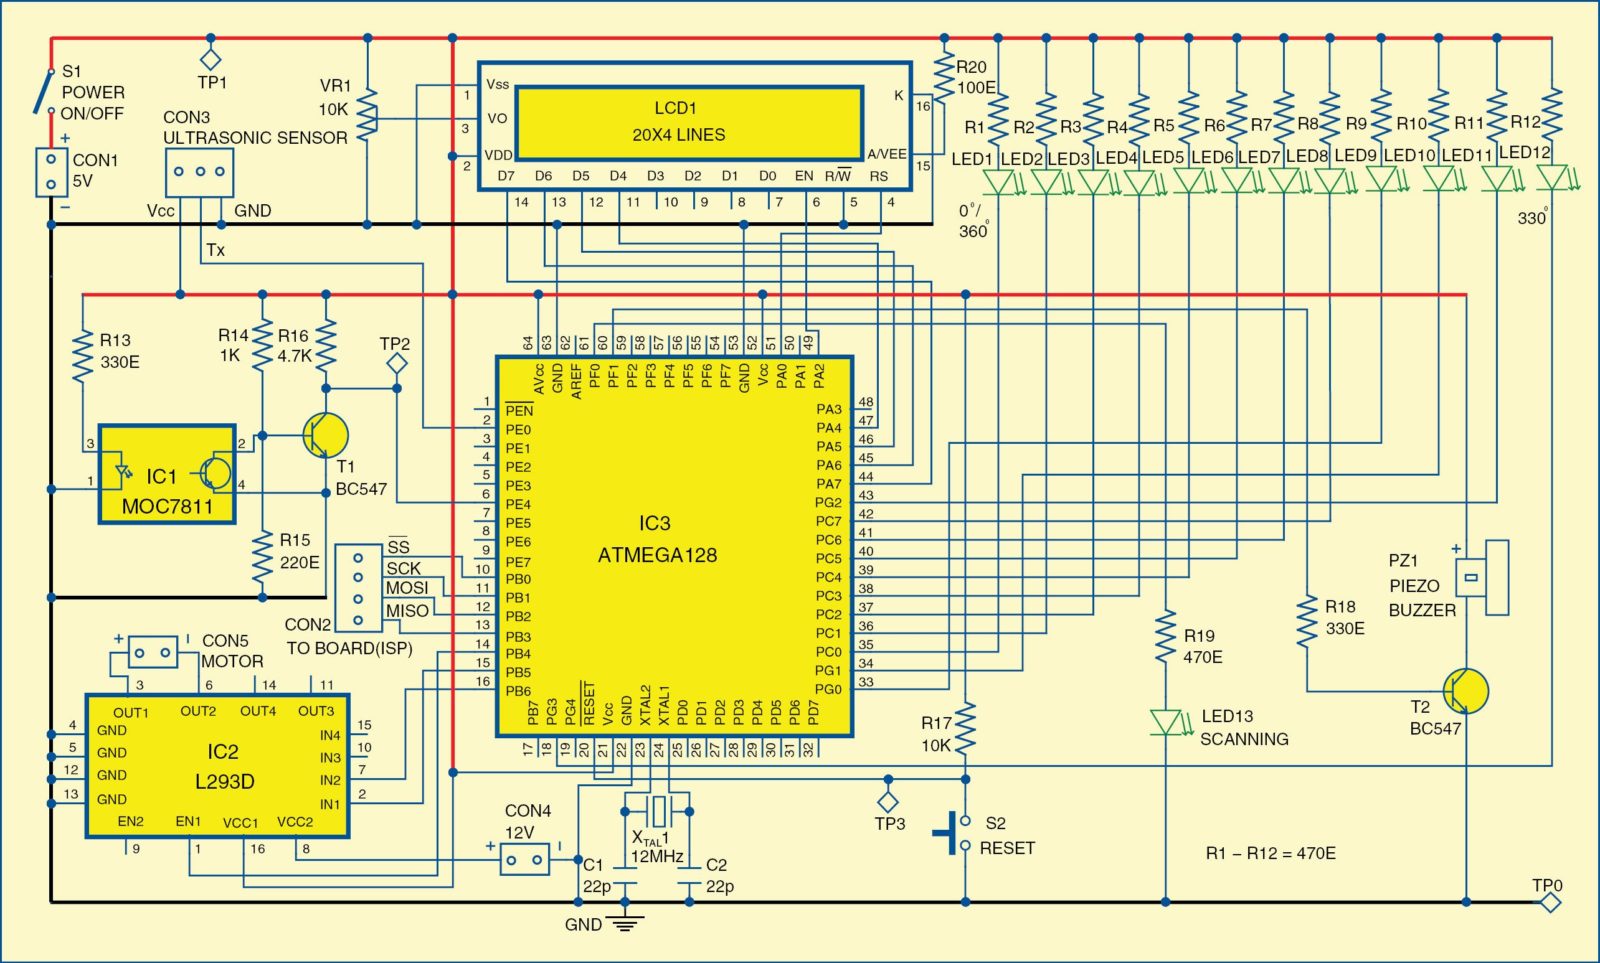
The block diagram of an ultrasonic radar system is shown Fig. 1. The system includes an ultrasonic distance measurment (UDM) sensor, LCD panel, opto interrupt sensor, a motor driver, DC motor, buzzer and LEDs. The schematic of the system is shown in Fig. 2.
Description of components
AVR microcontroller ATmega128 (IC3) is a high-performance, low-power Atmel 8-bit AVR RISC based microcontroller that combines 128kB of programmable flash memory, 4kB SRAM, 4kB EEPROM, 8-channel 10-bit A/D converter and JTAG interface for on-chip debugging. The device operates between 4.5V and 5.5V.
Ultrasonic distance sensor
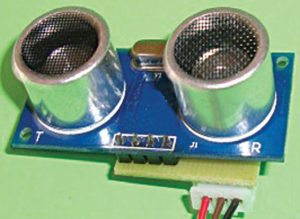
This sensor is a modified version of the original UDM sensor. The UDM sensor module has four pins but this module has only three pins for connection to external circuit. The transmitter unit sends an ultrasonic wave of 40kHz directed towards the target. The reflected signal is received by the receiver unit, which calculates distance based on the speed of ultrasonic waves and the time required by the waves to travel to-and-fro.
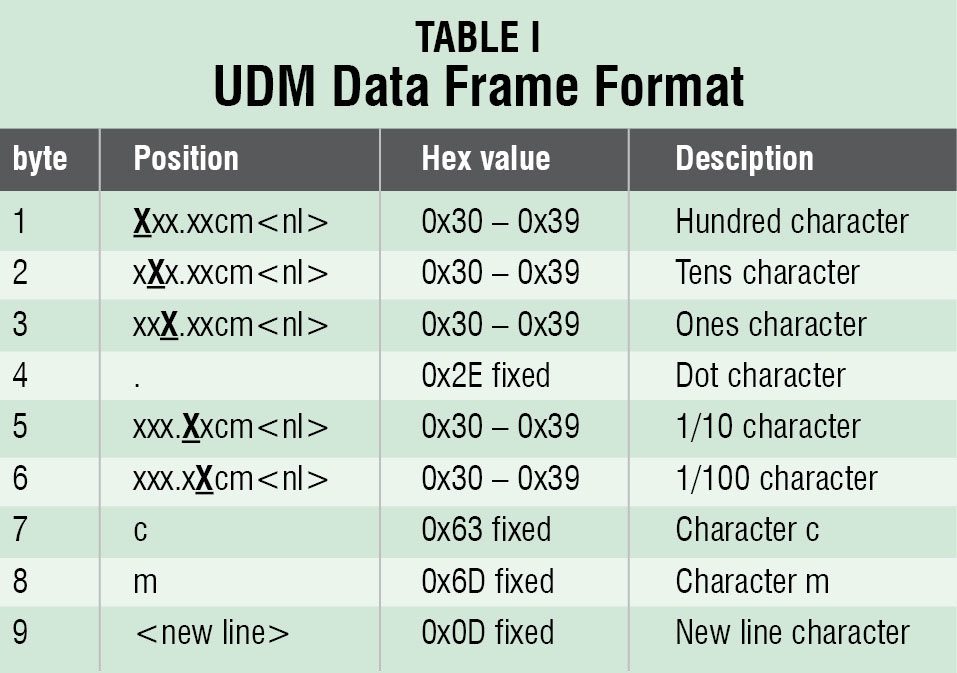
 It forms a 9-byte frame as xxx.xxcm of the calculated distance and sends it through a serial (UART) interface to the microcontroller at pin PE0 configured as RXD0. The sensor works on 5V DC power supply. Its minimum and maximum ranges are 10cm and 400cm, respectively. The rate of transmission of the serial data is 9600bps with TTL level output. The ultrasonic distance sensor is shown in Fig. 3.
The sensor can be easily interfaced with any microcontroller. Output from the sensor is in a frame of nine bytes. The frame format xxx.xxcm is described in Table I.
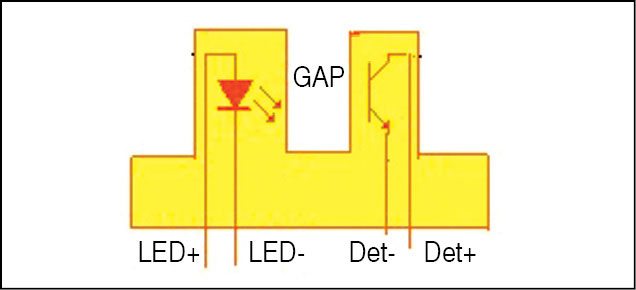
Slotted opto isolator module MOC7811. Internally, the module consists of an LED and a photo transistor. The plastic package encloses them in such a way that there is gap in between these two components as shown in Fig. 4. If the LED is forward-biased, its light falls directly on the base of the photo transistor and it conducts. But, if any obstruction like a thin strip, card paper or post card is placed in the gap, the light does not fall and the photo transistor does not conduct.
DC motor driver IC L293D
L293D (IC2) contains two in-built H-bridge driver circuits. In its common mode of operation, two DC motors can be driven simultaneously, both in forward and reverse directions. The operation of the two motors can be controlled by input logic at pins 2 and 7, and 10 and 15. Input logic 00 or 11 will stop the corresponding motor. Logic 01 and 10 will rotate it in clockwise and anti-clockwise directions, respectively. In the circuit, it is programmed to run 5rpm DC motor in a clockwise as well as anti-clockwise direction. In this circuit, the input logics are fed to pins 2 and 7 to control the motor connected across pins 3 and 6 of IC2.
LCD panel
The 20×4 LCD displays the scanning angle, measured distance, messages like Object Detected and Scanning, etc. It accepts ASCII value of any letter or digit and displays it on the selected line.
LED dial
Twelve red-colour LEDs are arranged like a dial of clock. Each LED indicates an angle between 0o and 330o that is separated from the next or previous by 30 degrees. When an object is detected, its angle is indicated by the corresponding angle of LED. This gives an approximate idea of position, direction and angle of an object with respect to reference position.
Buzzer
It is a piezoelectric DC buzzer that generates audible beep-like sounds when given DC supply of 5V. It is used to give short beep sounds on detection of an object.
Opto interrupt sensor circuit
This circuit generates a negative pulse when the strip passes the gap in the sensor. This pulse is used to generate an interrupt signal for the microcontroller. As shown in Fig. 2, the circuit comprises a slotted opto isolator module, BC547 npn transistor T1 and a few resistors.
The internal LED is forward-biased through the current-limiting resistor of 330Ω. This turns it on continuously. The falling LED light drives the photo transistor to saturation. Its output at the collector is low, which drives T1 into cut-off. This means that output of the circuit is high, which is the normal state when the falling light is not interrupted. When a strip passes through the gap, it blocks the light and the photo transistor goes into cut-off.
Its output at the collector is high, which drives transistor T1 into saturation and gives low output at its collector.
As the strip passes through the gap, we get high to low, which is taken as interrupt. Interconnection of various components with microcontroller ATmega128 (IC1) is shown in Fig. 2 and described below.
- Serial data output pin Tx of the sensor is connected to PE0 of IC3.
- Opto interrupt sensor interfacing circuit is connected to external interrupt 4 pin at pin 6 of IC3.
- Pins PB5 and PB6 of PORTB are connected to inputs (IN1 and IN2) of L293D chip. These pins are used to rotate the motor clockwise and anti-clockwise. Pin PB4 is connected to enable input of L293D chip, which is used to enable the output of the chip.
- DC motor is connected to two outputs (OUT1 and OUT2) of L293D (IC2).
- Pin PF0 of PORTF is connected to operation (scanning) LED17 through current limiting resistor R19. Another pin, PF1, is connected to the buzzer through npn transistor (T2) BC547.
- PORTA pins PA4 through PA7 are connected to data pins D4 through D7 of the LCD. Pins PA0 and PA2 are connected to control pins RS and EN of the LCD, respectively. R/W pin of LCD is connected to ground.
- LCD pins 2 and 15 are connected to Vcc, the latter through 100-ohm resistor R20, and pins 1 and 16 are connected to ground. Pin 3 of the LCD, which is used for contrast control, is connected with 10k pot, as shown in the figure.
- PORTC pins PC0 through PC7 are connected to cathodes of eight LEDs. Anodes of all the LEDs are connected to Vcc through current-limiting resistors.
- Similarly, four PORTG pins PG0 through PG3 are connected to four LEDs.
- The 12MHz crystal with two 22pF capacitors is connected to pins XTAL1 and XTAL2.
- The complete system works on 5V DC supply, with additional 12V DC supply given to pin 8 of L293D (IC2) for the DC motor.
Download PCB and component layout PDFs: click here
System operation
- Initially, the motor is stationary and the strip is in the gap of the slotted opto isolator module. This is the reference angle 0o (position) for ultrasonic sensor module.
- Next, the motor starts rotating in a clockwise or anti-clockwise direction. The speed of the motor is 5rpm, so we can presume that in one minute (60 seconds) it completes five revolutions. So, to complete one revolution, it takes 60/5 = 12 seconds.
Now, one revolution = 360o, which means in 12 seconds the motor will rotate by 360o, and in one second, it will rotate by 30o. Thus, to rotate the motor by 30o, it has to run for one second only. Furthur, to reduce the speed of the motor to 2rpm only, after moving the motor by 30o for one second, the motor rests for 1.5 seconds and then moves in a clockwise or anti-clockwise direction, depending on the direction of previous rotation. - As the motor rotates in clockwise or anti-clockwise direction, messages such as Scanning……, Angle:30, Angle:60, Angle:90, etc, are displayed on the LCD.
- When the motor rotates completely by 360o in 30 seconds, the strip again passes between the gap of the slotted opto isolator module. This generates an interrupt signal and the motor starts rotating in 30o steps at a speed of 2rpm in reverse direction, and messages are displayed on the LCD as scanning……, Angle:330, Angle:300, Angle:270, etc.
- Same thing happens when the motor reaches back to 0°. Thus, the cycle continues and the motor rotates clockwise and anti-clockwise continuously to scan a complete 360° at the rate of 2rpm.
Construction and testing
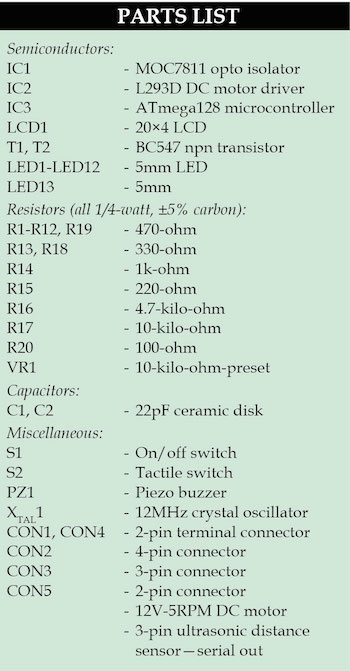
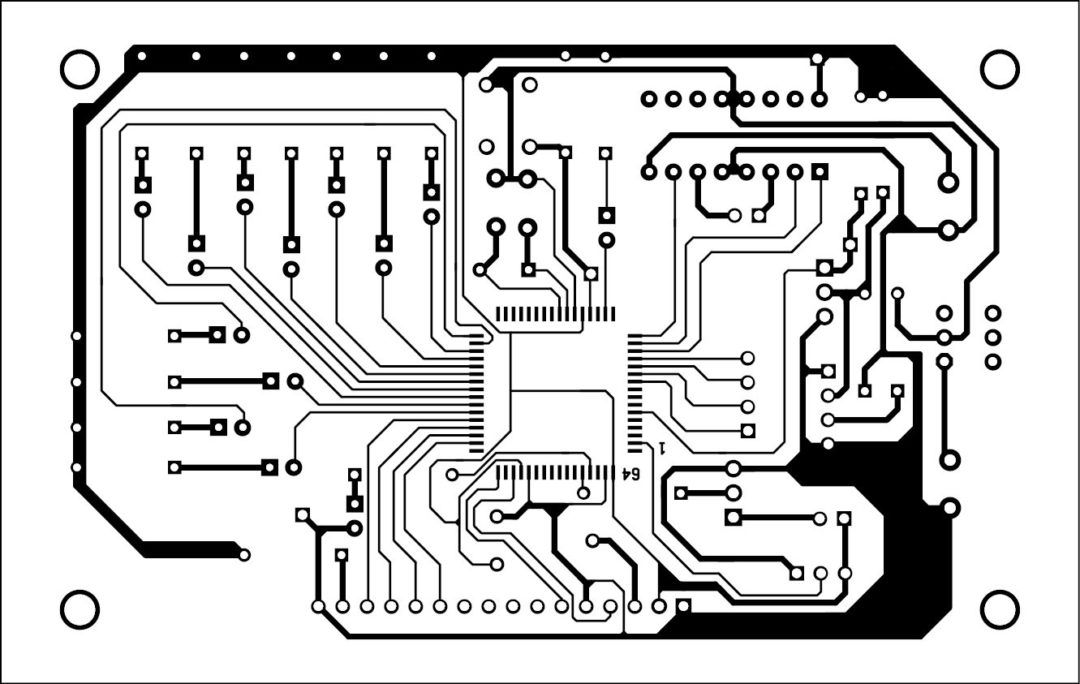
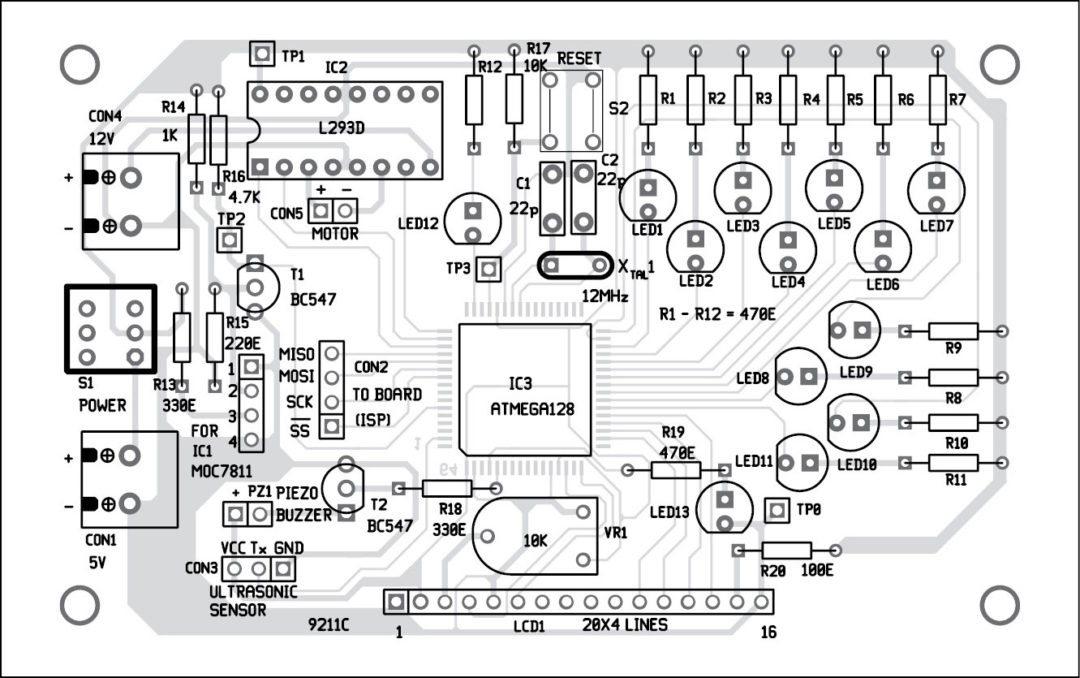
An actual-size, single-side PCB of the circuit is shown in Fig. 5 and its component layout in Fig. 6. The slotted opto isolator module, ultrasonic sensor and DC motor are external to the PCB. These are connected to the PCB through connectors provided on the PCB.
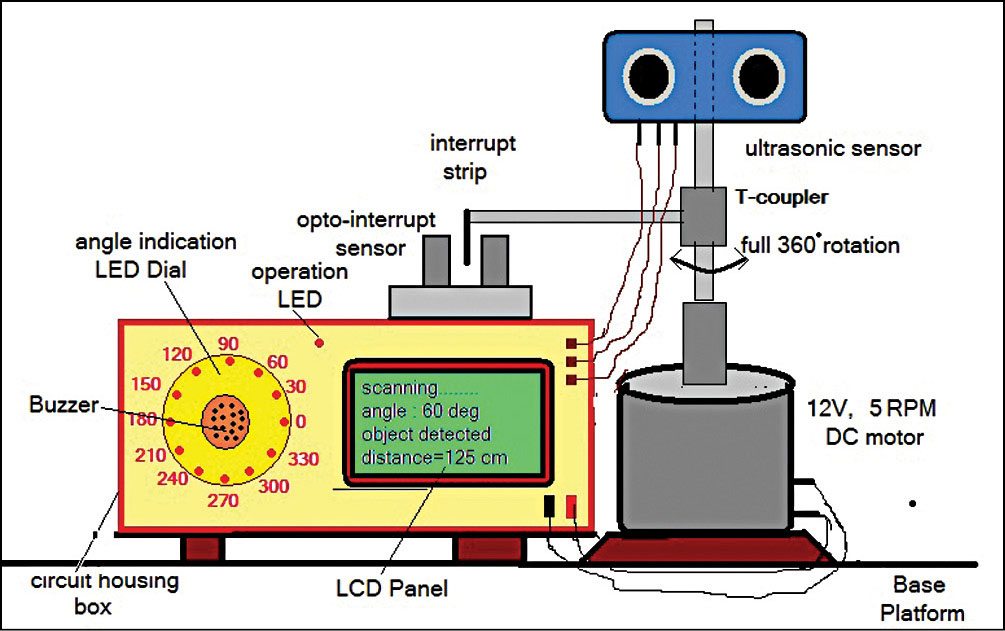
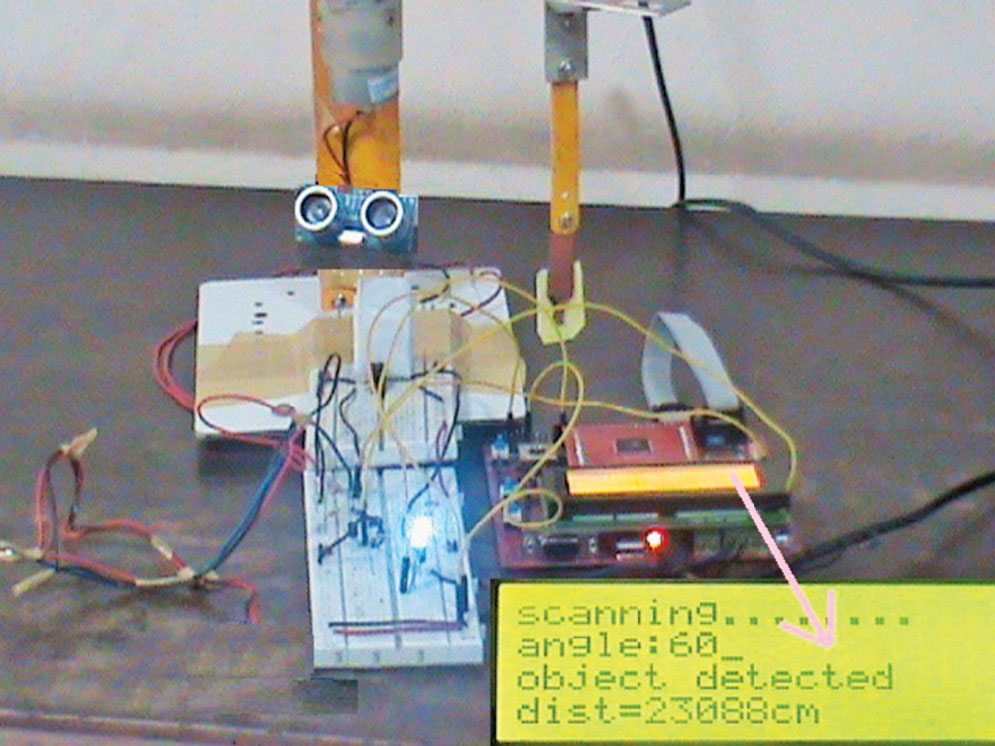
Make a separate circular dial. Refer the proposed system set-up as shown in Fig. 7 for fitting the LEDs (LED1 through LED12) and connect these through wires from the PCB. The prototype set up in EFY Lab is shown in Fig. 8.
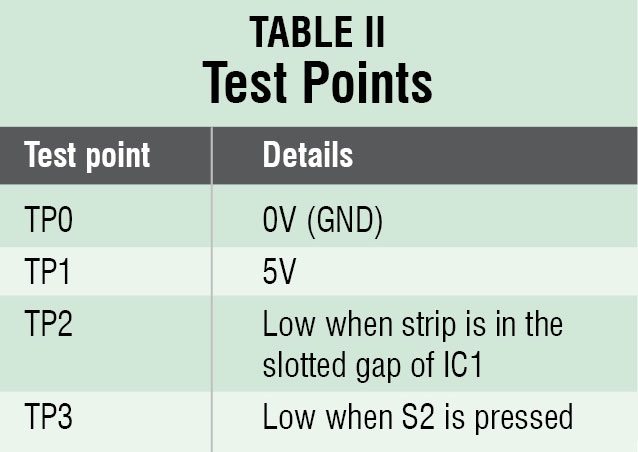
For troubleshooting, first check the voltages at various test points as listed in Table II.
Software program
The program for the microcontroller is written in C language and compiled using AVR Studio 4. The compiler is used to convert C program into a hex file for burning into the flash memory of ATmega128 microcontroller using AVR Studio 4. A 4-pin connector (CON2) is provided in the circuit for programming the chip using a suitable ISP-compatible AVR programmer board.
The complete program is a combination of different functions. It starts with the main function, which is used to configure various ports of ATmega128 microcontroller as input/output (I/O) and initialise the LCD. It also calls UARTinit() function to initialise UART0 to 9600bps and enable reception. The main function also enables interrupts to be used in the project and continuously rotates the motor in either direction (clockwise or anti-clockwise) at 2rpm.
The function angle_disp() is used for displaying the corresponding angle of the rotation of ultrasonic sensor module from its point of origin. There are two interrupt handler sub-routine functions, ISR(UART0_RX_vect) and ISR(INT4_vect), which represent operation mode on receiving interrupts.
ISR(INT4_vect) is used to set reference for the angle and operation of the motor in the opposite direction to the current direction of the rotation of the motor. ISR(UART0_RX_vect) receives nine bytes from the sensor, calculates the distance of the object from the sensor, and displays it on the LCD screen. As soon as an object is detected, the buzzer sounds and indicates the angle of object detection on the LCD as well as on the LED dial with corresponding LED indication.
All LCD functions, such as lcd_init(), lcd_cmd(), lcd_str() and lcd_num(), are included in LCD header file lcd.h.
Download source code: click here
If you are looking for the difference between Microprocessor and Microcontroller, you can read it here.
This article is a part of the Top 15+ Microcontroller Projects. If you want to read more projects based on Microcontroller, can go through this article.
Feel interested? Check out more interesting electronics projects.



How can i wire the udm with my circuit if it is rotating?? There is a tendency of wire problem?? Any tips??
Page 3, Step 4 says that it only ever rotates 360 degrees and then reverses. So you need to give it enough wire to be able to do one rotation.
hey i have atmega128a microcontroller can i use it. and how the programming can done please explain me in detail
The fig2 , please?
The circuit diagram of the Ultrasonic Radar not showing here.Tanks
Please reload the page.
The figure 2 is present on the second page of the article.
Can u please mention the website to buy all the components
Yes, you can purchase all the components from Kitsnspares.
What are its advantages?
from where will i get its gerber file of pcb
can i get the greber file of pcb layout?
angle led has only 8 values but if we divide 360 degrees by 30 degrees it comes out to be 12 please explain
Source code is not downloading.
Please, upload again!
Please refresh the page.