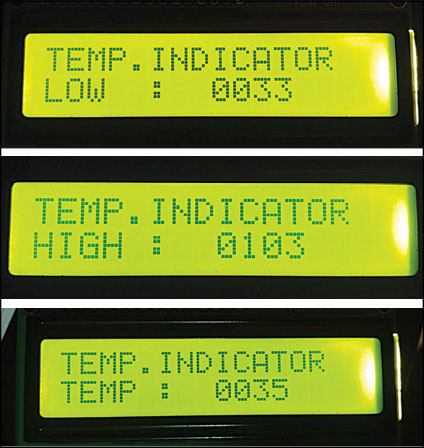
 Digital temperature controller is an essential instrument in the field of electronics, instrumentation and control automation for measuring and controlling temperatures. It can be used as much at homes as in industrial applications. Different types of analogue and digital temperature controllers are readily available in the market, but they are generally not only expensive, their temperature range is also usually not very high. Presented here is a low-cost microcontroller-based temperature controller that can read and control temperatures in the range of zero to 1000ºC. Real-time temperature is displayed on its LCD screen, and you can use it to control the temperature within the preset minimum and maximum range.
Digital temperature controller circuit and working
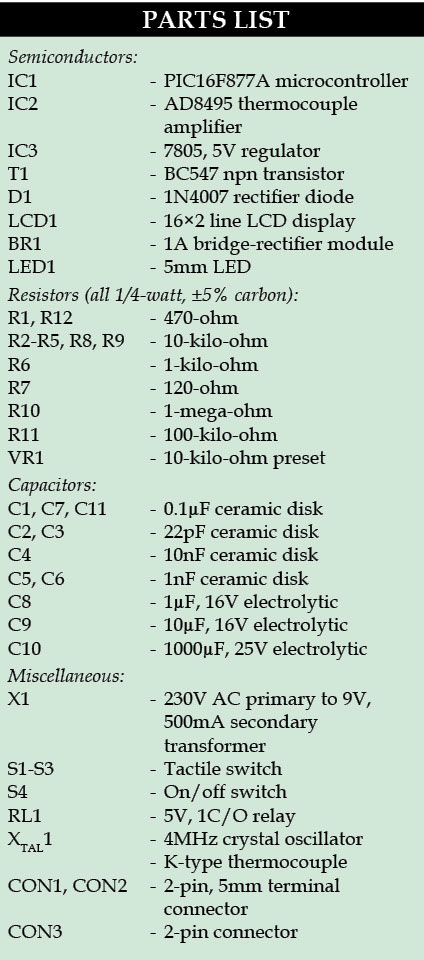
Fig. 2 shows circuit diagram of the digital temperature controller. The circuit is built around microcontroller PIC16F877A (IC1), precision thermocouple amplifier AD8495 (IC2), K-type thermocouple (connected at CON3), 16×2 LCD (LCD1), single-changeover relay (RL1) and a few common components.
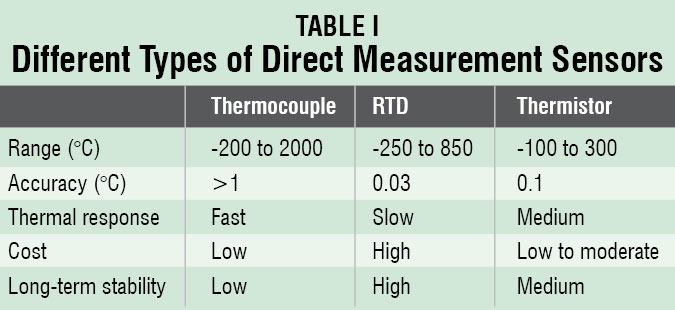
Sensor selection. There are basically two types of temperature-measurement systems—direct temperature-measurement systems for up to 1000ºC and indirect temperature-measurement systems for higher temperature range, where temperature sensors may get physically damaged due to the high temperatures. The selection of temperature sensor is dependent on the range of temperature you wish to check. There are different types of direct-measurement sensors, for different ranges of temperature (refer Table I).
 Thermocouple. Here we have used a K-type thermocouple for direct measurements of up to 1000ºC temperature. In K-type thermocouple, the two materials used to form the junction are Chromel (Ni-Cr) and Alumel (Ni-Al). K-type is a low-cost and one of the most popular general-purpose thermocouples. Its operating range is around -250 to +1350ºC, with sensitivity of 42µV/ºC approximately.
Microcontroller. The heart of the system is microcontroller PIC16F877A, which is a low-power, high-performance, CMOS 8-bit microcontroller. It includes 8kB Flash memory, 256-byte EEPROM, 368-byte RAM, 33 input/output (I/O) pins, 10-bit 8-channel analogue-to-digital converter (ADC), three timers, watchdog timer with its own on-chip crystal oscillator for reliable operation, and synchronous I2C interface.
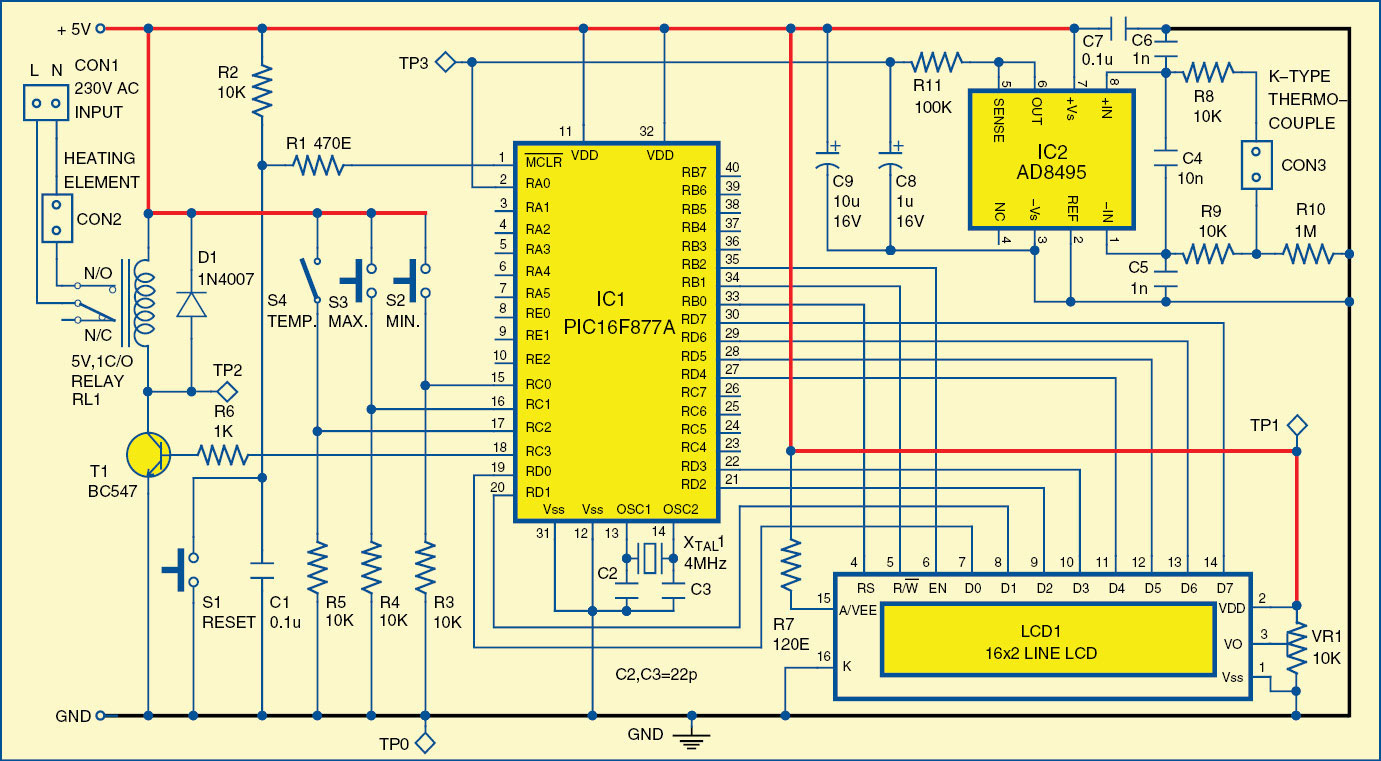
Port pins RD0 through RD7 of IC1 are connected to pins D0 though D7 of the LCD. Port pins RB0 through RB2 are connected to register select RS, read/write R/W and enable EN of the LCD. ADC channel RA0 of the microcontroller receives the analogue signal from thermocouple amplifier IC2. Switches S2 through S4 are connected to port pins RC0 through RC2 of IC1. Switches S2 and S3 are used to set the minimum and maximum limits of temperature, respectively. Switch S4 closes to start the ADC function and display the actual temperature. Port pin RC3 controls the heating element. When port pin RC3 goes ‘high,’ transistor T1 drives into saturation and relay RL1 energises to turn on the heating element.
A 4MHz crystal is connected between pins 13 and 14 of microcontroller IC1 to provide the basic clock frequency. Power-on reset is provided by the combination of resistor R2 and capacitor C1. Switch S1 is used for manual reset. IC2 is a precision instrumentation amplifier with thermocouple cold-junction-compensation circuit. The input signal for IC2 (approximately 42µV/°C) is generated by thermal effects of the thermocouple. IC2 produces output (5mV/°C) directly from a thermocouple signal. With a 5V supply, the 5mV/°C output allows the device to cover nearly 1000 degrees of a thermocouple temperature range. Output of IC2 is connected to ADC input pin RA0 of microcontroller IC1.

Download PCB and component layout PDFs: click here
Download source code: click here
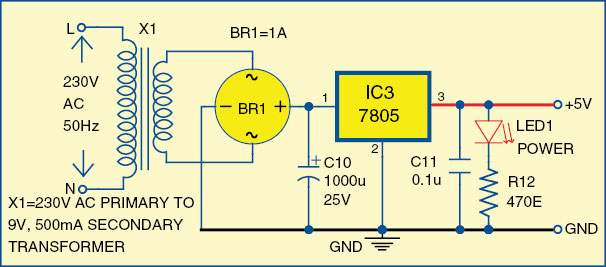
 The power supply circuit is shown in Fig. 3, where the mains supply is stepped down to 9V, 500mA by transformer X1. This stepped-down AC voltage is rectified by bridge rectifier BR1 and filtered by capacitor C10 before it is fed to IC3. Regulator IC3 provides regulated 5V DC supply. The glowing of LED1 indicates presence of power in the circuit.
Software
The program is written in ‘C’ language and compiled using Hi-Tech compiler along with MPLAB to generate hex code. The generated hex code is burnt into the microcontroller using a suitable programmer with configuration bit setting as shown in Fig. 4. The program is well commented and easy to understand.
Construction and testing
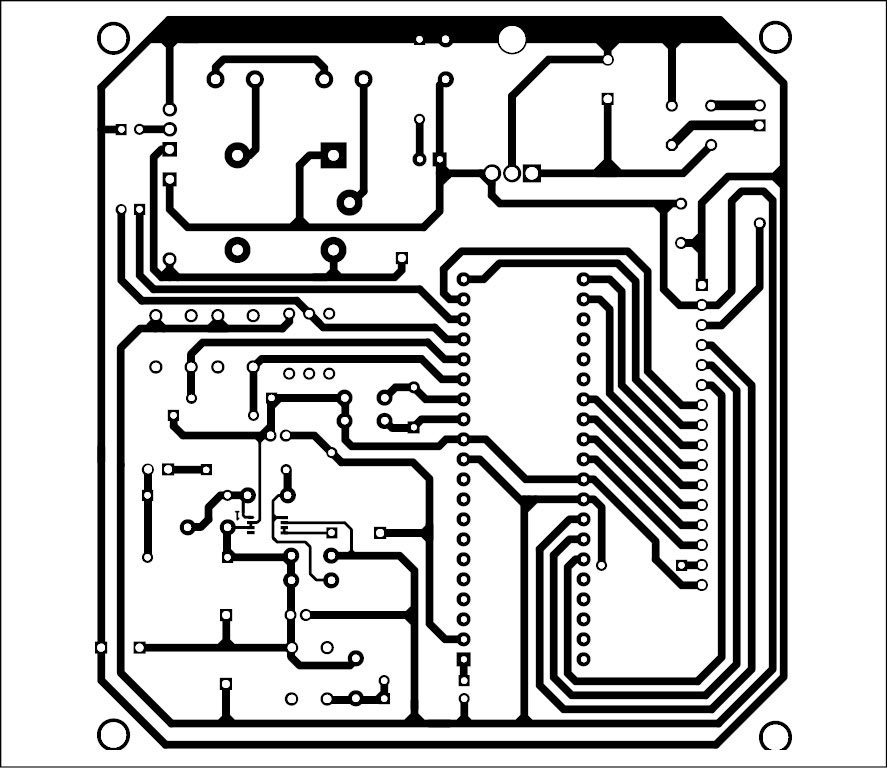
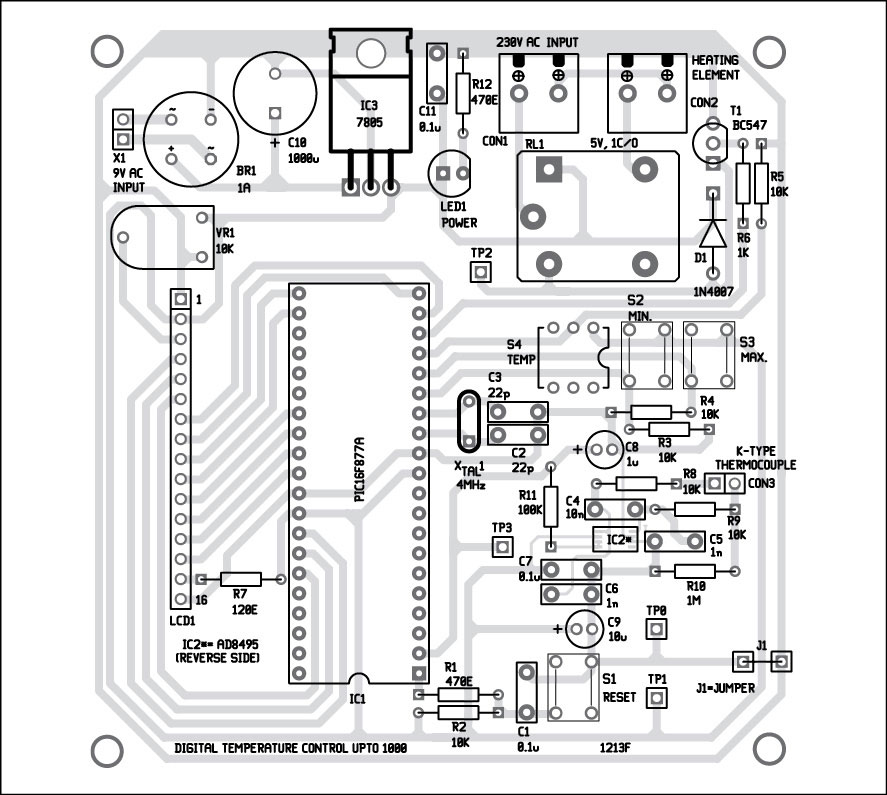
An actual-size, single-side PCB for the digital temperature controller is shown in Fig. 5 and its component layout in Fig. 6. Assemble the circuit on a PCB to save time and minimise assembly errors. Carefully assemble the components and double-check for any overlooked error. Use proper IC base for IC1. IC2 being an SMD chip, it needs to be soldered at the solder side of PCB. After assembling and wiring the circuit properly, connect 230V, 50Hz mains supply to primary winding of the transformer, and connect transformer secondary to the PCB at X1.
Set any minimum and maximum temperature with the help of LCD display, by pressing switches S2 and S3. The maximum temperature will start from minimum temperature +10 degrees. If the temperature being measured is more than the preset maximum temperature, relay RL1 de-energises and the heating element is switched off. Similarly, when the measured temperature goes below the preset minimum temperature, relay RL1 is energised and the heating element is turned on.
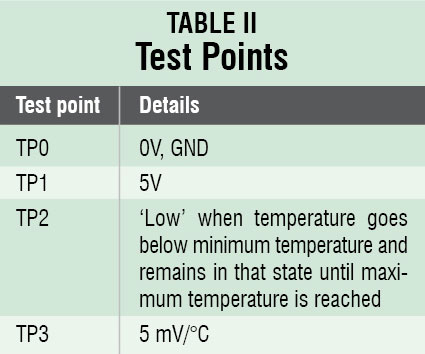
To check the circuit for proper functioning, verify 5V power supply at TP1 with respect to TP0. TP2 is ‘low’when temperature goes below minimum temperature and remains in that state until the maximum temperature is reached.
The author is a B.Tech (electronics engineering) from Dr A.I.T., Bengaluru


i dont get AD8495 IC kindly tell me the substitute of this ic
You may please try AD8494/AD8496/AD8497
Is this code also valid for pic116f887?Or some different coding is required?
We have not tried on PIC16F887.
Hello. Question about the programming. I tried to program the PIC with ICprog and JDM programmer, but i’m getting verifying error after data verification. Can You suggest me something?
You can burn the code using any equivalent programmer. During testing we had used PICStart Plus Programmer with MPLAB software.
AD8495 or any other ic given above in the previous comment are not available please tell me some other ic for the same
hello sir,
can you please mail me the C program for this project??..we searched for it but we didn’t get.
Hello Sir,
can you please provide us the program for this project
The source code is present within the article.
we are unable to open that file.can you convert to any other file and please mail us??
DEAR PLS TELL ME WHER THE IC AD8495 AVAILABLE IN INDIA
no
how to branch max6675 with pic16f75
Its working fine..Thank you
You are welcome.
please mail me the coding i am unable [email protected] thank u
can you please assist me about this design n tell me the source code
Hiii Sir.
In this Proect I also want to control temperature under COOLING Atmosphere so what i should use here as a Cooling Junction instead of Heating Element??
Can I use Any other Simple Instrumentaion Amp instead of using Thermal INSTRUmentaion Amplifier..
also I will be more Gladful if I receive any operating Video of this Project…
Thank You for Your warm responce….
My email id IS : [email protected]
sir,
whether LM35 sensor can be used in the place of IC2-AD8495 and K-type thermocouple ??…is there any other similar circuit diagram for this same temperature controller project using LM35?
hello sir pls tell me what is thebest pragraming txt book if you have pls send to me iam new for programing to embed
Sir,
I do not get the Source code for this project when I click download. Kindly mail it to my mailing ID [email protected]
Thanks.
Raj
Here is the download link.
I try to download it but doesn’t open so please help me where did I get the source code
Please redownload it.
Please snd me the hex file as I can’t download on your link.
[email protected]
Raj
Thanks for the post sir.
Can i use lm35dz instead of the k type thermocouple?
If.yes, how can i connect the lm 35dz pin to the circuit?
Thank you.
I have been trying to get the source code for this project and failed several times and asking if its possible to email it or buying already programmed micro-controller.
Still asking if I can use LM35DZ in place of AD8495 K TYPE thermocouple.
Thank you.
Hi Sunil ,
Sanjeev this side from Frigoglass we required one temperature indicator with six display
can u please guide us for same
Regards
sanjeev
Please fix the source code!!!!
Hi Sam, Could you please elaborate on your query?
Hello sir please am using proteus to draw the circuit and stimulate but I couldn’t get the relay and the k-type thermocouple on its can you help with that sir happy if I would get a quick response to that
Hello I drew the circuit using a proteus software but couldn’t get the k type thermocouple and relay used can you help with that
i want to display temperature on 4 digit 7 segment display. can u send me code for that?
hello can i get the hex file, due to hi tech compiler is not available to my existing programmer, thanks
Heater Electric 1000 watt Converter OR Controller 01
Name : Mian Muhammad Hanif
City : Lahore
Country : Pakistan
Mobile No : 03224916443
Name : Muhammad Umar
e-mail : [email protected]
To,
Sub: Purchase Heater Electric Converter OR Controller
Dear Sir,
Our clients have electric heater stove top used as below:
[1]
1000 watt 220 v 5.5 amp qty 3000, used high electric bill amount.
[2]
2000 watt 220 v 9 amp qty 1500 used high electric bill amount.
[3]
3000 watt 220 v 15 amp qty 3000 used high electric bill amount
We are interested purchase Converter OR Controller
12 Volt and 2 Amp.
Save for electric bill.
We are first time work on project.
This is very big business in Pakistan
Already Pakistan used electric 220 volt.
We are interested electric 220 volt input and 12v and low amp output.
Please advise us
Thanks
Muhammad Hanif
There is a problem accessing source code, none of the provided links or download sites give access to any code. By the look of the other comments lots of people are experiencing same difficulty, and none of your suggestions work. Whats the story.
Hi Geoff, the source code is present within the article, just click and download. If you are not able to download the code, please temporarily turn off the antivirus and then redownload.
didn’t find source code, can you mail me.
Kindly refresh the page, previously the page was divided into 2 pages. We have updated it to one page.
This is an informative piece!
Thank you for your valuable feedback.
Hi Sir,
I am developing a pump monitoring system in which i am taking few parameters to monitor mentioned below:
1) Winding Temperature Measuremnet using Pt100.
2) Bearing Temperature Measurement (2 sides one is on Driving end and other is on Non-Driving end)using Pt100.
3) Water Level Sensor Hi/Low.
4) Seal Sensor.
So can you suggent me if the above microcontroller PIC16F877A will be able to do the above task or not..?