Here is a dual-mode robot that can be operated manually using an RF-based remote control and can also move automatically avoiding all the obstacles. The robot has some inbuilt intelligence to avoid obstacles by changing its path. It can be further modified for applications like automatic vacuum cleaner. In such an application the vacuum cleaner will automatically clean the floor, or you can direct it using the RF remote while sitting relaxed on your sofa.
Circuit and working
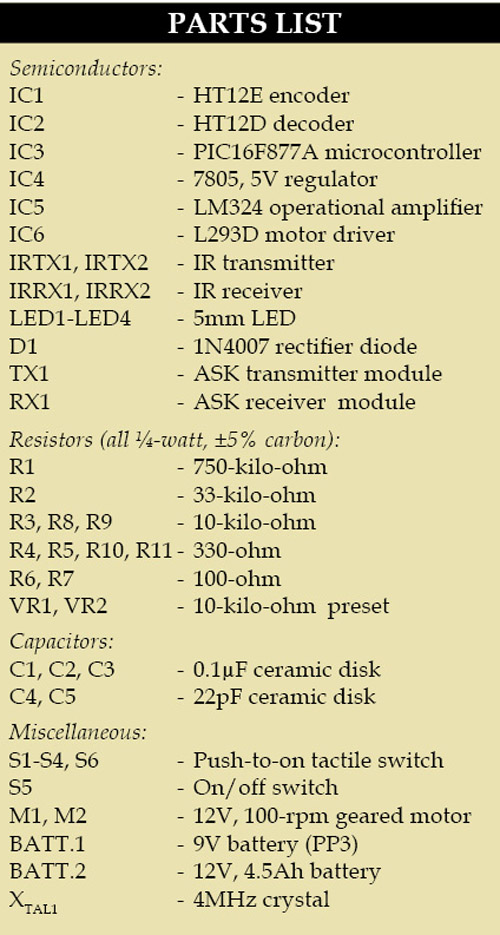
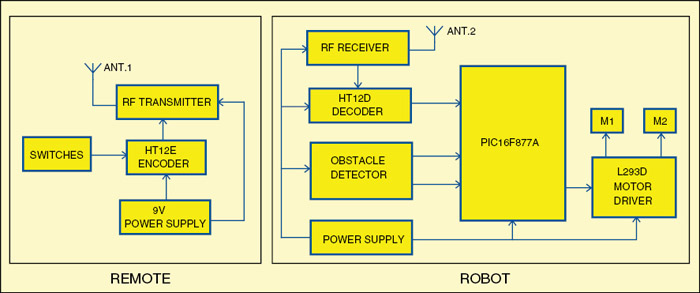
Fig. 1 shows the block diagram for PIC-based dual-mode robot. When a button is pressed in the remote, the corresponding code is transmitted through RF transmitter. At the receiver end, this transmitted signal is received and decoded. The MCU unit compares the received code and drives the motors corresponding to the code received. Obstacle detectors detect any object in the way and intimate the microcontroller.
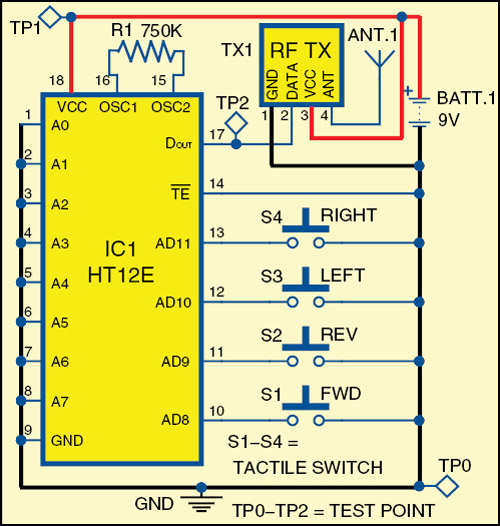
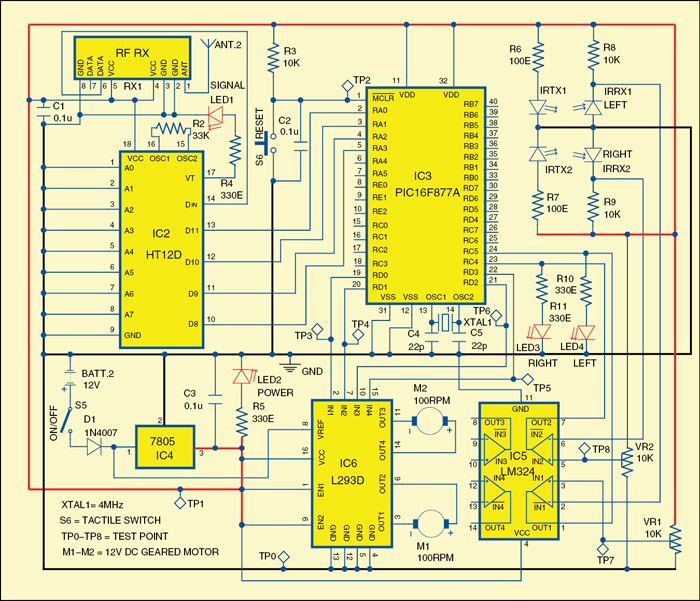
Figs 2 and 3 show the circuits of remote control and robot, respectively.
Remote control. It is built around encoder IC HT12E (IC1), 433MHz RF transmitter module (TX1) and a few discrete components. Switches S1, S2, S3 and S4 are interfaced with AD8 through AD11 of encoder IC1 for forward (FWD), reverse (REV), left (LEFT) and right (RIGHT) motions, respectively. Resistor R1 is connected between oscillator pins 15 and 16 to set the transmitter frequency. IC1 is permanently enabled for transmission by connecting its TE pin to ground.
When any switch, say S1, is pressed, the corresponding data is serially transmitted from DOUT pin through the RF transmitter module. A 9V battery is used to power the circuit.
Robot
It comprises an RF receiver module (RX1), decoder HT12D (IC2), microcontroller PIC16F877A (IC3), operational amplifier LM324 (IC5), motor driver L293D (IC6), regulator 7805 (IC4) and a few discrete components. Data transmitted from the remote is received by the RF receiver module and further decoded by IC2. Decoded data is fed to pins RA0 through RA3 of microcontroller IC3. Identical addresses are selected for the encoder and the decoder by shorting them to ground. Output pins RD0 through RD3 of the microcontroller are fed to IN1 through IN4 of driver IC6 to drive motors M1 and M2, respectively. Enable pins EN1 (pin 1) and EN2 (pin 9) are kept high for always-enabled output.
Regulator IC4 provides 5V regulated supply. 12V battery supply is directly connected to pin 8 of motor driver IC6. Two IR transmitter-receiver pairs are used for obstacle detection. Presets VR1 and VR2 are used to set the reference voltage for the two operational amplifiers in IC5.
When the robot reaches close to an obstacle, the reflected IR beam is detected. Voltage at the inverting pins of operational amplifiers goes lower than the reference voltage and their outputs go high. The same is indicated by LED3 and LED4. Output pins 1 and 7 of IC5 are connected to pins RC5 and RC4 of microcontroller IC3. The microcontroller controls the motor corresponding to the data received from the transmitter and obstacle detection system.
Working of the robot
Working of the system is simple. The robot is in manual mode by default. In manual mode, it can be directed by the remote. For each direction there is a dedicated button on the remote. When the robot encounters any obstacle, it stops moving forward. The robot will, however, be able to move in the rest of the directions.

To make the robot work in automatic mode, press S1 and S2 simultaneously. In automatic mode, the robot will move in forward direction. If it encounters any obstacle, it will stop. To avoid the obstacle, the robot will automatically move a little back, turn to the right by 90 degrees, move forward, then turn left. After the obstacle is avoided, the robot will continue moving forward.
To turn off the automatic mode, press S3 and S4 simultaneously. This algorithm can be further refined for different applications.
Software. The source code for the robot is written in ‘C’ language and compiled using MPLAB IDE. It is designed to run on Windows. Source program ‘pic_rf.c’ is used for the microcontroller. The program is well commented and easy to understand. The pic_rf.c file is converted into hex code using the MPLAB compiler. The hex code is burnt into the microcontroller using a suitable programmer.
Construction and testing
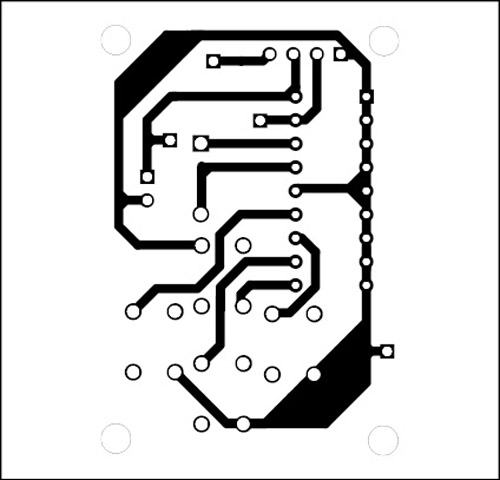
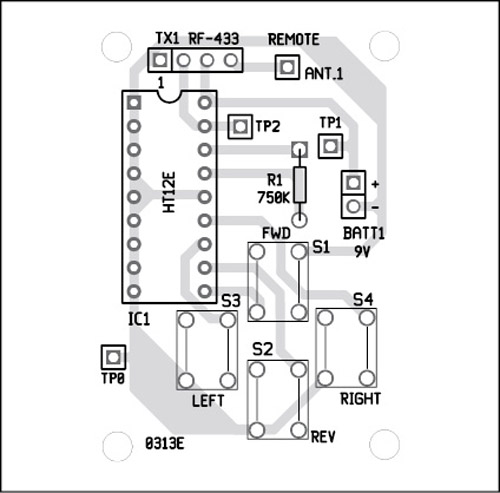
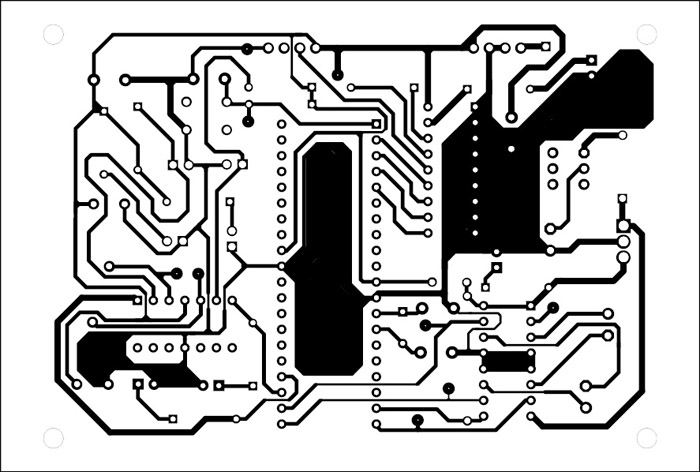
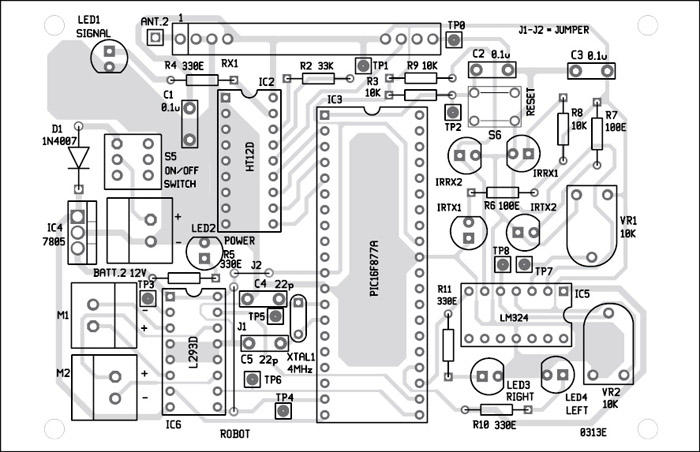
An actual-size, single-side PCB for the remote is shown in Fig. 4 and its component layout in Fig. 5. PCB for the robot is shown in Fig. 6 and its component layout in Fig. 7. Suitable connectors are provided on both the PCBs to interface motors, RF modules and power supplies.
Testing of remote section. Check the correct input supply at TP1 with respect to TP0. Press any switch and monitor the changes at TP2 using an oscilloscope.
Download PCB and Component Layout PDFs: click Here
Download Source Code: click Here
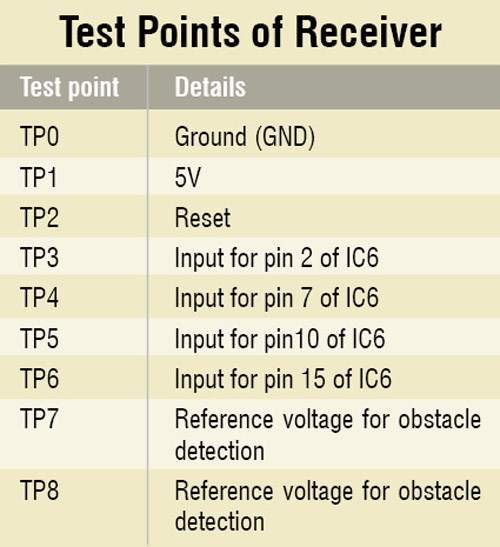
Testing of robot section. Verify correct power supply to the robot at TP1 with respect to TP0. Proper reset to the microcontroller can be verified at TP2. Press any switch and check whether LED1 is glowing or not. Check the voltage at TP3, TP4, TP5 and TP6 to confirm whether correct actions are initiated by the microcontroller after receiving the code. LED3 and LED4 will glow if any obstacle comes in front of the robot. Reference voltage for the obstacle detection system can be checked and adjusted at TP7 and TP8.
The author is a BE in electronics and telecommunication from RGPV University, Gwalior


can i know what type language do you use for the programming
C programming is used in most projects
sir,
this PCB layout is approx 4 times, what will be the actual size, kindly confirm
Can you please email me the source code? If possible email me your code since i need help with my project.
Dear Aishwarya, the source code is present at the end of the article.
Provide source code is empty
Please re-download the file after turning off the antivirus temporarily. Maybe the antivirus is deleting the files.
can you please email me the source code
The source code can be downloaded from here.