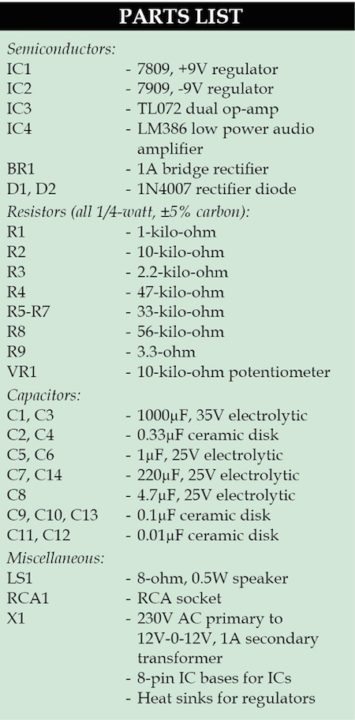
 The small-signal amplifier is generally referred to as a voltage amplifier because it usually converts a small input voltage into a much larger output voltage. The audio power amplifier works on the basic principle of converting low-power audio signal to a suitable level to be delivered to the load.
This low-power amplifier circuit is useful for the amplification of sound from small-signal devices such as mobile phones, laptops or desktops.
Circuit and working
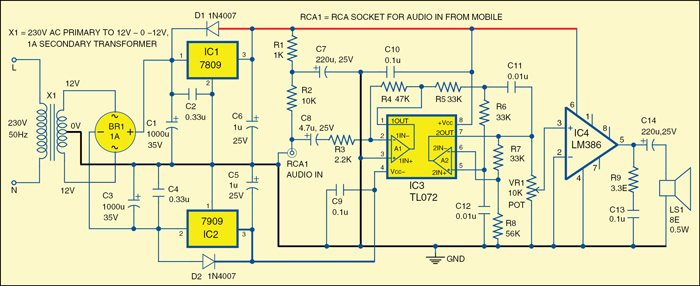
As shown in Fig. 1, this circuit is built around a step-down transformer (X1), bridge rectifier BR1, regulators 7809 (IC1) and 7909 (IC2), dual op-amp TL072 (IC3), low-power amplifier LM386 (IC4) and some other components.
The circuit can be divided into two sections—dual power supply section and amplifier section. The dual power supply section is built around step-down transformer X1 (230V ac primary to 12V-0-12V, 1A secondary) and two voltage regulators 7809 and 7909. IC 7809 is a positive voltage regulator, while 7909 is a negative voltage regulator. Diodes D1 and D2 are used to protect IC1 and IC2 against reverse voltages from capacitors connected to the regulators. These regulators provide ±9V regulated output for the operation of the circuit.
Use suitable heat sinks with the regulator ICs because they get hot during operation. In case of overheating, there is provision for a thermal shutdown.
The amplifier section is built around TL072 (IC3) and a low-power amplifier LM386. The op-amp A1 of IC3 operates as a low-noise preamplifier. Capacitor C8 is used in order to pass low frequency. The op-amp A2 of IC3 operates as a low-pass filter. For changing the cut-off frequency, you have to change the values of capacitors C11 and C12.
LM386 is a low-power amplifier IC with built-in biasing and inputs that are referred to the ground. It has a gain of 20 and can drive a speaker of 8-ohm impedance.


Download PCB and component layout PDFs: click here
The circuit is simple to use. You have to simply feed the output from a mobile phone, or any other low-volume device, into RCA1 socket on the PCB. The amplified sound can be listened-to through the speaker (LS1). Potentiometer VR1 is used for volume control.
Construction and testing
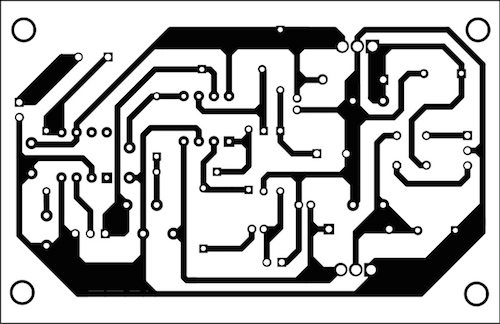
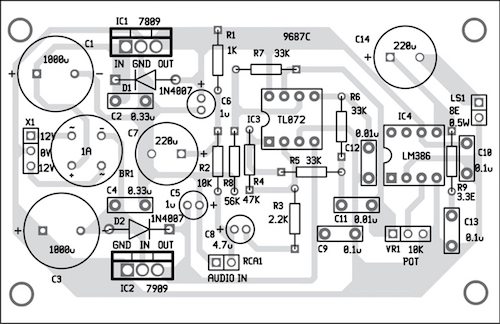
An actual-size, single-side PCB for the simple low-power amplifier is shown in Fig. 2. Its component layout is shown in Fig. 3. After assembling the circuit on the PCB, enclose it in a suitable plastic box.
Fix RCA1 socket on the front side of the box for an audio-in signal. Fix a three-pin connector on the PCB for connecting secondary terminals (12V-0-12V) of transformer X1 and to two-pin connector on the rear side for mains 230V AC, 50Hz. Fix the transformer firmly on the cabinet with screws or nuts and bolts. Connect the speaker affixed on top of the box or placed at a distance. Use a shielded cable for connecting to the RCA socket.
Before inserting IC3 and IC4 into their respective IC bases, verify that all the connections have been made properly.
The author is a lab engineer at EFY


it didnt worked for me
plz help with a video of connections
Could you please check for connections again?
do u have any video of this project?
could you guys come up with a video or something to further explain its working
And also what’s the function of TL072 here
The LM386 pin 4 should go to the -9V rail and not the GND pin. Also the power supply rejection ration of both amps should be sufficient to prevent the 100hz ripple from the bridge rectifier and filter caps so that you do not need any 9v regulators.