Stress meter lets us access our emotional pain in an electronic format. With the help of this device one can know stress levels of the human body. If the stress is very high, the stress meter gives a visual indication through a Light Emitting Diode (LED) display along with a warning beep. The gadget is small enough to be worn around the wrist.

The gadget is based on the principle that the resistance of the skin varies in accordance with your emotional states. If the stress level is high the skin offers less resistance, and if the body is relaxed the skin resistance is high. The low resistance of the skin during high stress is due to an increase in the blood supply to the skin. This increases the permeability of the skin and hence the conductivity for electric current.
This property of the skin is used here to measure the stress level. The touch pads of the stress meter sense he voltage variations across the touch pads and convey the same to the circuit. The circuit is very sensitive and detects even a minute voltage variation across the touch pads.
Stress Meter: Circuit explanation
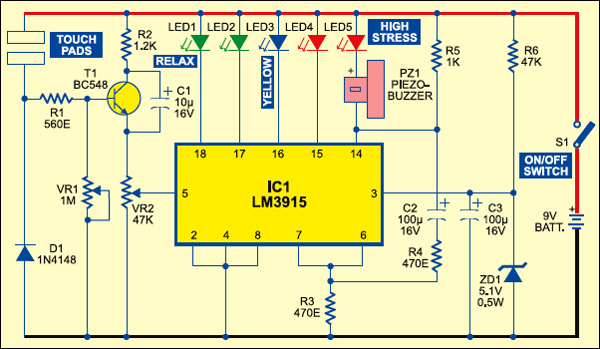
The circuit comprises signal amplifier and analogue display sections. Voltage variations from the sensing pads are amplified by transistor BC548 (T1), which is configured as a common-emitter amplifier. The base of T1 is connected to one of the touch pads through resistor R1 and to the ground rail through potmeter VR1. By varying VR1, the sensitivity of T1 can be adjusted to the desired level. Diode D1 maintains proper biasing of T1 and capacitor C1 keeps the voltage from the emitter of T1 steady.
The amplified signal from transistor T1 is given to the input of IC LM3915 (IC1) through VR2. IC LM3915 is a monolithic integrated circuit that senses analogue voltage levels at its pin 5 and displays them through LEDs providing a logarithmic analogue display. It can drive up to ten LEDs one by one in the dot/bar mode for each increment of 125 mV in the input. Here, we’ve used only five LEDs connected at pins 14 through 18 of IC1. LED1 glows when input pin 5 of IC1 receives 150 mV. LED5 glows when the voltage rises to 650 mV and LED5 flashes and piezobuzzer PZ1 beeps when the stress level is high.

Resistors R4 and R5 and capacitor C2 form the flashing elements. Resistor R3 maintains the LED current at around 20 mA. Capacitor C3 should be placed close to pin 3 for proper functioning of the IC. Zener diode ZD1 in series with resistor R6 provides regulated 5V to the circuit.
Assembly and usage
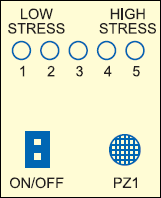
The circuit can be assembled on a small piece of perforated board. Use transparent 3mm LEDs and a small piezobuzzer for audio-visual indications. Enclose the circuit in a small plastic case with touch pads on the back side. Two self-locking straps can be used to tie the unit around your wrist.

After tying the unit around your wrist (with touch pads in contact with the skin), slowly vary VR1 until LED1 glows (assuming that you are in relaxed state). Adjust VR2 if the sensitivity of IC1 is very high. The gadget is now ready for use.


What are sensor are used in this stress meter ?
Hello I want to know about touchpad please tell me which type touchpad I can use…? Please
ANY CONDUCTING MATERIAL LIKE ALUMINUM
Proximity type sensors
can we use metal plates instead of touch plates
what type of metal ???
use cu, or al
will we use iron piece as touch pads
The circuit is not working. The last LED lights up for a split second and then nothing happens. Please help. Thanks in advance.
I had exactly the same issue. It turns out that R6 needs to be 47ohms not 47k ohms. I worked this out based on the maths for a Zener diode based voltage regulator.
I need help brother. Tried 47 ohms but still same problem. Mail at [email protected]
i need some more informations about this projects , send this to my mail id “[email protected]
Kindly elaborate your query.
What type of material i need to be use for touch pads?
Any one have a stress meter redyment
What is touch pads
Please tell me about the touch pad???
any videos in concern with this project???
this circuit is not working…… when we switch on, then only 1 led was blink for a bit of second…….please help
Led glows then shut off. Mail solution at [email protected]
Kindly elaborate your query.
I need more information about this projects, Please send this to my mail ID, it’s urgent please do the needful as soon as possible.
[email protected]
What kind of information are you looking for?
I want circuit diagram connecting video
hello… hi, can u please sharing to me, why my stress meter only blinking at one led red only? why it can’t give blinking in yellow or green led? its urgent too.. can u help me? what happen to my circuit…
Please help i got all components except lm3915 ….Instead i gotta lm3914 can I use that
Where can I buy touch pads
What is the cost of making this project?This is sensor based or not? Also I need more information regarding this project like it’s video and components needed for this project.
What type of touch pads did you use?
Can we make touch pads on our own?
Is there any circuit for designing the touch pads
Please explain about the touch pads.
Is this circuit needs any codes for sense the skin resistance or buzzer on
How many secs will it take to buzzering
Can we do it for final yr projects