


 This timer switch for an electric water heater is based on NodeMCU and Blynk IoT cloud solution. An electric water heater is used in bathrooms during the cold season for bathing with hot water. A common problem is that when you wake up in the morning, you need to wait, say 20 minutes, for the electric heater to sufficiently heat the cold water. One possible solution to this problem is using a timer switch.
The timer switch presented here can be used to start and stop the electric water heater from Blynk app in your smartphone. Using this, hot water will be ready when you wake up. The author’s prototype is shown in Fig. 1.

Circuit and working
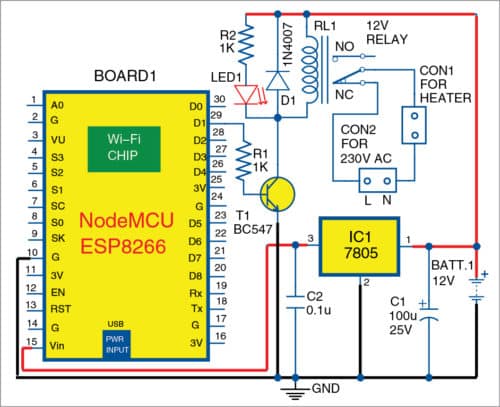
The circuit diagram of the Internet of Things (IoT)-based timer switch for the water heater is shown in Fig. 2. NodeMCU is used as the microcontroller (MCU). The circuit also has 5V voltage regulator 7805 (IC1) for powering NodeMCU. A 12-volt relay (RL1) is used to switch on and switch off the water heater through relay driver transistor BC547 (T1).
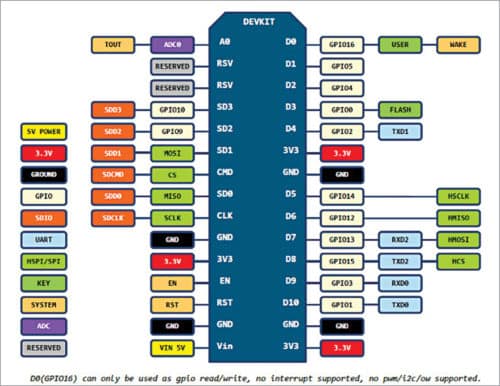
NodeMCU is an open source IoT platform that includes firmware that runs on ESP8266 Wi-Fi module. The pin diagram of NodeMCU is given in Fig. 3.
Connecting NodeMCU with IoT platform
NodeMCU is programmed with ESP8266_standalone.ino using Arduino IDE by selecting NodeMCU 1.0 (ESP-12E Module) as the preferred board from Board Manager. For adding NodeMCU board in Arduino IDE, check the tutorial on the following link.
The IoT platform can be accessed using Blynk app on iOS and Android devices using the steps given below.
1. Download Blynk app on your smartphone, and either create a new account or log in using your existing Facebook credentials.
2. Go to Create New Project in the app and enter the project name (say, IoT_ heater). Choose Device, for example, NodeMCU, and click on Create.
3. After creating a new project, an authorisation token number will be sent to your email account.
4. Download Blynk library from https://github.com/blynkkk/blynk-library. Install the library from Arduino IDE. Go to Sketch>Include Library>Manage libraries>Add .zip and browse to the zip library, or after extracting the library, add it to Library folder of Arduino IDE on your computer/laptop.
5. After installing Blynk library, browse Windows folder, go to File>
Examples>Blynk>Boards_wifi> ESP8266_Standalone.ino sketch. Paste your authorisation token, and enter your Wi-Fi network SSID name and your network password in the sketch.
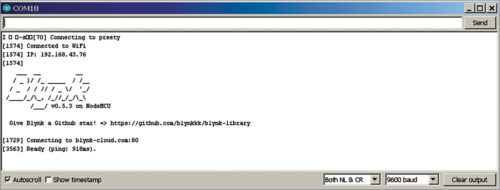
6. Connect NodeMCU via USB cable and select the COM port in Arduino IDE. Open ESP8266_Standalone.ino, compile and upload the sketch into NodeMCU board. Then, open serial monitor to check whether your board is connected with Blynk or not (Fig. 4).
7. Go to the project created above (IoT_heater) on Blynk app, add widget (+ sign) and select timer widget on your cellphone.
8. Go to Timer Widget Settings. Declare the GPIO (for example, D0, D1, D2, etc) of NodeMCU, which you are going to use as output for controlling the heater. Select the starting (say 7:00am) and stopping (say 7:30am) times of the timer in the app.
Construction and testing
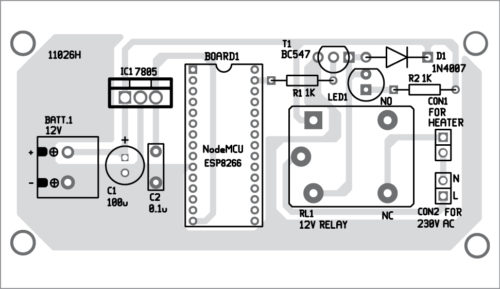
The PCB layout of the IoT-based water heater is shown in Fig. 5 and its components layout in Fig. 6. Assemble the components on the PCB as per the circuit diagram.
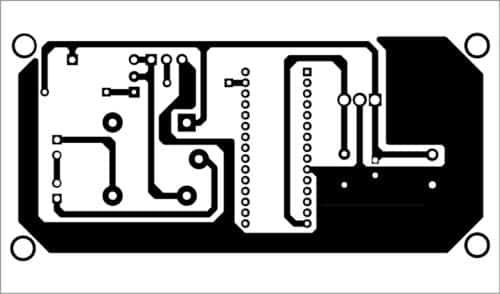
Download PCB and Component Layout PDFs: Click Here
Connect the water heater to 230V AC mains at connector CON1 through normally-connect (NC) contact of RL1. Connect 230V AC mains to CON2. When you click on Play in Blynk app, the timer will start. When the timer reaches the pre-determined or set time, as defined in the app, it will automatically start. The relay will get energised, and the heater will be switched on. And after the stop time, the relay will get de-energised and the heater will be switched off. Now, the project is ready to use.
Yogesh Amuthavalli is an electronics hobbyist

Does this kind of relay be enough? Some water heaters are 3000watts.
Why not simply use a sonoff
A very important design aspect that has been overlooked is the rating of the relay. Water heaters are generally 1Kw or more, to use this circuit as is, it must be paired with a contactor of suitable rating.