 Sometimes things do not fall in place and we curse ourselves for taking the wrong turn or making the wrong choice. But in P.B. Shelly’s words, when the realisation later dawns on us we feel like as described below by the poet.
We look before and after
And pine for what is not
Our sincerest laughter with some pain is fraught
Our sweetest songs are those that tell about our saddest thoughts
Once I bought a pair of Arduino-compatible GPS receivers from aliexpress.com at a throwaway price and then the whole problem started. The GPS receivers do not talk to any standard program. So, none of the Arduino programs such as AdafruitGPS, NeoGPS, TinyGPS, TinyGPS++, or the oldest GPS could talk to the module to decipher data.
Frustrated, I asked for the refund of money—stating the reason that the receivers were non-compatible with Arduino. (That’s what they were told, actually!)
The seller immediately made the refund, which was a small amount, and I simply set the receivers aside to finally throw them in the wastebasket someday. But what happened a couple of months later is worth sharing!
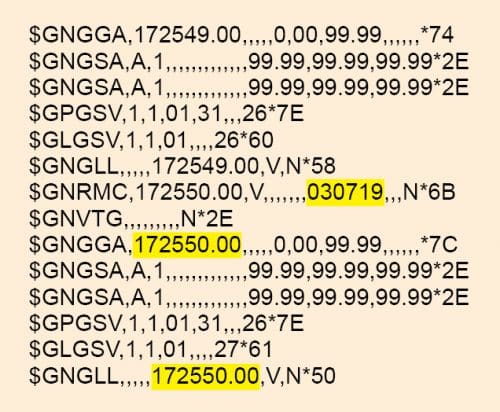
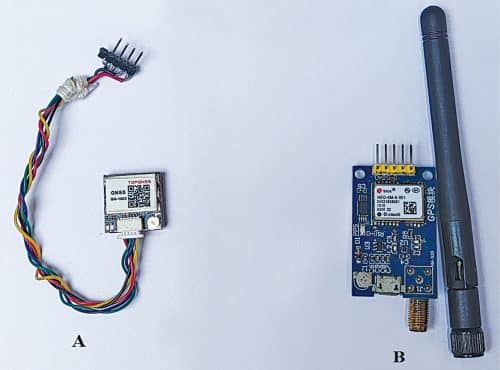
I was experimenting with a project where precise time-keeping was necessary, and I lay my eyes on these small ‘good-for-nothing’ GPS receivers. I picked one of them and, using a USB-to-serial FTDI board, I connected the module to the raw serial terminal of my computer (3.3V+Gnd+Tx+Rx pins used). I set the terminal speed as 9600-8N1 and I found all those NMEA (National Marine Electronics Association) data (see Fig. 1) arriving at the GTK terminal of my Ubuntu PC. Two different types of GPS modules (A and B) used by me are shown in Fig. 3. You can use anyone of the modules for this project.
Though the data was not at all clear to me (what was what) at first, a close look later showed that the figures highlighted in yellow in Fig. 1 were UPC (United Pacific Time) and date strings.
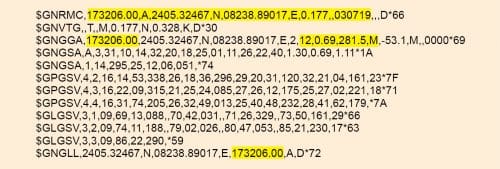
For a better picture, I connected the GPS module to Serial2 hardware port of ESP32, and the data now arrived very clearly on the Arduino terminal. On looking carefully, all that GPS data started looking meaningful: A (active or fixed), longitude, date, number of satellite-in-view, speed, mean-sea-level, etc. All these data were arriving at fixed position with fix frequencies as shown in Fig. 2.
Different type of NMEA data started arriving on Serial2 port of the ESP32 board that was used during testing. The data was different from the normal NEMA data, and that was the reason why normal GPS programs could not decipher them at all.
After a few cursory studies of the data that was arriving, I found that important parameters like latitude, longitude, hhmmss (hours, minutes, seconds), ddmmyy (day, month, year), altitude, number of satellites in view, fix, km/hour speed could be located easily in the data.
Once I knew where these data were located in the once ‘junk-like’ serial NMEA data stream, I made an attempt to pluck out the now those useful data for the project.
In an Arduino, for connecting any normal UART module, it is always good to avoid the native Rx and Tx (D0 and D1) pins as these two pins are used while uploading sketch (software) from a computer. One has to make those pins free while uploading the sketch, else, it will not upload. Therefore, it is convenient to connect any UART device to some other GPIOs, and for that people mostly use programs like softwareserial or neoserial. Unfortunately, these software do not work on ESP32.
ESP32 has three hardware serials, and any pin can be set for the task with the following commands:
Serial2.begin(9600, SERIAL_8N1, RXD2,
TXD2); // 17,12,4,35 pins are OK
You can set any pin for the Tx and Rx ports. One more interesting fact about the NMEA is that, the data that arrives endlessly is in CSV form. Therefore, separating it on CSV is easy! For invoking the hardware serial of ESP32 and getting the data in CSV format, the following commands helps:
Serial2.begin(9600, SERIAL_8N1, RXD2,
TXD2); //RXD2=16, TXD2=17
while (Serial2.available() ) {
String val +=Serial2.readStringUntil(‘\
r\n’);
}
That’s the few lines of commands in Arduino, which plucks out the comma separated NEMA sentences out of the whole lot.
Clock
Well, till now we have got the CSV strings of the NMEA data and now we have to segregate them and then use for our purpose. We can develop a small GPS clock on ESP32 using this procedure. Once you master this trick, you can connect any UART device to any microcontroller using following commands:
val.trim();
len=val.length();
Serial.println(val);
j=val.lastIndexOf(‘,’);
delay(500);
//Serial.println(j);
//for(i=0;i<=j-1;i++) list[i]= getValue
(val,’,’,i); // un necessary loads memory
for(i=0;i<=200;i++) list[i]=
getValue(val,’,’,i); // 200 variable is
enough!
The data once acquired in the string ‘val’ is now to be stripped in comma-separated array variable named list[]. The NEMA strings happen to be quite long and collecting so much data is generally unnecessary, and it overloads the memory. So, it is quite prudent to restrict the number of CSV variables to 200 or less. Therefore, the next line of the program is used for this purpose.
Local time
After getting the handful CSV values in list[] variable, we can start our local calculations. First, we set an active or fix block to ensure that the GPS receiver is ready and active through following commands. Two variables defined at the top of the program are to offset for the local time. list[1] is time, list[2] is active when it is ‘A’ and so are the other important variables. The details of the sketch can be followed very easily.
if((list[0]==”$GPRMC” or list[0]==”$GNRMC”)
&& (list[2]==”A” or list[2]==”V”) ) {
//$GNRMC+A or $GPRMC+V
const int timezonehh = 5; //Timezone hour
offset
const int timezonemm = 30; //Timezone
minute offset
We may use a TFT colour display, which is entirely controlled by the TFT_ILI9163C.h header file. Any other display with suitable header files can also be used instead.
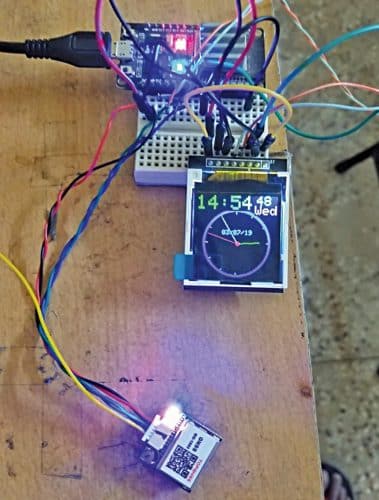
The prototype is shown in Fig. 4. The circuit diagram of ESP32 based GPS receiver is shown in Fig. 5. It is recommended to use an external 3.7V battery power source for the circuit.
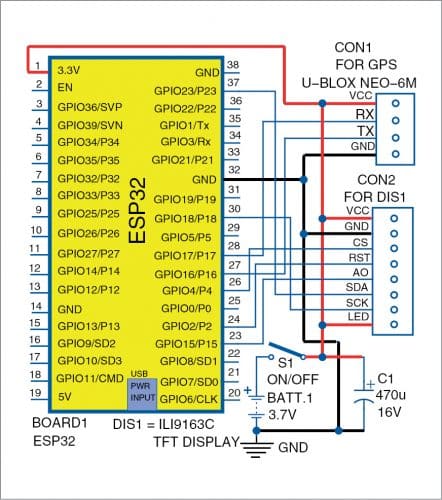
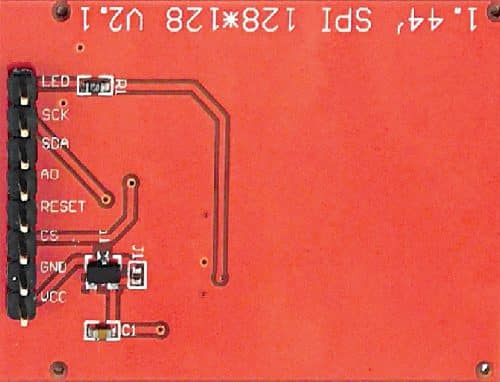
The TFT ILI9163 display works on five pins other than the VCC, LED, and GND pins. SCK and SDA pins of the display, which are fixed type, are connected to GPIO18 and GPIO23 pins of ESP32 board, respectively. The A0, CS, and RESET pins can be connected to any GPIO pins but should be defined in the code accordingly. Pin details of TFT ILI9163C display are shown in Fig. 6.
For finding out the day-of-week, the small function calcDayOfWeek(int d, int m, int y) is used in the code (esp32_GPSrx). It finds out the day-of-week from the dd, mm, and yy values. It’s so easy!
You need header files such as Adafruit_GFX_Library and TFT_ILI9163C to successfully compile and run the code of this project.
Download Source Code
Aftermath
With restoration of these cheap GPS modules by reading their UART data, it was rather easy to decipher them rather than using the fancy readymade programs that the Arduino galaxy is replete with such as GPS, Adafruit-GPS, NEOGPS, TinyGPS, TinyGPS++, and NEMAGPSc. So, I can now go ahead with the gas pipeline detection project I have in mind with the spare GPS module and, whenever required, can peep into more UART devices in future—before looking out for readymade header programs.
Finally, I called the guy at aliexpress.com so that I could pay back the amount they had refunded me on my lodging the complaint. All they sent me was a big thank-you note and requested me to send them the Arduino sketch!
Somnath Bera is an avid user of open source software. Professionally, he is a thermal power expert and works as additional general manager at NTPC Ltd


Good
Thank you for your feedback.