The ESP32 Camera costs barely INR:650 [$10 USD]. It can take pictures at a 2MBPS rate, and it can send pictures up to 200 meters distance using a small antenna on 2.4 GHz but when it teams up with an Internet-enabled network it can do AI-related works as well!
It’s a collaborative style of work. The ESP32 Camera takes & sends the picture to a remote computer that is connected to the Internet and pulls the specified AI model and analyzes the object and determines the class of the object. It then sends the class of the object back to the ESP32Camera which then executes the object-specific command entrusted on it.
As long as the detection computer is on, the ESP32 Camera is all vigilant for its work. Once the model is loaded, the active Internet connection is no longer required. However, the detection computer needs to remain on all the time. The ESP32 camera also reproduces the live feed from the ESP32Camera.

Project
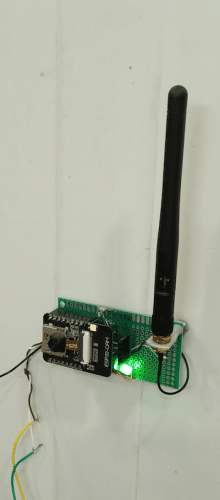
The project we undertook as a test project to monitor a road intersection owing to it’s interference over a land dispute. The area is protected by law against assembling. Besides having a PTZ [Pan Tilt Zoom] camera focused on the same direction, the ESP32Camera watches out the same direction and in case it finds more than one man/woman assembles at the road intersection, it makes the GPIO14 pin high.
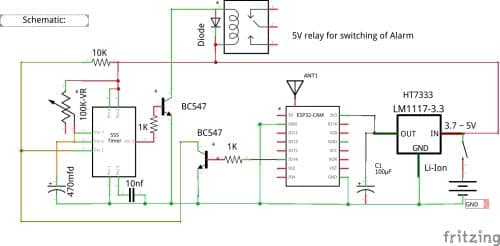
The direct GPIO14 output of ESP32Camera in this case is not very stable, it flickers due to continuous redrawing of the image boundary. That’s why the GPIO14 output, via a switching transistor is given to the trigger input of a monostable delay timer [0 to 10 seconds] built on IC555. Once triggered, it will keep the relay on minimum 1 sec to 10 seconds depending on the preset value of the 100K variable resistor. The trigger pin of 555 is Pin-2, which is connected to the collector of BC547 vide GPIO14. If the GPIO14 is high , it connects the trigger pin-2 to ground vide the emitter of the transistor – BC547.
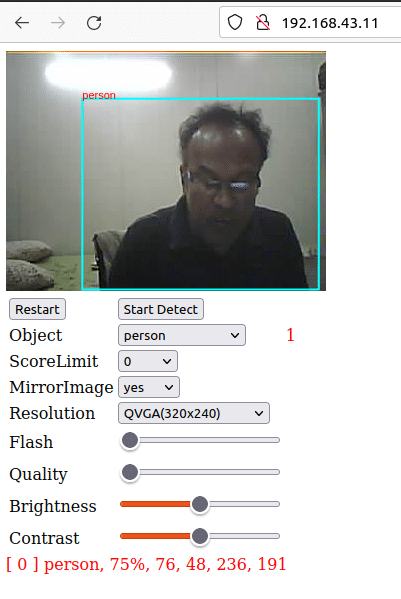
The IP address is set as fixed type [192.168.43.11] which can be changed by your requirement.
The ESP32 continuously draws image boundary over the image. If it finds two images, it draws two boundaries and so on. The confidence level can be set from 0 to 100%. The image resolution, MirrorImage, Flash [on 100% switch on the in built LED], Quality, Brightness & Contrast can be changed. However, if you increase image resolution from 320×240 to 1600×1200 the system will be extremely slow. It better to left the control at default level first and then try from there.

BOM
- ESP32 with Camera = INR 650.00
- IC555 = INR 50.00
- BC547 – 02 nos = INR:50
- 100K Variable = INR:50
- HT7333 or LM1117 [3.3V regulator] = INR:50
- 10 nf, 470 MFD one each = INR:50
- 5V relay = INR:50
- Battery, connecting wires etc extra.
- The whole [0…10 sec] monostable timer built on IC555 costs INR:75
Prototype
Programming process: Please ensure latest Arduino IDE 1.8 or above for compilation of this project. The ESP32 camera does not come with built in USB to serial interface. Therefore, to upload the sketch one needs to have a USB to Serial programmer which looks like this and comes for INR:250 to INR:300. The schematics shown below. The GPIO 0 to be pulled to ground during uploading mode and the reset button of the ESP32 to be pressed during first few seconds of uploading after that it is to be released.
Schematics of ESP32 Camera programming

Aftermath: ESP32 camera is very cheap yet it has got wide possibilities. The coco-ssd model that is used in this project can detect a wide range of objects which can be selected from the pull down menu which varies from person to toothbrush. Whatever object is selected, if the number is more than 1 or as decided by you, the ESP32 camera will monitor that number. If it exceeds, it will give command to the relay to switch on the alarm circuit.
The following additional projects ideas can be built on this project.
- Scarecrow – In presence of birds / dogs /cats / cows or cars it will fire the alarm.
- Automatic Magic eye for your front door – In case somebody appears / arrives, it raises alarm inside. The guest need not to push any alarm bell as such.
- Guest counter for any temple / mosque – For passage of every human being , a counter will increase.


sir may i simulate this in proteus and arduino ide. please tell me which library i have to download. in proteus and in arduino ide for this.