 In metropolitan cities traffic jams are one of the major problems and for the common man and he who use to travel on their legs is one of the major problems. Many time it is seen the people are waiting at crossing to get the traffic clear and the people have to wait and keep standing for an hours to cross the road it become more complicated when any child and old women have to wait for long time to cross the road so today we are going to Raspberry Pi TrafficLight Using TensorFlow & Python that checks how many people are waiting at zebra crossing and from how long they are waiting at zebra crossing and give priority to people rather than vehicles accordingly.
How Our System Works ?
- First a camera streams the live video at zebra crossing
- Then that video is cut in certain frames and a tensorflow with computer vision modules checks the number of people and time from which they are waiting to cross the
- If the system get that the number of people is greater than the 3(can be changed ) waiting at zebra crossing then it give priority to them. If the number of people at zebra crossing is below 3 but waiting for more than 60 seconds (can be changed) then it give priority to them in crossing.
So let’s start our project with some of required components
Bill of material

Prerequisites
Assuming that you have already Raspbian os installed and with Python3 environment on raspberry pi and also have access to its desktop.
sudo apt-get update
sudo apt-get upgrade
sudo nano /etc/dphys-swapfile
Then change the line CONF_SWAPSIZE=100 to CONF_SWAPSIZE=1024
sudo /etc/init.d/dphys-swapfile stop
sudo /etc/init.d/dphys-swapfile start
sudo pip3 install opencv
sudo pip3 install numpy
wget https://bootstrap.pypa.io/get-pip.py
pip3 install dlib
pip3 install tensorflow
After the installation you can now proceed with the cloning of TF modules, examples, and files using the following command:
git clone https://github.com/tensorflow/tensorflow.git
After successfully cloning, go to the directory → research folder → and paste the code attached with the article. Now open the python3 IDE.Now let’s understand and change the code. First we have import the required modules in code and these modules are:
- os
- cv2
- numpy
- tensorflow
- argparse
- sys
- gpiozero
- time
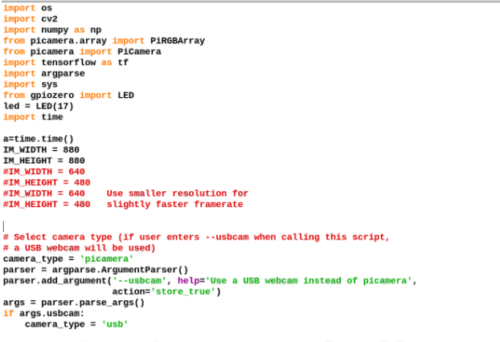
Next we will set the path for tensor flow detection modules and the we will set the name and path for labels here we have using the “trafficlight.pbtxt”. Next part of code will check the camera video and cut it in various frames and after that we have code that will try to detect the objects in each frame and then map with the labels that is assigned in traffic.pbtxt . here in traffic.pbtxt have only two labels that is “person” and “bicycle”( you can exclude the bicycle )
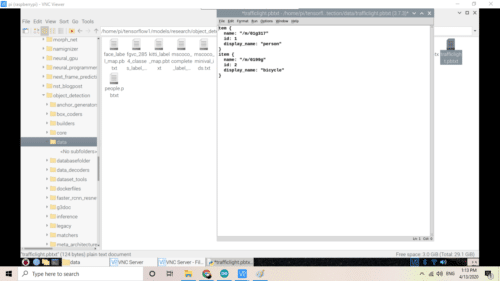
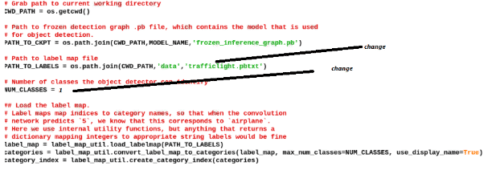
Now in next part of the code we check the label of object detected and here we have set a substring ie “person” we use this substring to count the number of people in image.

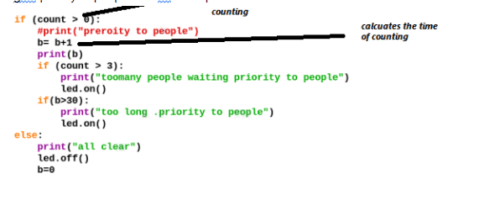
Now we have created several if() conditional statement that checks weather number of people detected is greater than 0 . Next if () statement will check count number is greater than 3 if yes then it turns the redlight on to stop vehicles and let the people pass . if number of people waiting at crossing is less than 3 then it start counting the time and if the time exceeds the 60 min then it give priority to people and let them pass.
Connection
Now connect the RPI camera to RPI Camera port using ribbon cable and then connect the components as in diagram(Refer fig 8).

Testing
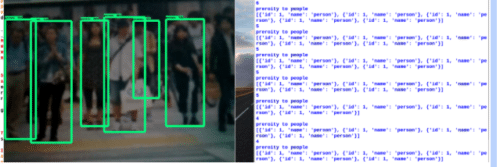
Now save the code and run the code in python3 IDE and wait for few minutes to load the TF modules and let the camera video window to appear and then bring the camera in front of many people if it detects the number of people detected is greater than 3 then it turn on red LED for stop sign. If people detected is less than 3 than wait for 60 second if the same people is wait for more than 60 seconds then it will let them pass and stop the vehicles by turning the red light on.
Congrats, Raspberry Pi TrafficLight Using TensorFlow is ready!!


“After successfully cloning, go to the directory → research folder → and paste the code attached with the article”..
Hellow :), what is mean by this? i cannot understand clearly.. Really hope you can help me.
You have to clone the TensorFlow GitHub respiratory using git clone followed by a link so that the pre-trained models and essential files copied to your raspberry pi automatically. After performing this process you can see a Tensorflow folder in raspberry pi. Now open that and then follow the steps as described in the article
Can i have your telegram number? maybe we can setup a google meet or any medium to teach me about above project.
Hello, i’ve been trying to “sudo pip3 install opencv” but I’m not able to because of this error
Looking in indexes: https://pypi.org/simple, https://www.piwheels.org/simple
Collecting opencv
Could not install packages due to an EnvironmentError: 404 Client Error: Not Found for url: https://pypi.org/simple/opencv/
Can you help me?
Hello, I have been some trouble going through with this project. When I try “sudo pip3 install opencv” I get the next error.
Looking in indexes: https://pypi.org/simple, https://www.piwheels.org/simple
Collecting opencv
Could not install packages due to an EnvironmentError: 404 Client Error: Not Found for url: https://pypi.org/simple/opencv/
I hope you can help me.
Have you connected the RPI to the internet, then check the python3 IDLE environment installed then try to install it.if still got any error try this
sudo apt-get install python3-opencv
you can ask doubts here in the comments. For more help needed you can whats me at 7061350809
Hello good morning, may i know the link where you download your pi os?
I have attached Voice bonnet on Rpi so installed it with AIY Voice Raspbian os for pi. You can download the official latest OS for raspberry pi from the raspberry pi official website, you can find the os image in the download section
Hello sir, can I get your email or any medium that I can contact you? almost 6 times I try to run the following code, but still got some errors.. really hope that you can help me.. Btw really nice project sir?.
Hello sir, can I get your email or any medium to contact you sir? About 6 times I try to run the given code and follow all the step given, but still got some errors.. I really hope that you can help me sir.. Btw really nice project sir ?
what error are you facing? copy error and send me on comments section I will try to guide you
Please send me details of error or contact me on what’s app 7061350809