 We receive many SMS alerts every day. These are automated messages that are broadcast to a list of mobile numbers. Ever wondered how the system works? This article can help you build your own SMS alert system in no time and monitor it as well.
If you check the messages in your mobile phone, you will see that these marketing SMSes come from unknown numbers. Companies use services from Cloud communication platforms and send you messages that are computer-generated via the Internet.
Advantage of using such a platform is evident—messages can be broadcast to any number of people at predefined times, without human intervention.
In this article we build a similar system using an interesting Python package that I recently discovered. It is called Twilio Python Helper Library. Twilio (www.twilio.com) is a Cloud communication platform that provides APIs to build apps that can communicate via text messaging. We use this package to build our SMS alert system.
We use another API from OpenWeatherMap (http://openweathermap.org) and read current humidity levels at a specific location. This software currently monitors for Delhi region, but you can change it for your location. If the read humidity exceeds 70 per cent, it sends a message ‘Humidity exceeds the set level’ to your mobile. Else, it sends ‘Humidity below set level’ to your mobile at desired intervals. Messages are sent using Twilio API. I have added humidity-monitoring feature to give you an example. You can monitor whatever you want.
The software is written in Python programming language and tested on a Windows 10 OS based computer.
Download and install Python 2.7.11
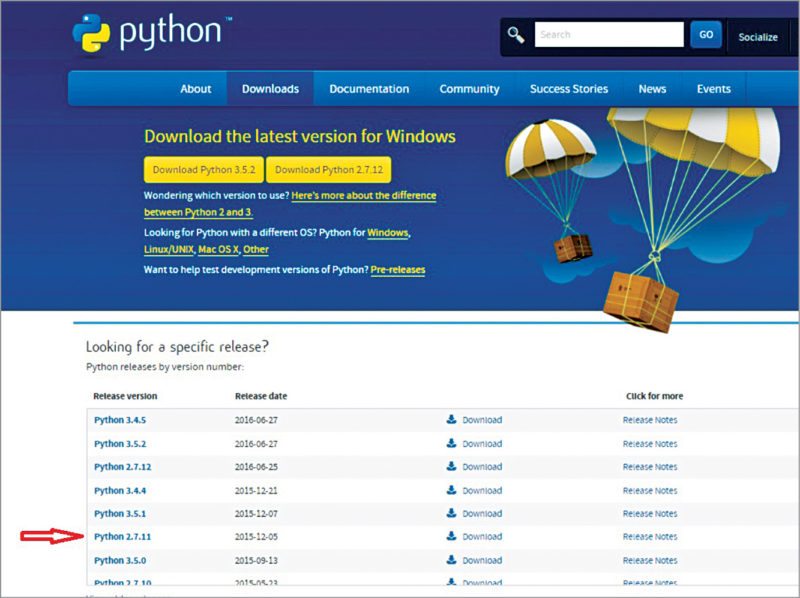
As the software is built using Python programming language, install it on your computer before starting to write any code. Use Python 2.7.11 for this software. You can download the same from www.python.org/downloads
Once you open the link, you will see the page shown in Fig. 1. Click Download Python 2.7.11 as shown in the figure.
Once downloaded, install the software. Double-click on the downloaded file, select ‘Install for all users’ and click Next (Fig. 2).

Select a location to install Python. Click Next (Fig. 3). Keep the default selection and click Next (Fig. 4).


You will be prompted for permission to install the software; select Yes. The page shown in Fig. 5 will appear to show the status of installation. Once finished, Next tab gets activated.
Click Finish to complete software installation (Fig. 6).


Add Python to path environment variable
Python can be directly run through the Command Prompt on Windows machine. But this needs Python directories to be added in the path under System Variables as explained below. If you run python.exe command immediately after installation, without adding the path variable, you may encounter the error shown in Fig. 7.

Follow the steps below to add Python to the path in System Variables under Environment Variables:
1. Right-click on My Computer →Properties→ Advanced System Settings (Fig. 8).

2. Click on Environment Variables and search for the path variable. Select the path under System Variables and click Edit (Fig. 9).
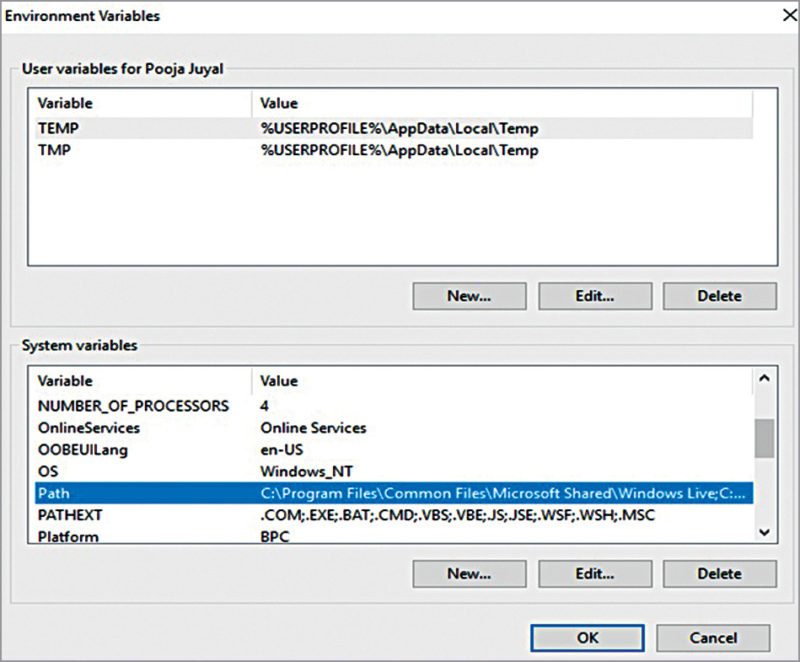
3. In case of Windows 7, add the following at the end of variable value (or at the path of Python installation):
;C:\Python27\Scripts
4. In case of Windows 8 or above, the window shown in Fig. 10 will appear. Click New and add:
C:\Pyhton27

5. Select OK and it is done.
6. Open Command Prompt and type Python (Fig. 11). This screen confirms proper installation of Python.

7. Now you can directly run Python commands from Command Prompt.
Prerequisites
Before you start writing your program, install required packages so that you can import these into your program. Register on Twilio website to obtain Twilio phone number, account SID and authorisation token. These are required in the source program to send text messages.
Then, register on OpenWeatherMap website and obtain a key. This key is required to read weather details from the website.
Install Twilio package
Twilio package can be easily installed in Windows using pip installer. This comes pre-packaged with Python 2.7.11. So you do not have to install it again. To download and install Twilio, run Command Prompt as Administrator and type the command shown in Fig. 12.

Note. It is important that Command Prompt is run as Administrator. Otherwise, the command will not work.
To check proper installation of Twilio, run Python in Command Prompt and type the command given below:
>>>import twilio
If this command does not give any error message, it means Twilio is properly installed.
Register with Twilio. Follow the steps given below to register or sign up:
1. Go to www.twilio.com and click Sign Up (Fig. 13).


2. Fill in your details in the form and click Get Started. (Choose Python as language).
3. Twilio will ask your phone number; enter it on the next screen.
4. Log into your account with the username and password you created.
5. You will see the dashboard as shown in Fig. 15. If you do not see all the details on your console dashboard, you can navigate to Account and find everything there.
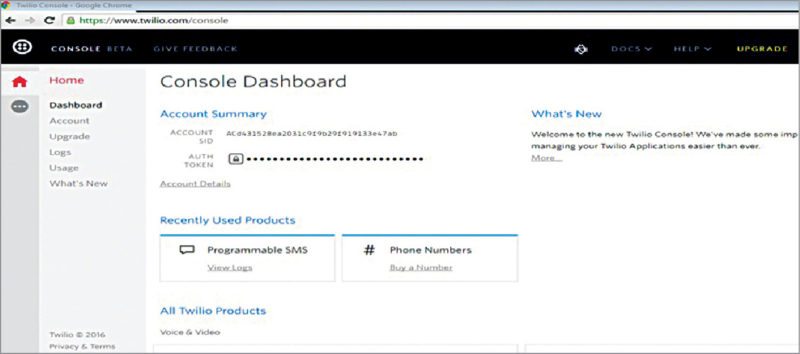
6. Note down account SID, authorisation token (click Lock to get it) and Twilio phone number (click Phone Numbers to get it).
Install PyOWM Python package
This package will be used to read weather details from OpenWeatherMap website (http://openweathermap.org/). Install it by using the commands shown in Fig. 16.

Register with OpenWeatherMap
To obtain the key, just sign up with the website by submitting your details (Fig. 17) and sign into your new account.
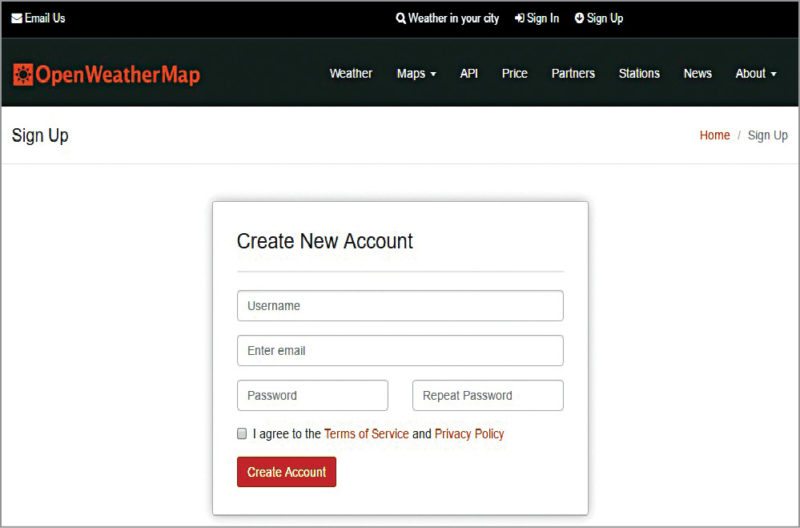
Click on API Keys and note down your key.
Confirm
If you have done everything mentioned below, you are ready to write the code:
1. Python 2.7.11 installed and added to path Environmental variables
2. Twilio package installed
3. Twilio phone number, account SID, authorisation token obtained from Twilio website
4. PyOWM package installed
5. Key obtained from OpenWeatherMap website
Go ahead and write the code then.
Python IDE
Python IDE comes with Python 2.7.11 installation and is used to write, test and debug Python programs.
You can run it directly from the installed applications by clicking on its logo. Or, write IDLE in Search tab on Windows Start page, click on IDLE (Python GUI) option. You will get Python shell screen as shown in Fig. 18.

Python is an interpreted language, so you can immediately start writing the commands followed by pressing Enter from the keyboard. Commands get executed when you press Enter.
Test by typing 2+2 and then press Enter. You should get 4 as the answer in the next line.
Create new program
Enter Python IDLE→File→New File
Now you can start writing the program in IDLE. I have provided the complete program in Text.py file (Fig. 19). I would recommend copying the code from this file, or use the file as it is, because Python is an indentation-sensitive language.
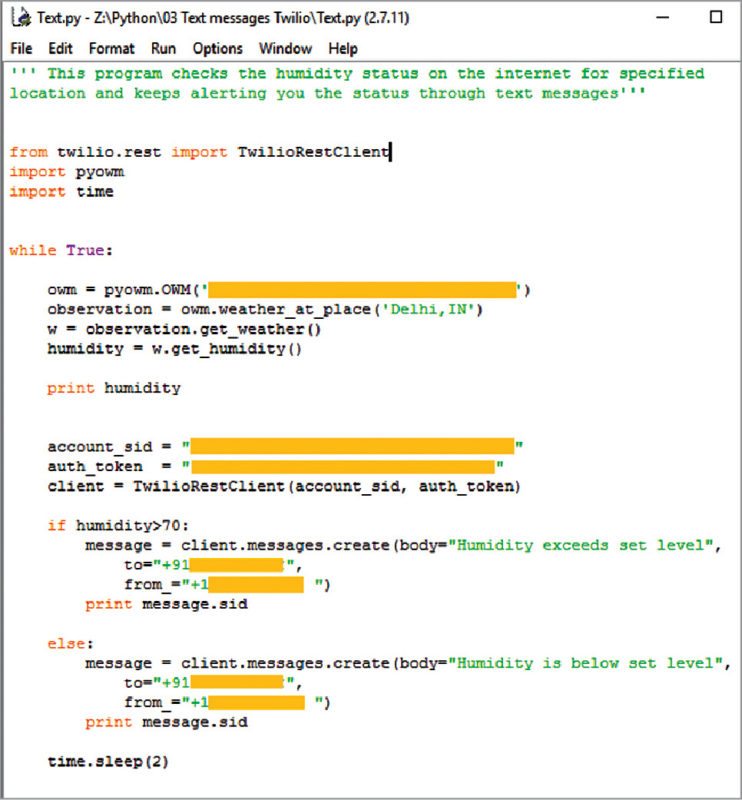
Note. You need to enter the information (Twilio phone number, account SID, authorisation token and key) in the code you have obtained in the previous steps.
Importing modules
Let us start with importing different modules that would be required in the program.
From twilio.rest import TwilioRestClient. This module will import Twilio used for sending text messages.
import PyOWM module will import PyOWM to read humidity, and import time module will import time module for delays.
The above two modules have already been installed and the third module comes pre-packaged with Python. You can check all the different modules in Python standard library or at https://docs.python.org/2/library/
Functions used
Read current humidity level from OpenWeatherMap website. The following function initialises with the key obtained from OpenWeatherMap website:
owm = pyowm.OWM(‘ENTER YOUR KEY’)
The following function sets location to Delhi, India:
observation = owm.weather_at_
place(‘Delhi,IN’)
The following function gets weather status:
w = observation.get_weather()
The following function gets humidity value:
humidity = w.get_humidity()
This section reads the current humidity level in the specified area and puts it in the variable humidity.
In the next section there is print command for printing out the read humidity level for testing purpose. You can also read temperature, wind condition and much more with commands such as w.get_Temperature.
Following code initialises Twilio API for sending texts using account SID and authorisation token:
account_sid = “ENTER YOUR SID”
auth_token = “ENTER YOUR TOKEN”
client = TwilioRestClient(account_sid,
auth_token)
Enter account SID and authorisation token you obtained from previous steps.
Following code sends ‘Humidity exceeds set level’ text message’ if read humidity exceeds the set level of 70 per cent:
if humidity>70:
message = client.messages.create
(body=”Humidity exceeds set level”,
to=”ENTER YOUR PHONE NUMBER”,
from_=”ENTER TWILIO NUMBER”)
print message.sid
The following section will compare the read humidity value from OpenWeatherMap website to the trigger of 70 per cent. You can change the trigger as required.
If the read humidity exceeds 70 per cent, it will send a text message to your mobile phone ‘Humidity exceeds set level.’ If the read humidity is below the set trigger, it will send a text message ‘Humidity is below set level.’
Two-seconds time interval setting is achieved by using time.sleep(2) command.
Please note that the two-seconds time is only for testing purpose. If you want to read humidity every two hours and receive the text messages, replace 2 by 2×60×60=7200.
Running the program
Enter Python IDLE→File→Open. You can also double-click on Text.py file to run it directly on Windows. The program can be terminated with Ctrl+C in Interpreter window.
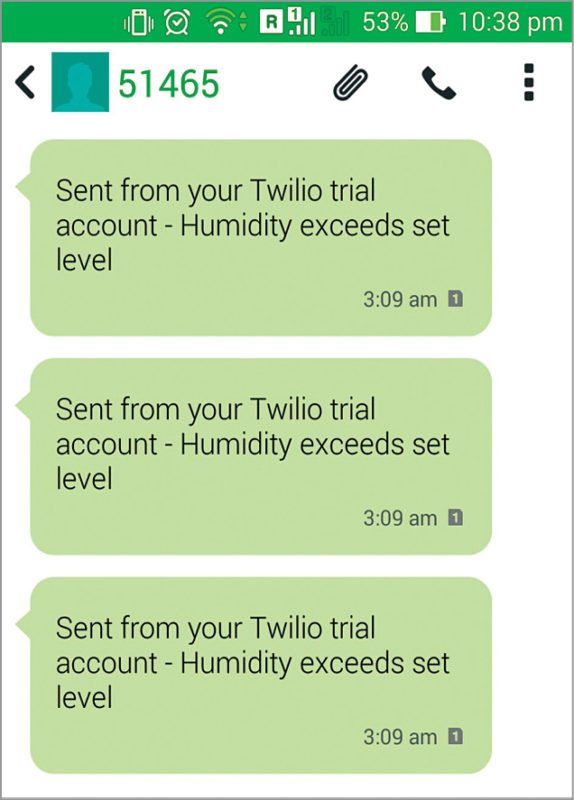
Fig. 20 shows the alert messages received on the mobile phone.
Download source code.
More interesting projects available here.


Interesting project!
For the app to be operational my computer must be permanently connected?
As explained in the article, the project is based on a cloud communication platform and so your computer should be connected to Internet all the time.
Interesting project!
Can you please explain the code?
could you please tell whether this can be used for sending notification to a mass of people rather than one