


Quality control is an important process in all manufacturing industries. Normally, it includes checking the final product on sample basis and confirming whether the whole lot is suitable for dispatch or not. However, it is not a foolproof method to ensure quality as:
1. The whole lot is judged on the basis of a few samples. There is a possibility that the samples selected conform to quality standards but many others in the lot don’t.
2. Quality judgement depends on the expertise of the person checking the samples.

That is where computer vision comes into play. With systems using computer vision to judge the quality, you can implement 100 per cent quality check independent of human interference. The computer vision system presented here for quality control of blister-packed medical pills is just a proof of this concept, which can be used across industries after appropriate adjustment.
This camera-based system takes pictures of the product, which are analysed after image extraction through image processing and checked against quality standards. In case of blister packing, manufacturers need to check whether all the blisters have been filled with unbroken tablets. The system automatically checks the number of pills through the camera and indicates if the number is less than expected.

Software requirements
The software for this system is written in Python and uses SimpleCV image processing library. Even beginners can easily get started with computer vision as all the steps, from installation, program creation to running the program, have been detailed here. The software was successfully tested on Windows 7 and Windows 10 environments. With little adjustment, it can be made to work on Linux systems as well.
The software and hardware prerequisites to run this program are:
1. Python 2.7.11
2. Python added to path environment variable
3. SimpleCV and its dependencies
4. USB camera (you can also use the one in your laptop but testing with USB camera is easier)
5. Windows 7/10 system
The steps to install Python and add it to the path environment are the same as given in the ‘Time For a Break’ article published in March issue, hence not detailed here.

Install SimpleCV.
SimpleCV is an easy-to-use image processing library. It is a Python framework that bundles together open source computer vision libraries and algorithms. Installing SimpleCV is relatively easy on Windows. Follow the steps below:
1. Download SimpleCV Version 1.3 Superpack from http://simplecv.org/download/ link as shown in Fig. 2. The Superpack already has all the dependencies bundled into it for installation. The dependencies for SimpleCV are:
• Python 2.7.3
• Python Setup Tools
• NumPy
• SciPy
• Easy_install
• OpenCV
2. Once SimpleCV is downloaded, double-click the file to start installation. This will install SimpleCV and all the dependencies one by one
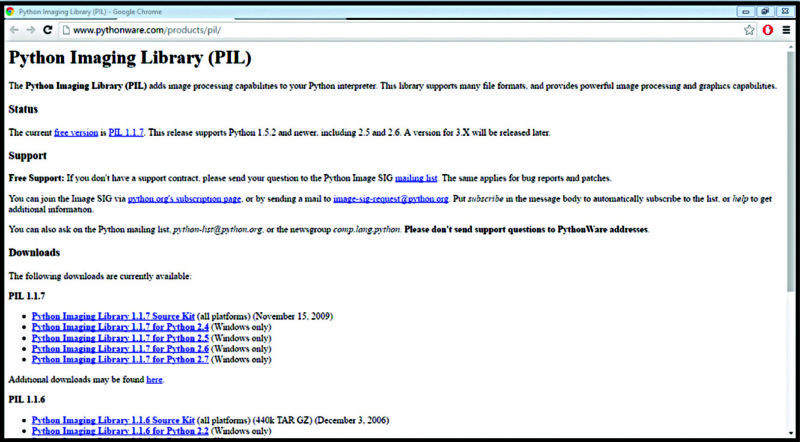
3. Download Python Imaging Library (PIL) for Python 2.7 from http://www.pythonware.com/products/pil/ as shown in Fig. 3 and install it
Test SimpleCV.
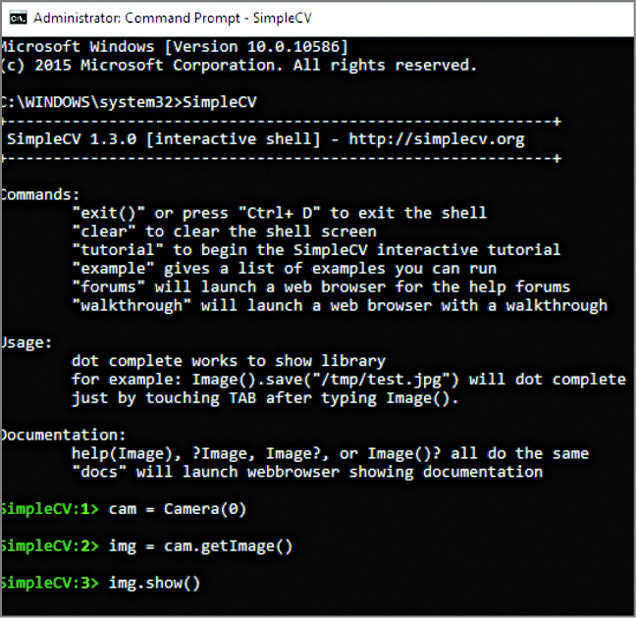
Run command prompt (as administrator), type in SimpleCV and press Enter. SimpleCV shell should appear now for accepting commands as shown in Fig. 4.

As the recent version of SimpleCV doesn’t work well with the latest version of ipython, you need to uninstall the latest version of ipython and install an older one using below commands under C:\Windows\Systems32:
[stextbox id=”info”]
> pip uninstall ipython
> pip install ipython==4.2.0
[/stextbox]
(Before you run these commands in command prompt, you need ‘pip’ already installed. You can install it by using >python -m pip install -U pip command.)
Setup for USB camera
You need to complete the setup before proceeding further. The setup is simple, requiring just a USB camera attached to a laptop or PC. This project used a regular USB webcam, which is easily available in the market. Plug in the camera and check whether it is detected in Device Manager (Fig. 5). The camera should be mounted such that it does not move and captures the whole tablet pack underneath. No additional lighting is required. The camera effectively captures images in low lighting as well.

Test camera.
Run the command prompt as an administrator, type SimpleCV and press ‘Enter.’
Once you get SimpleCV shell, type the following commands to test the camera (Fig. 6):
[stextbox id=”info”]>cam = Camera(0)
>img = cam.getImage()
>img.show()[/stextbox]
If you get images from the USB camera, your camera has been detected as Camera(0) by the operating system. Otherwise, change Camera(0) to Camera(1) in above commands and try again. The reference camera is used in the software.
Python IDE
Python IDE, which comes with Python installation, is used to write, test and debug Python programs. When Python is run, it opens up a Python Shell window as shown in Fig. 7.

You can run it directly from the installed applications by clicking its logo. Or, write IDLE in the search tab on the Windows start page to get the option to be clicked. Python is an interpreted language, so you can immediately start writing the commands and press ‘Enter.’ The commands get executed when you press ‘Enter.’ Test by typing 2+2 and then press ‘Enter.’ You should get four as the answer in the next line.
Create new program
Run Python IDLE->File->New File
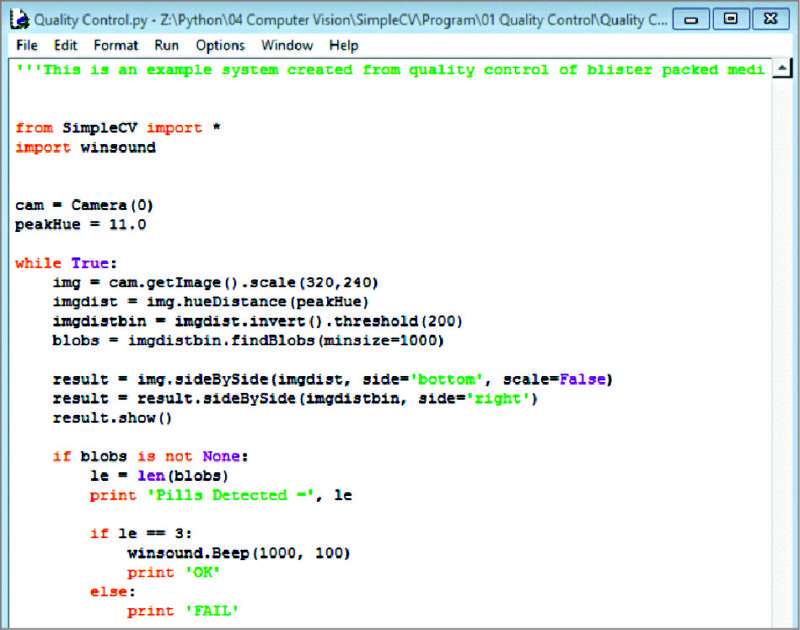
Now you can start writing the program in the IDLE. The complete program is provided in Quality Control.py file as shown in Fig. 8. Copy the code from this file or use the file as it is, because Python is an indentation-sensitive language.
Import modules
Modules required in the program are:
1. from SimpleCV import * # importing everything from SimpleCV
2. import winsound # importing winsound to play sound
The winsound module comes prepackaged with Python, while we have already installed SimpleCV using aforementioned steps.
Functions used
Initialise camera. You need to be sure that your camera is detected as 0 or 1 and update the program accordingly as given below:
Cam = Camera(0) # initialise the camera
Peak hue level.
Enter peak hue level of the colour to be detected. In this project, tablets used had the peak hue of 11.0. You need to find it out for your tablets and update the same in the code as given below:
[stextbox id=”info”]peakHue = 11.0[/stextbox]
The software counts the number of tablets by detecting the objects matching the predefined colour and separating them from the rest of the scene as shown in Fig. 11.
Here we have used an HSV system instead of RGB as it performs better in such applications.
To find out the hue value for the tablets you are using, run the following code:
from SimpleCV
[stextbox id=”info”]import *
cam = Camera(0)
while True:
img = cam.getImage()
peak = img.huePeaks()
print peak[/stextbox]
A separate hue.py Python file is also provided for hue. Now, put the tablet pack under the camera and run this code. Ensure optimal lighting as excessive light will reflect off the silver background of tablets to create false results. When you run the code, you will start to see many numbers. Just note the first one in the list. That is the hue value for your tablets.
Capture image.
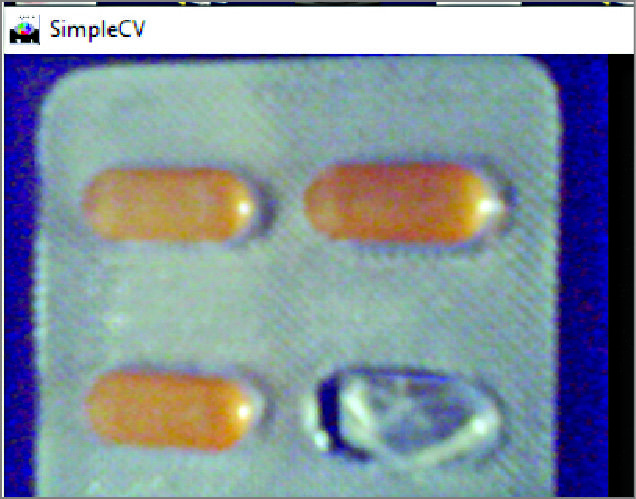
The following function captures the image (Fig. 9) of the tablet pack and scales it down to 320×240 resolution:
img = cam.getImage().scale(320,240)
Hue distance image.
The function below creates another image that indicates the hue distance for the value you selected:
[stextbox id=”info”]imgdist = img.hueDistance(peakHue)[/stextbox]
The tablets should look black (Fig. 10) because the difference is zero there. If not, you have not selected the right hue value.
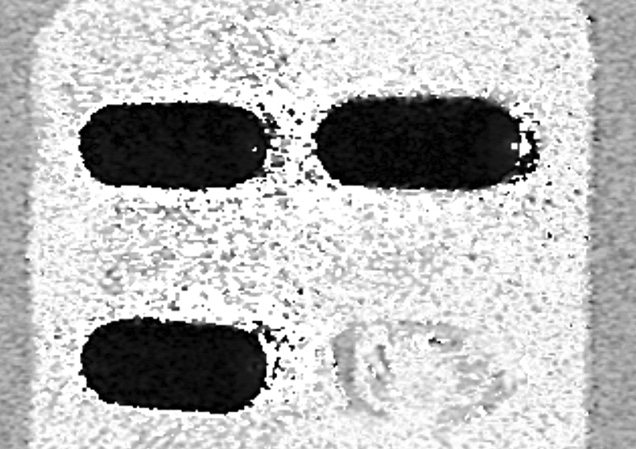
Inverted image.
The tablets will become white (Fig. 11) after this command:
[stextbox id=”info”]imgdistbin = imgdist.invert().
threshold(200)[/stextbox]
Now you can detect them as blobs. Threshold of 200 is selected after hit-and-trial so that white region is clearly visible.

Blobs detection.
Blobs are continuous regions of similar light-coloured pixels. Once blobs are detected, you can apply many operations on them, to find their area, length, angle, etc. You can even count them.
For example, in the following command, Minsize=1000 indicates that you want the system to detect only those blobs which are above size 1000:
[stextbox id=”info”]blobs = imgdistbin.findBlobs(minsize=1000)[/stextbox]
This is also selected via hit-and-trial method such that you only get tablets area as blobs. The function detects all blobs and their co-ordinates are stored in a matrix called blobs.
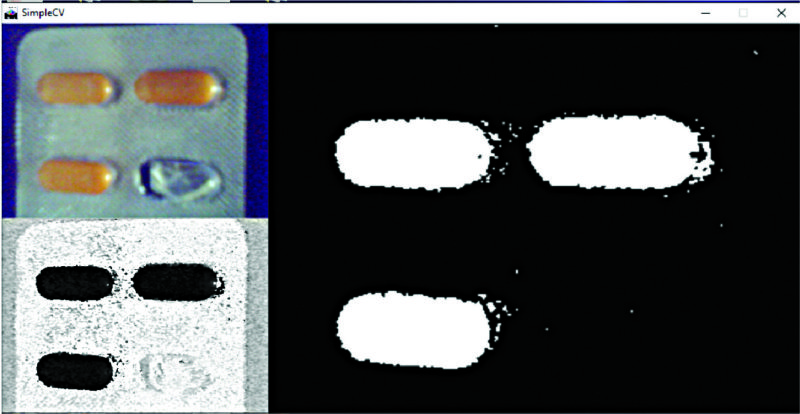
Display all images.
The following function shows all the processed images side by side (Fig. 12):
[stextbox id=”info”]result = img.sideBySide(imgdist,
side=’bottom’, scale=False)
result = result.sideBySide(imgdistbin,
side=’right’)
result.show()[/stextbox]
Count blobs.
The number of blobs is equal to the number of tablets. Below function counts the number of blobs:
[stextbox id=”info”]if blobs is not None:
le = len(blobs)
print ‘Pills Detected =’, le[/stextbox]
The first statement helps the code to keep running even if no blob is detected. Otherwise, the program will terminate in the next step. The second statement counts the length of the matrix, which is equal to the number of blobs. The third statement prints the number of blobs detected.
Check and compare the blobs detected.
The code for this purpose follows:
[stextbox id=”info”]if le == 3:
winsound.Beep(1000, 100)
print ‘OK’
else:
print ‘FAIL’[/stextbox]
The first statement compares the number of detected blobs with the prefixed number of pills in the pack. Here, the fixed value is entered as 3 because three-tablet blister packs were used for testing purpose. You need to change the number as required. The second statement plays a beep (frequency, time) if the number of blobs detected is 3 and the third statement prints OK. Otherwise, correct blob detection fails.
How the system works
The blister-packed medical pills are manufactured through automated processes. These processes are generally carried out using a conveyor system. The packs are put on the conveyor belt, inspected and packed. There you can mount the camera to continuously monitor the packs for quality control. The source code for the system runs in an infinite loop. But for actual implementation, you need to adapt it and make it trigger based, so that processing happens only when the blister pack arrives under the camera.
The camera captures an image of the pack and converts it into one that shows hue difference from your predefined value. This means that pills will be shown as black because only at their places there will be no difference in hue from the predefined value. This image is inverted, so pills appear white and the rest of the surrounding area turns black.
The objective is to pre-process the image so that the pills area appears as blobs to get detected. The blobs are easy to count and the blob count indicates the number of pills in the package. This number is compared with the desired number of pills for each package, thus missing pills are automatically detected. The software beeps if the number of detected pills matches the desired value. You can also program it to do the opposite.
The steps to run the software are reproduced below for better understanding:
[stextbox id=”info”]Run Python IDLE->File->New File[/stextbox]
Paste the program or use the file Quality Control.py.
Enter right values for:
1. Camera (number?)
2. peakHue (that you have found using the second program hue.py)
3. Threshold through hit-and-trial method
4. minsize for blobs detection. This depends on the placement of your camera. Use hit-and-trial method to get the correct value
5. le == ?? (put the number of pills desired in your packs)
Now click Run followed by Run Module.
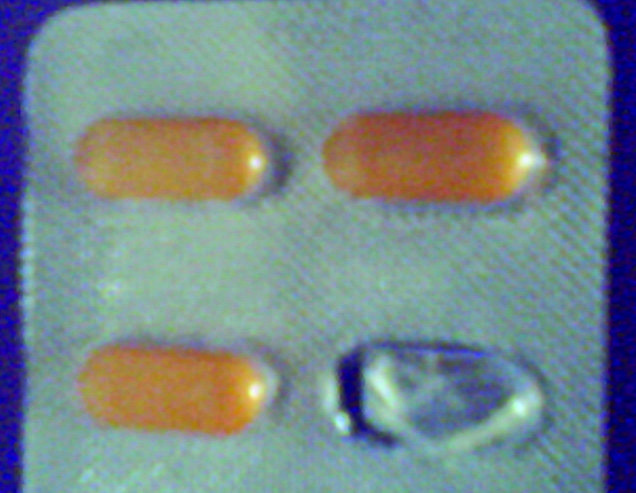
You will immediately see a screen with various processed images such as the one shown in Fig. 1. If the number of detected pills is equal to the desired value, the software will produce a beep sound and show OK on the console. Otherwise, it will show Fail on the console.
Hi, the code for the .py files are not there
You can download all the relevant soucre code including .py files from http://efy.efymag.com/admin/issuepdf/ComputervisionbasedqualitycontrolusingPython.zip
Hi really great project can u share the source code? the above link in the comment is not working, Thanks
Please refresh the page and retry downloading from the link